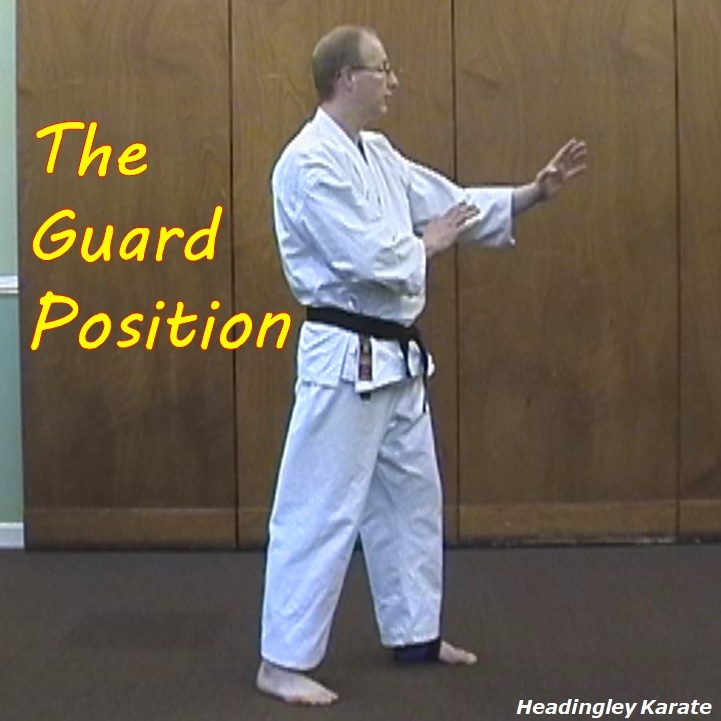
In a recent post I advocated the value of demonstrating zanshin. Its something I stress to students frequently. That may seem odd, because our style of karate is not inherently demonstrative. Our stances aren’t demonstratively large. Our kicks are not demonstratively high. Nothing we do is intended to be demonstrative. Everything we do is for its effect, not because it looks good or looks powerful. And yet, I stress the importance of demonstrating zanshin.
I learnt about zanshin in my first dojo. We were taught to maintain focus after the end of any partner technique. To focus attention on the vanquished assailant, but at the same time to use hearing and peripheral vision to monitor the rest of the environment. Doing so makes it much harder for you to be caught off guard. This is zanshin.
But of course, for self-defence we don’t just want to embody zanshin after we’ve been attacked. We should embody it in our daily life so that, as much as possible, we are always prepared. Having that innate awareness is great. That others can see it in you is an extra benefit. Potential assailants will see that you are switched on and will most likely pass you over for easier prey. Its entirely possible they won’t even be consciously aware that they’re doing that, but that doesn’t mean they’re not doing it. It even works if they’re quite drunk, I can attest to this (from personal experience) with certainty.
And this is why I talk about demonstrating zanshin. Not so that you exaggerate it, but just so that you do it so well that it cannot help but be noticed by others. If you can do this, just as a matter of course, then your zanshin will ensure you are ready for action. Crucially, it will also act as a deterrent in and of itself.
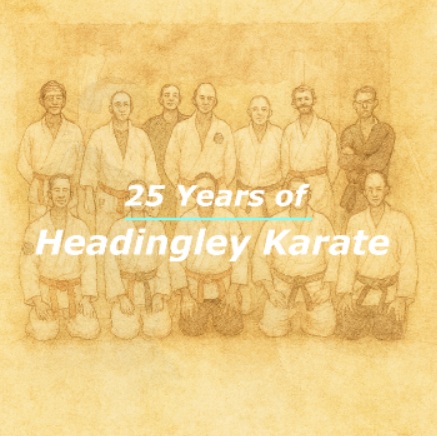
This year we celebrate the 25th anniversary of Headingley Karate. It was in January 2001 that I taught my first class here in Headingley.
Some things have changed since then. We have a range of students with different levels of experience. I’m ably assisted in teaching by my long term students and colleagues, Carl and Martin. I’d like to think my knowledge and skill as a teacher has grown – best let others judge that. The best indicator though I think - a number of students have fed back over the years that the lessons they learned here have helped them successfully avoid or resolve violent situations.
Some things haven’t changed. Our emphasis now is the same as it was then – teaching practical self-defence based on the principles of classical Okinawan Shorin Ryu. We’ve been based at the same venue all that time, Headingley Parish Hall on St. Michael’s Road. The price has changed, but not by much, going from £4 (if I remember rightly) to £6 per 2 hour session. I think you’ll struggle to find a more affordable adult class. And speaking of adult classes, that is all we do. Not masses of kids lined up learning karate-do, just small groups of adults learning a useful life skill.
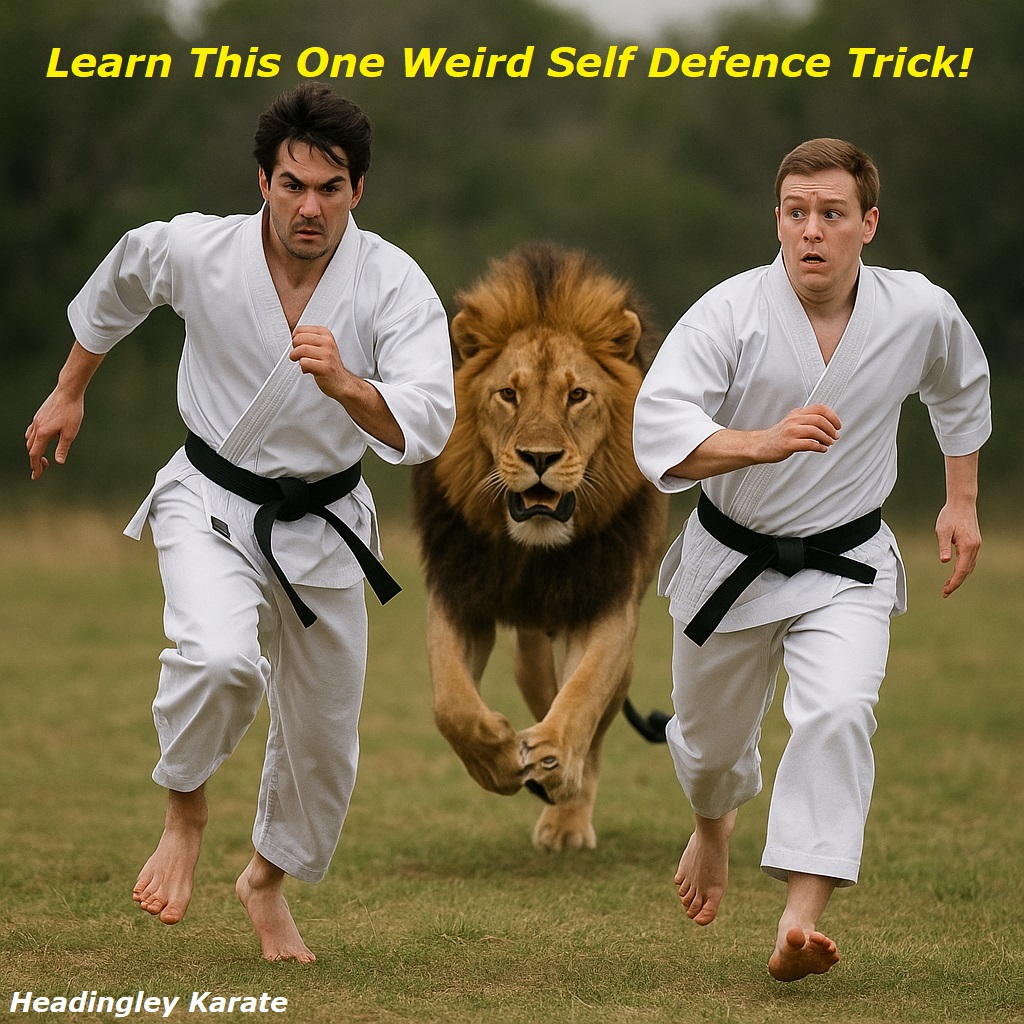
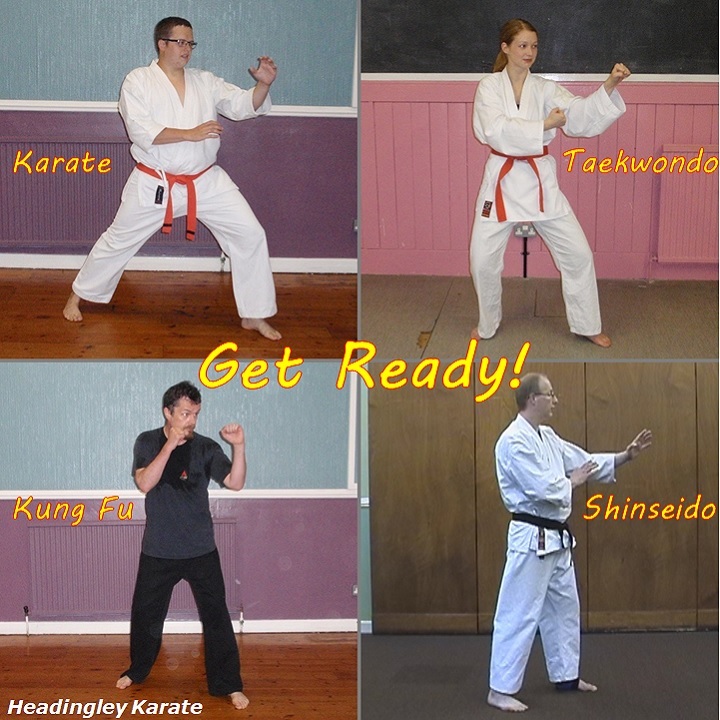
Learn This One Weird Self Defence Trick!
Are you ready? This is going to blow you away…
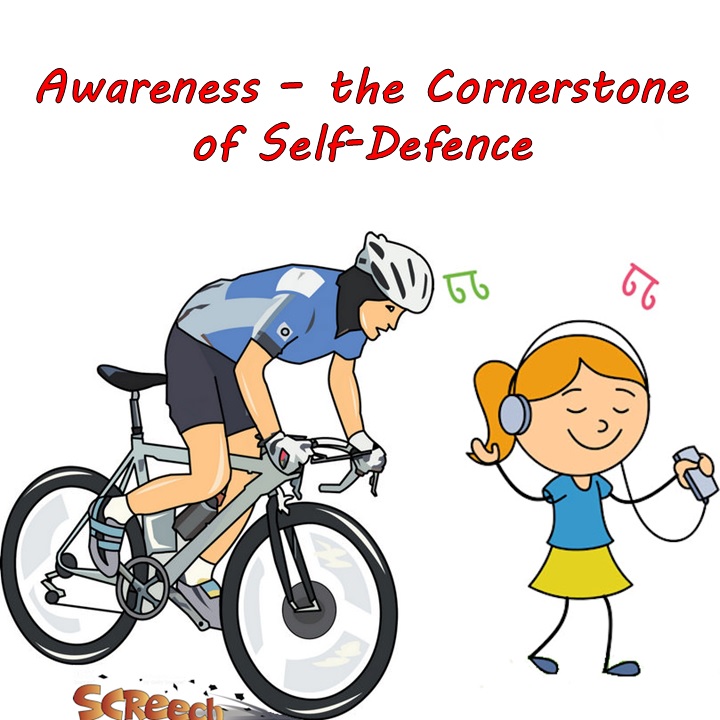
Don’t be the one wearing headphones!
OK, now we’re past the clickbait, let’s dig in. I’ve written before about the importance of zanshin – awareness. About the need to use all of your available senses. And certainly not to deprive yourself of any of them. But everywhere I go at the moment so many people are wearing headphones, whether it be relatively subtle airpods or great big over-ear affairs. I’ve been in situations where I’m the only person present NOT wearing them. I find that particularly poignant given that I’ve been doing some dogsitting recently. I’ve been walking the dog in the park, or in the woods, or down by the canal. I’ll pass people on their own in secluded places, engrossed in their own world, unable to hear what’s going on around them.
Obviously you’re at greater risk of assault if you can’t hear a potential assailant approach, but it goes beyond that. The headphones are like a flashing advert on top of your head, alerting anyone interested to the fact that you’re not paying attention.
You’ve heard the saying that you don’t need to be able to outrun a lion, just the person standing next to you. The lion will go for the easier prey. In the same way, the scum that are looking for a victim will likely target the easiest prey. If you’ve deprived yourself of your ability to hear, but I haven’t, which of us do you think that will be?
Why the clickbait? Well probably the easiest thing you can do to improve your chances in self-defence it is to demonstrate zanshin. Not depriving yourself of one of your senses will immediately and dramatically improve your zanshin. Being switched on to what’s going on around you will a) reduce your risk of assault and b) improve your chance of successfully dealing with it if it does happen. Its that simple, that straightforward. So really, why wouldn’t you make that simple change?
When I was a kid in the 1970’s we were very ignorant of karate history. We believed that the modern styles (Shotokan, Wado, etc.) had been passed down unchanged since time immemorial. Nothing, of course, could have been further from the truth.
But we had a good excuse for our ignorance. What little understanding we had came via the Japanese instructors of the time (who were themselves often not hugely knowledgeable about karate before their lifetimes), or from the small amount of English language writing on the subject. There wasn’t a great deal of the latter.
Things are very different now. By comparison, there is a wealth of written material available. There are historical texts translated into English. There are history books that shed light on the wider effect changes in Japanese society had on the development of modern budo. There are youtube videos that allow you to compare numerous Okinawan and Japanese variants of kata.
And yet, many people seem intent on being as ignorant as ever. Despite all the information now available, they cling uncritically to the same misconceptions we harboured decades ago. Some people continue to share these decades old demonstrably incorrect myths on their social media channels. I’m unclear what they believe the benefit of doing this is.
And then some people just make stuff up, often in an attempt to justify some of the nonsensical stuff taught by the teachers of yesteryear. Its OK to be ignorant, and to ‘fess up to that. But its not OK to make stuff up to hide your ignorance.
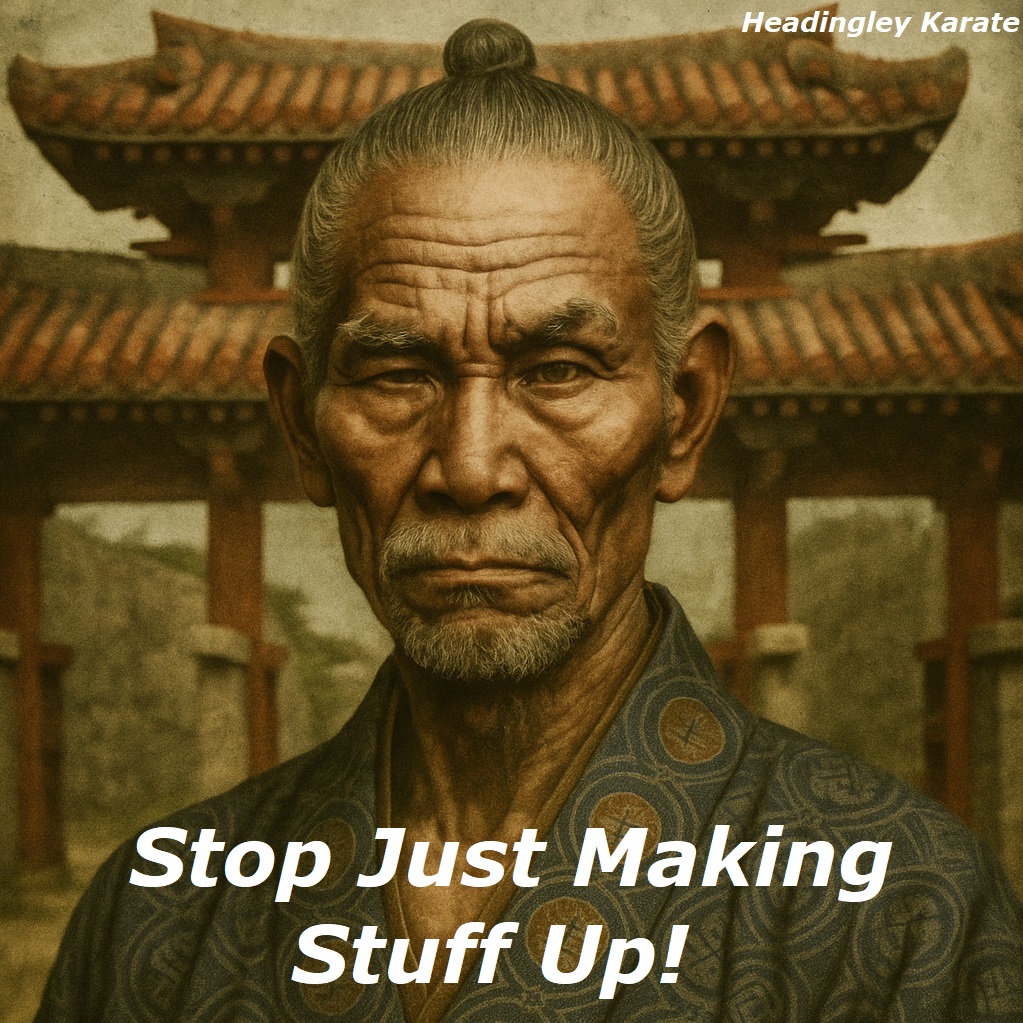
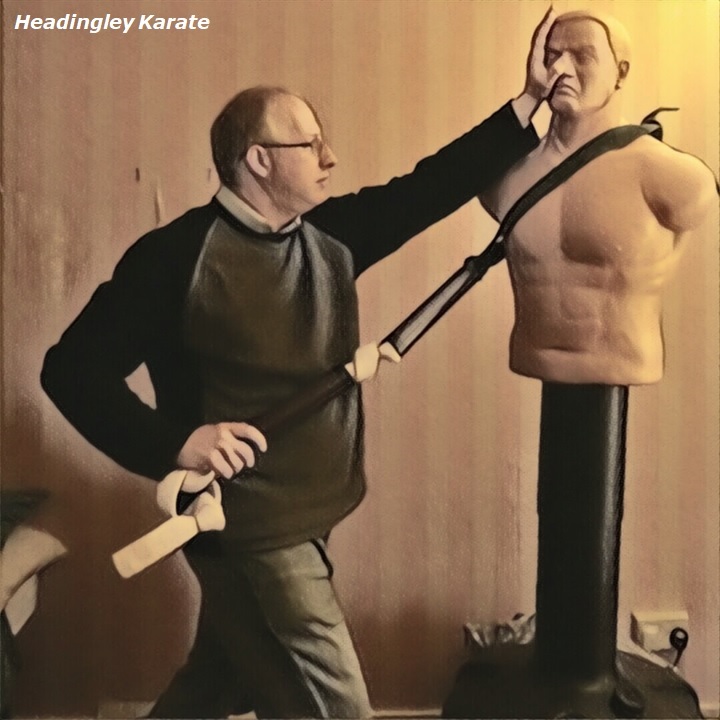
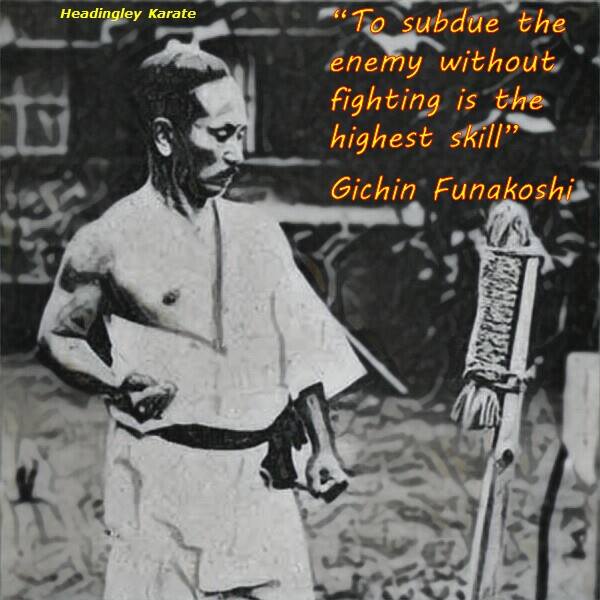
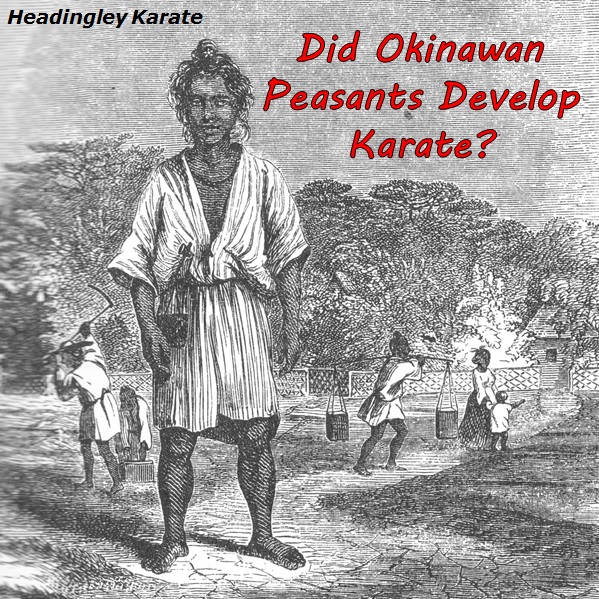
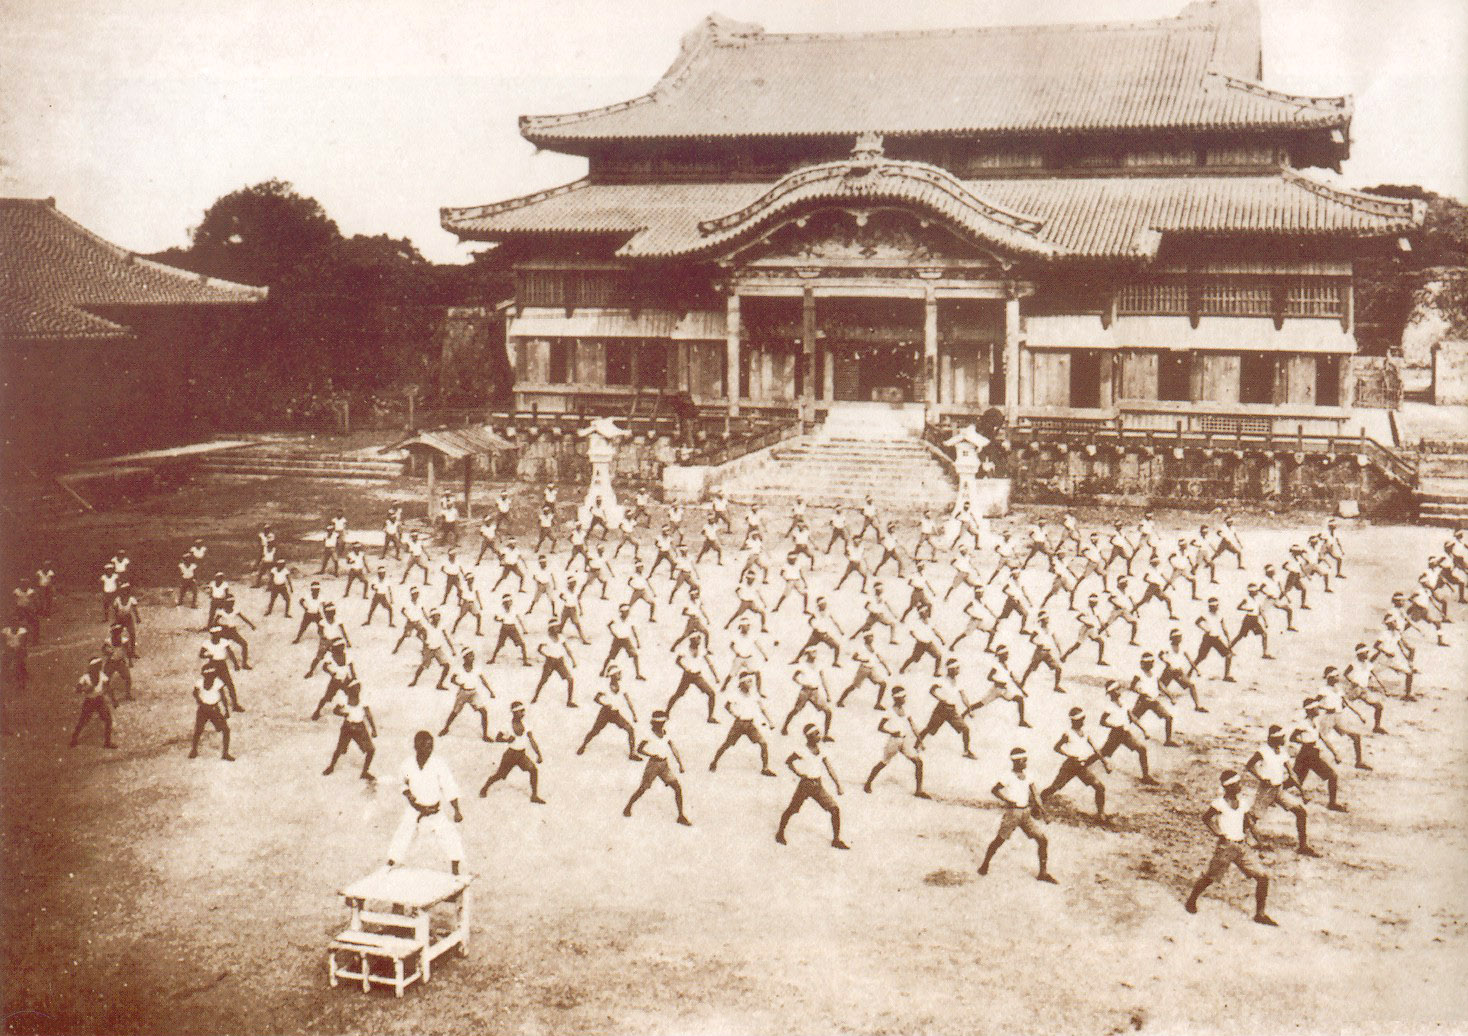
And now, to add insult to injury … AI generated ‘historical photos’ of ancient masters. No, it isn’t Azato or Itosu, its just some guff you got AI to make up to drive traffic to your social media page. Just stop it! Stop Just Making Stuff Up!
My picture? Oh, that! Yeah, that’s not Sokon Matsumura. And he’s not standing in front of the Shuri gate. Its just some guff I got AI to make up.
On with the description of section 4 our Pinan Daikou kata. The last step in the previous section was a simultaneous low block and kick. From there, put the foot down and...
Elbow into your own hand.
Move the front foot across and pivot 180 degrees into a short back stance, raising both arms into Kaisho Haiwan Uke.
Move the front foot across, to widen the stance, striking inwards with a knife hand while simultaneously drawing the lead hand back towards your own head.
Kick with the rear leg then...
Drive forwards, rolling the arms in a vertical loop, landing in...
A crossed-foot stance so that your weight can be dropped down through the lead arm.
Extend the rear leg behind you, turning 180 degrees into back stance and raise the arms behind you.
Step forwards and to the left, to drop into crossed-foot stance with gedan juji-uke ('low x-block').
We now just have a few moves left to get to the end of the kata. Anyone familiar with the Pinan kata will see that this subsection is based primarily on both Pinan Yondan and Godan.
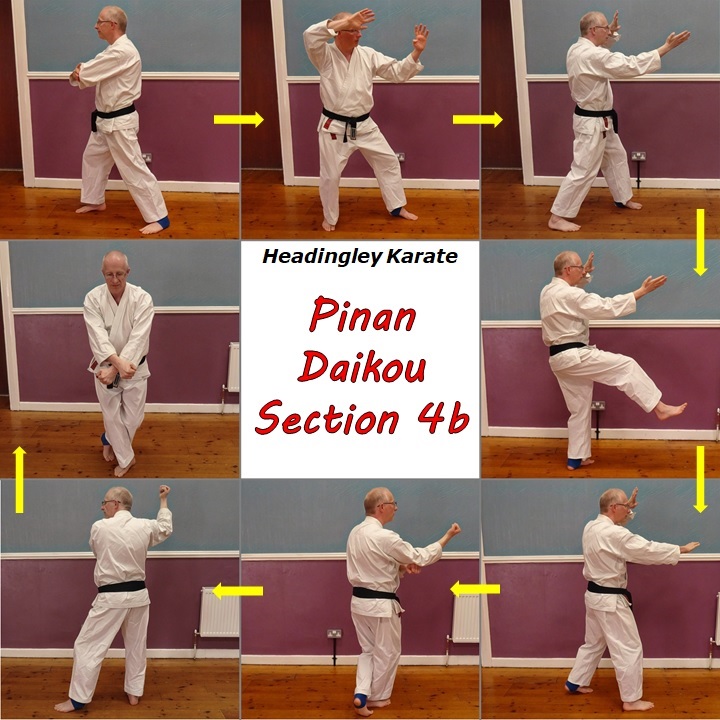
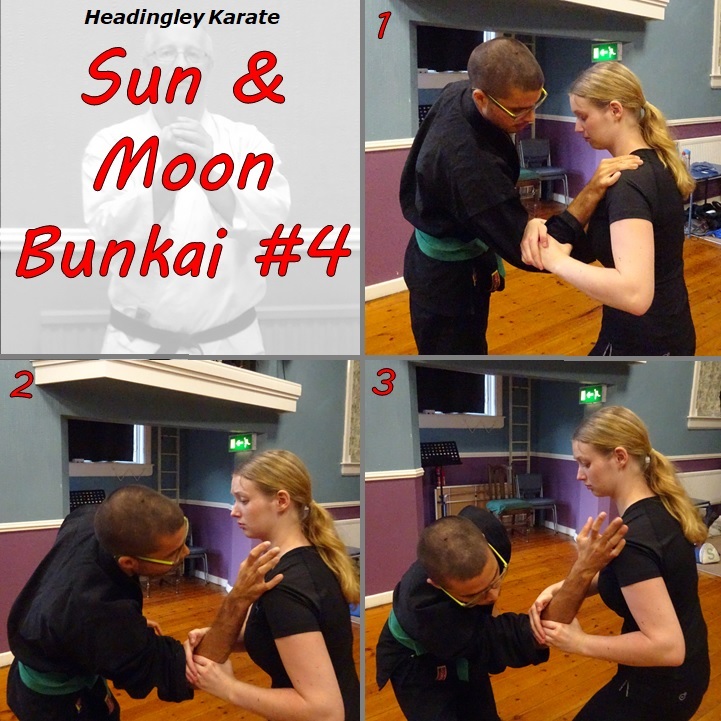
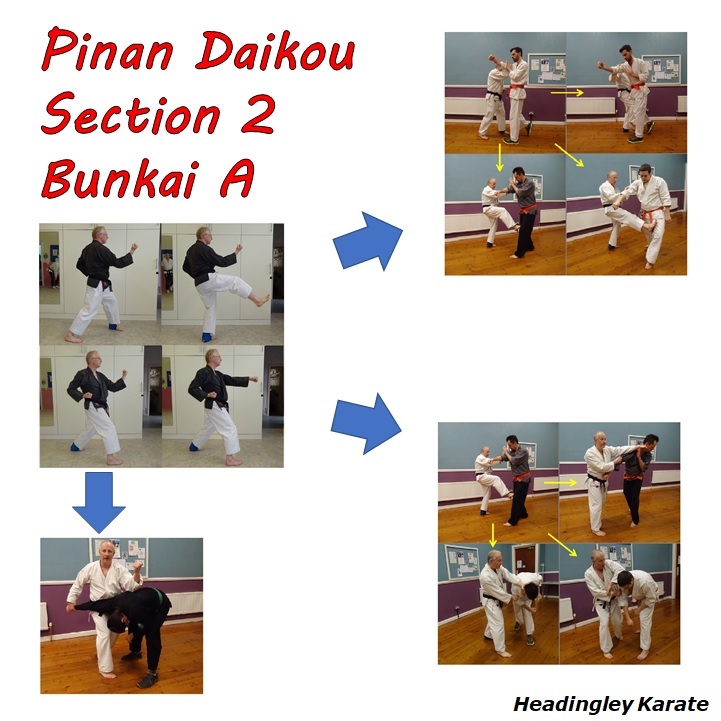
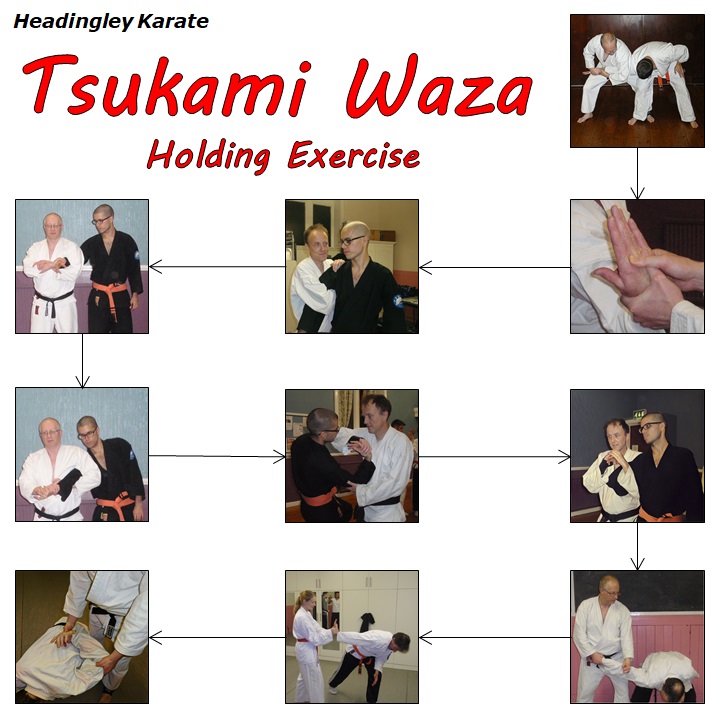
This picture shows the first 6 moves of Pinan Daikou Section 4, plus their introductory bunkai. It serves as an aide memoire to the kata and bunkai. The sequence is as follows:
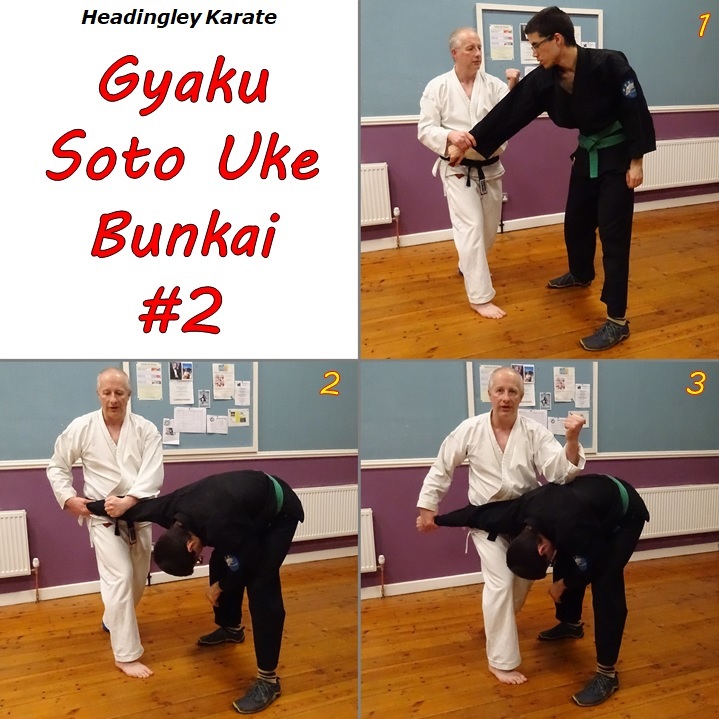
Swing both arms inwards around the shoulders. This is used (with just one arm only) to release a 2 handed choke.
Block, evade and counter. It does exactly what it says on the tin – the point being that all 3 things happen simultaneously as the opponent throws a straight punch (or reaches to grab).
Step forwards with shuto (knife-hand). Against a straight punch or attempted grab, check inwards at the elbow then step forwards and strike, turning and unbalancing the enemy as you strike.
Spin round to face the rear. Having attempted an armbar and met resistance, switch to a spinning armbar.
Stack hands at hip. From an uppercut capture the arm and apply an elbow/shoulder lock.
Low block and kick. Another way of dealing with a partially failed armbar – simply kick the enemy and re-apply.
Each of these has been explored in detail in previous posts. My next post will look at the next section of the kata.
This video explores the common faults that occur when practising the tegumi drill. Its important to practice the drill correctly if you want to ingrain the right skills...
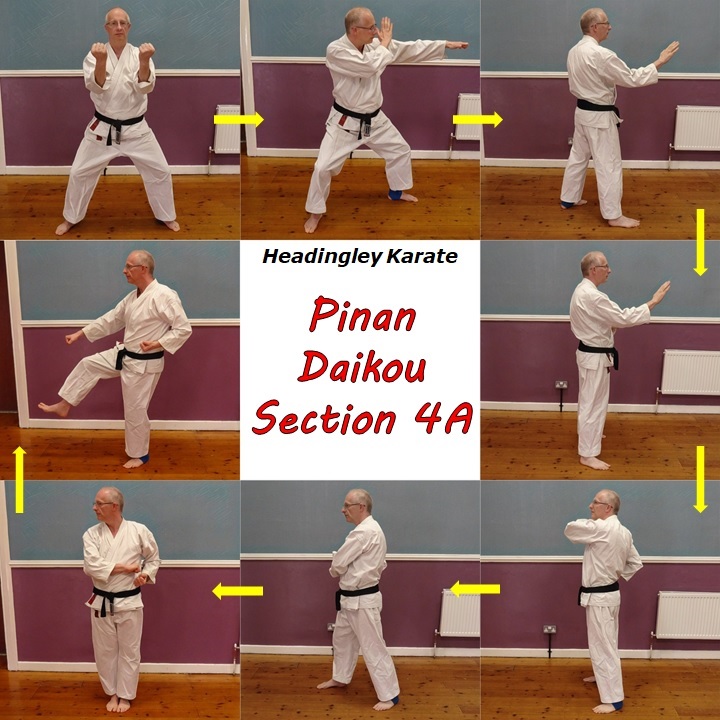
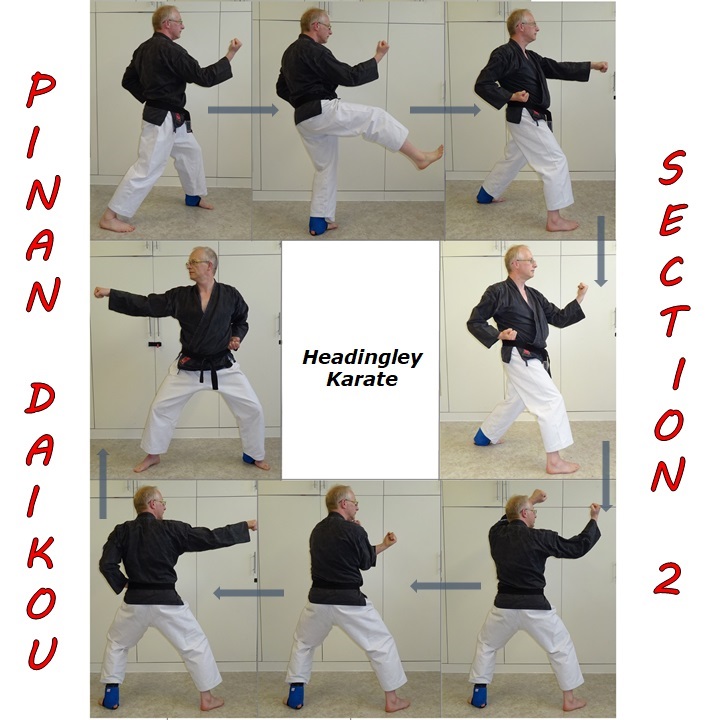
I've now completed my description of the movements in Pinan Daikou, their mechanics and introductory bunkai. Now to recap the moves in Section 4. This section is too long to show the pictures in one post, so I've broken it down into 3. This first post includes pictures for any intermediary steps that are not obvious:
From the last posture in Section 3, swing both arms inwards around the shoulders to a double inward block position.
Step out with the right foot, simultaneously punch with the left hand and block with the right.
Step forwards with the right foot and strike with a right knife-hand.
Step forwards with the left foot into a parallel stance and...
Spin round, pivoting on the left foot, pulling your right fist back to the hip and your left fist to the right shoulder.
Step forwards with the right foot, dropping the left fist onto the right and...
Pivot to the left, drawing the left foot to the right, stacking the hands on the left hip at the same time.
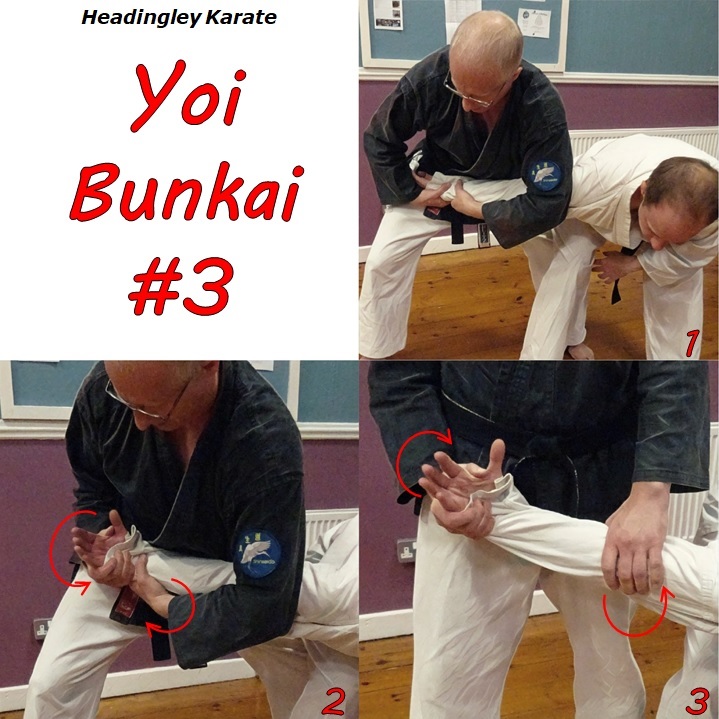
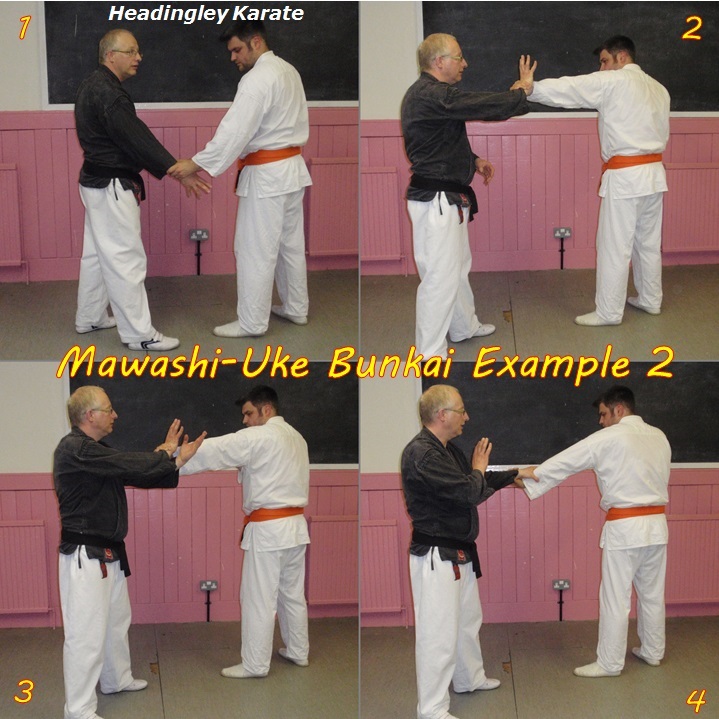
The circular block feels like turning a wheel. We've seen this mechanic already, though previously it involved turning a wheel through 180 degrees. Now we'll rotate through 360 degrees. Pressing with the palm-heels is straightforward enough. Do we need to use the two mechanics together, as they are presented in the kata? Not necessarily, it just depends on the specifics of the situation. Here, however, we will apply them together.
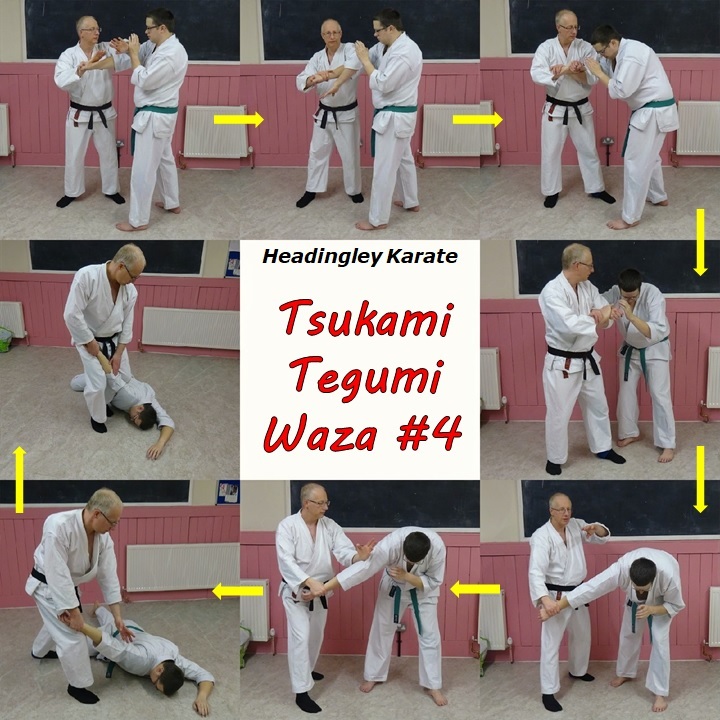
Imagine that the enemy reaches out to grab your right wrist with his right hand (pic 1). As he does, catch his arm above the elbow and pull it upwards and back towards yourself. Here I've grabbed his clothing but you could equally well grab flesh. At the same time rotate your right hand around to grab the enemy's wrist and start pushing it towards him. The combined action should bend his arm at the elbow (pics 2 and 3). You have started to 'turn the wheel'.
Move your body forwards to the left as you continue to turn the wheel, cranking the enemy's arm behind his back as a result. By pic 4 you've turned through 180 degrees, which is as far as you can go without adjusting your arms.
Keep pushing up with your right hand, so you can take your left hand off and reposition it on the enemy's hand, as if applying a kote-gaeshi wrist lock (pic 5).
Once your left hand is firmly in place you can now switch your right hand. Move your right hand over to grasp their elbow. Use both hands to continue rotating the enemy's forearm, forcing it up their back as you attempt to complete turning the wheel through 360 degrees (pic 6). Press forwards with both hands as you do so, so that you can lock the shoulder and move the enemy forwards and/or face down towards the ground.
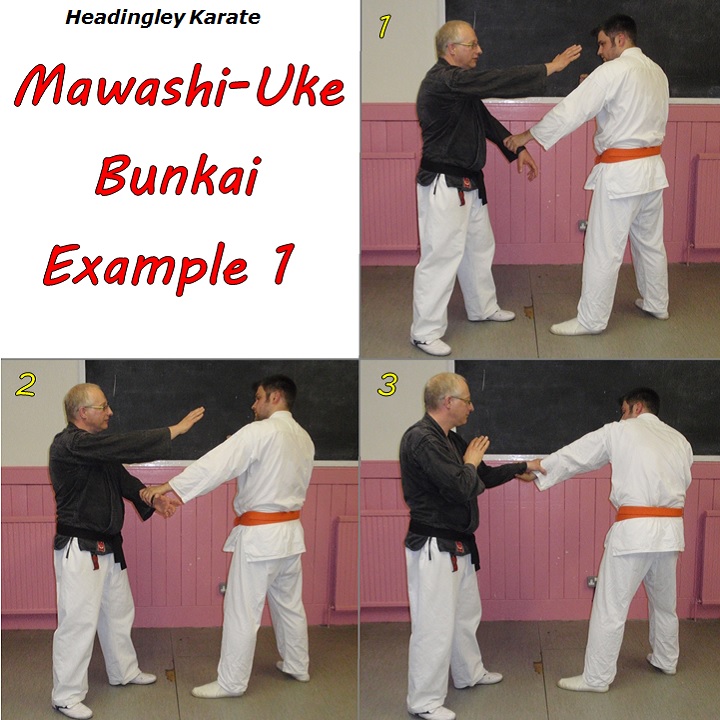
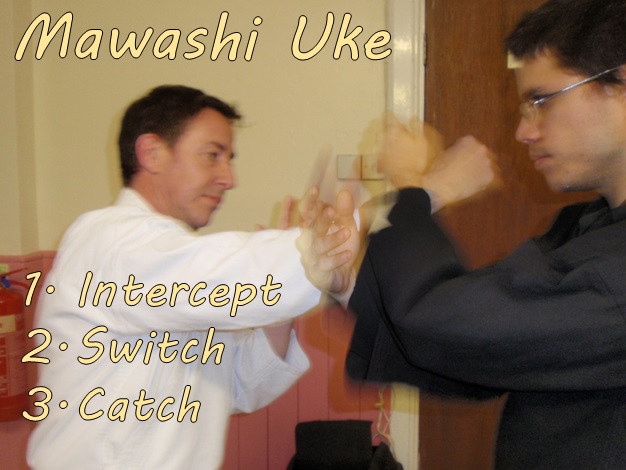
This is the final move of Pinan Daikou, with the exception of the salutations of course. It actually doesn't feature in the Pinan kata, or any other Shorin Ryu kata that I'm aware of. But it does feature in Goju Ryu, at the end of Sanchin kata for example. I have included it in Pinan Daikou as I consider it an important and useful theme.
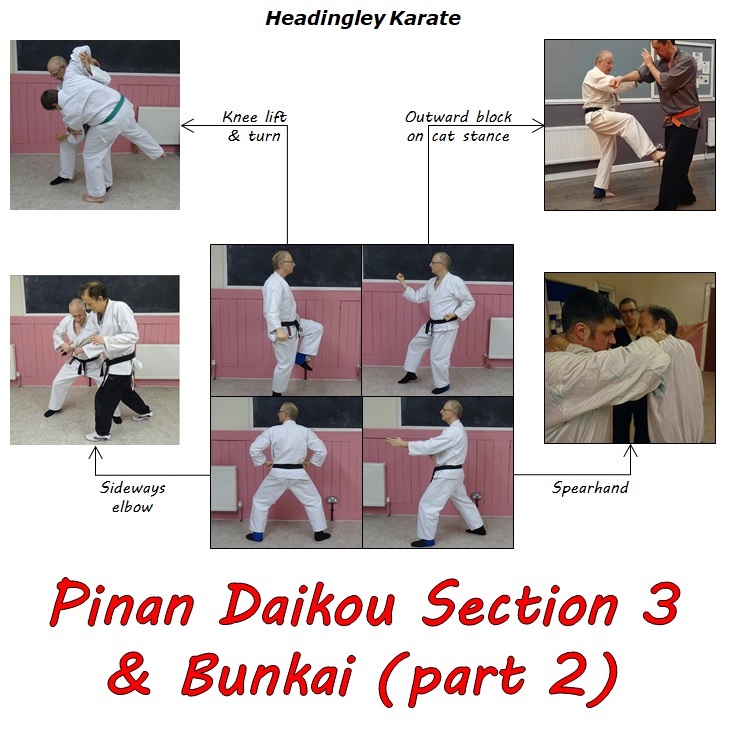
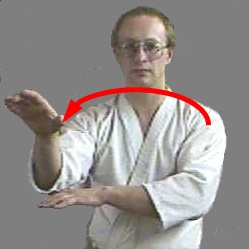
This move is often referred to as mawashi-uke, or 'roundhouse block'. However, it is actually an extension or continuation of the movement I think of as mawashi-uke, as seen in our tegumi practice. Here the blocking motion is continued so that both hands travel round in a complete circle. Photo 1 shows the preceding posture - knife hand strike on a cat stance. Photos 2 through to 5 show the circular block - note the directions shown by the arrows in the pictures. Once the circle is complete press forwards with both hands (see photo 6).
This move in Pinan Daikou follows immediately after the 'stack hands at hip' posture. From 'stack hands' (with your left fist at your right hip) simultaneously perform a left front kick (mae-geri) and a left outward block (soto-uke) (pic 1).
Next place your left foot down, turning it towards the right, close to the right foot. At the same chamber the hands in preparation for knife hand (shuto) - sweep your left hand round in an arc to the right, while raising your right hand to your left shoulder (pic 2).
Finally turn (moving your right foot) into a right cat stance (neko-ashi-dachi) and complete the knife hand strike.
This move obviously derives from the Pinan kata (Pinan Shodan). It also appears in the classical kata in various Okinawan styles but not in the Matsumura system. We have a similar, though by no means identical, sequence in Seisan.
As for mechanics there's nothing new here (that we haven't already seen), its just the sequence of these three components that is novel.
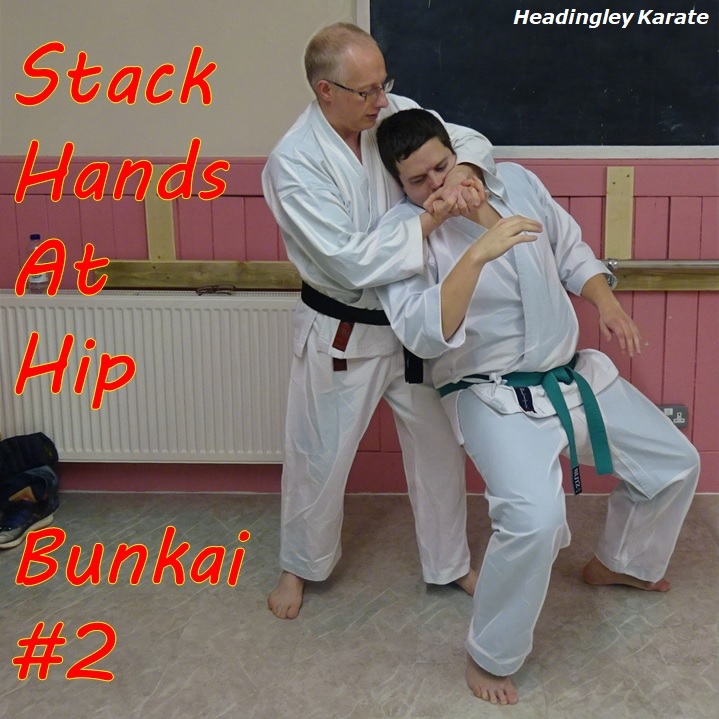
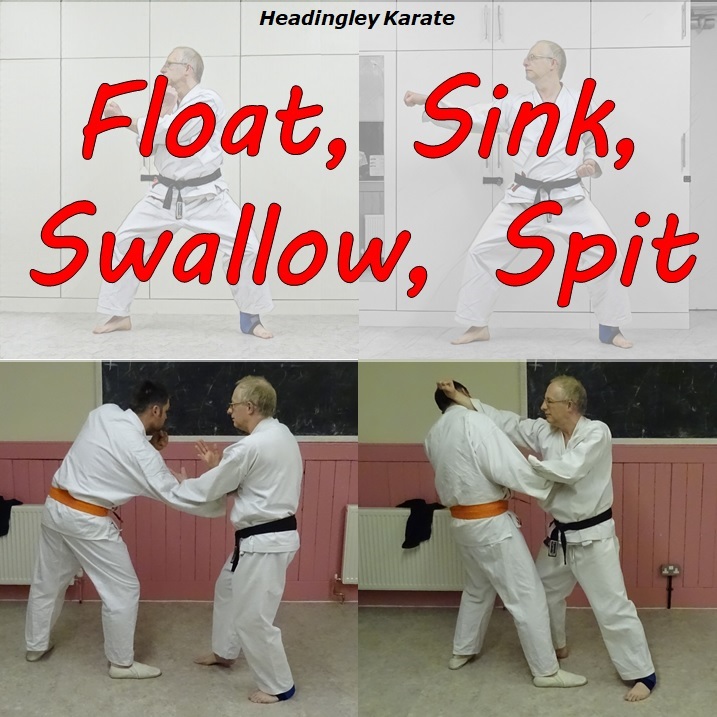
For application of this version of 'stack hands' we should look at what differentiates it from the previous one: a) the rear foot draws up to the front, with no rotation of body or hips, and b) the hands draw back together to the same hip with no forearm rotation and no significant movement across the body.
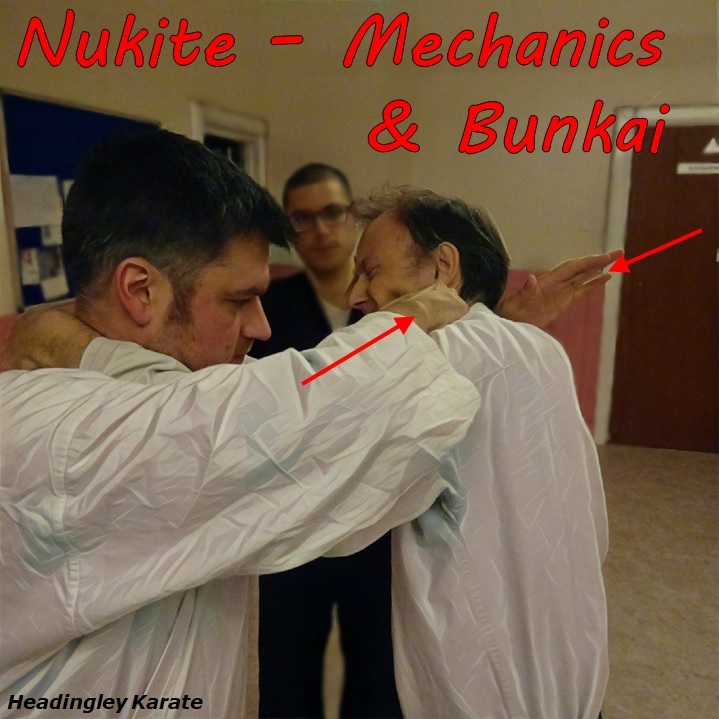
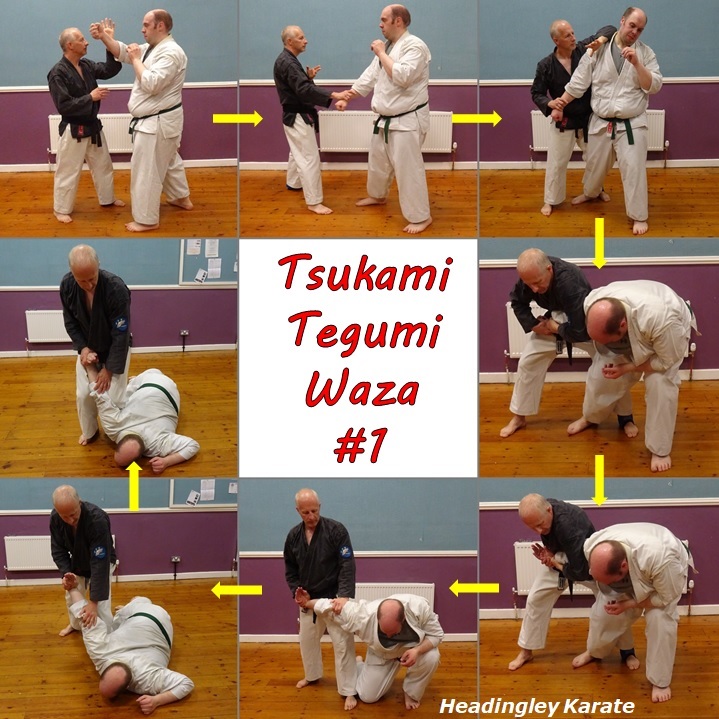
Imagine you're behind the enemy with both of you standing fairly upright (ie. you're not in a deep stance and they're not bent over). Drive forwards (bring the feet close together) so that you impact their back with your own torso (hip, chest or whatever). At the same time thrust both arms over their shoulders.
The impact imparts momentum to the enemy. Capitalise on this as follows. Bend one arm (here the left) and bring the hand across to clasp the other hand from above. As the hands clasp, the left forearm slides across the enemy's face. Draw the clasped hands back together, towards the right hip. This applies a face crank, encouraging them to move backwards away from the stimulus. Between the power you can apply to their head and their enthusiasm to move away from your forearm, it becomes easy to draw them back off balance.
This is a great way to unbalance the enemy and control their movements. You can't hold them there, but its great for manoeuvring them into an even more vulnerable position. Applying pressure with your ulna takes a little practice, its important to get the angle right, depending on the target.
Finally note how many points of contact there are. Not just the face, but also with both arms on the shoulders or arms, with the hip or torso to their body and, if necessary, a knee to their thigh. This keeps them off balance and under control, and prevents any twisting that might result in an unintended neck injury.
This is an instructional video on how to practice the basic tegumi flow drill. This is an important drill in our dojo in that it ingrains several fundamentals skills of Okinawan Karate. View on...
Another year rolls by and I note that we're now not so far off our 20th anniversary of teaching Okinawan Karate in Headingley. How quickly time flies!
This year has been relatively quiet for us, largely due to ill health on my part earlier in the year. But, as the old samurai saying goes, when you fall you just have to get back up and keep on keeping on. Or words to that effect.
So what's new for 2020? Not that much from us, its more a question of what's old. That's Old Style Karate, ie. from before the advent of sport Karate. If it ain't broke there's no need to fix it, or change it. And of course there's the Old Style Prices. I can't actually remember when we last put our training prices up.
One thing that will hopefully be new is a shift in our use of social media. I'm aiming to post more instructional videos, to give an insight into how we train. This may mean that I post less often (making video is time consuming) but hopefully the content will make up for that. Keep your eyes peeled for the first video...
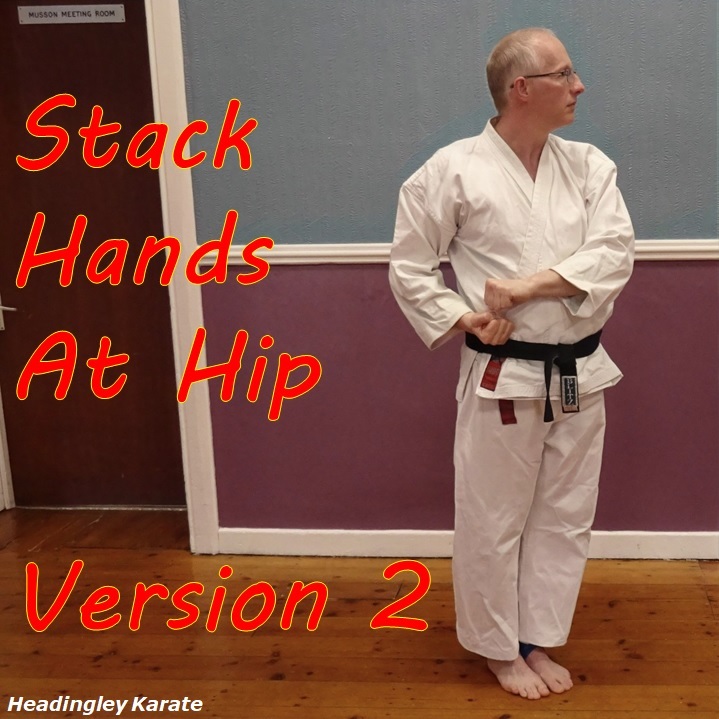
We've already done 'Stack Hands At Hip' in Pinan Daikou so why repeat it again? Especially as the rationale when I reorganised the Pinan kata into this new version was that each movement should be practiced once only, on each side of the body. The answer is principally because it's the starting position for 2 of the other techniques in the kata. That's not to say that those movements couldn't be executed from different starting positions, but in terms of understanding their mechanics, it made sense to begin them from the stacked hands posture (ie. as they are presented in other kata).
This repetition does, however, provide the opportunity to practice different ways of getting into the posture. In this instance we do something differently with both hands and feet, starting from the 'hi-lo wide' posture used in the previous move.
The feet: from a left forward stance (facing the diagonal) simply draw your rear (right) foot up the front foot. Your hips and shoulders face the same way as the feet, ie. to the diagonal.
The arms: draw your left arm down and across the body from its initial age-uke position. At the same time sweep the right hand round to the front of the body so that it ends up palm up, beneath the left hand. Snap both hands together back to the right hip, into the classic stacking position.
So there is a considerable contrast with the power generation used in the earlier version of this posture. There the power came from moving the hands across the centre from one hip to the other, whilst rotating the forearms and augmenting the whole movement by the turning of the body. Here the power comes from snapping back both hands back to one hip, at the same time as drawing the leg (on the same side as the hip), up to the same point.
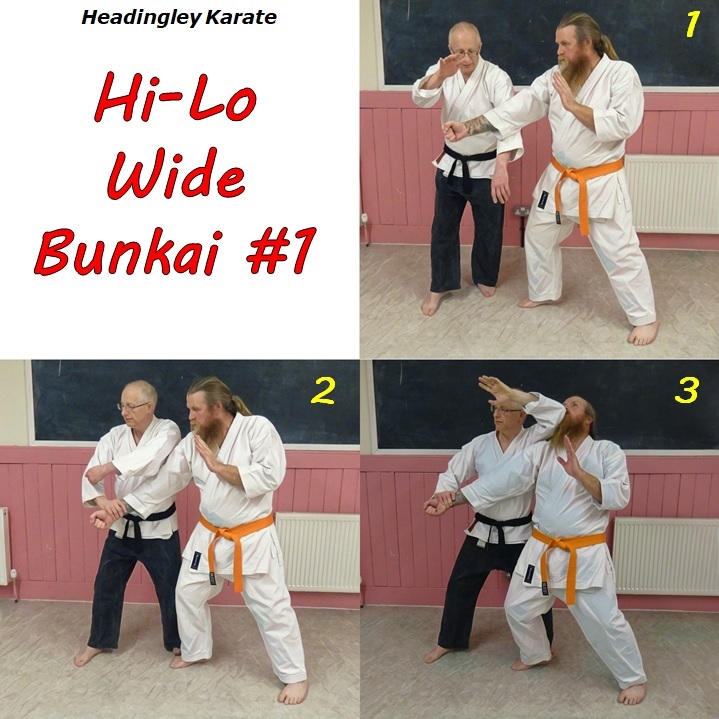
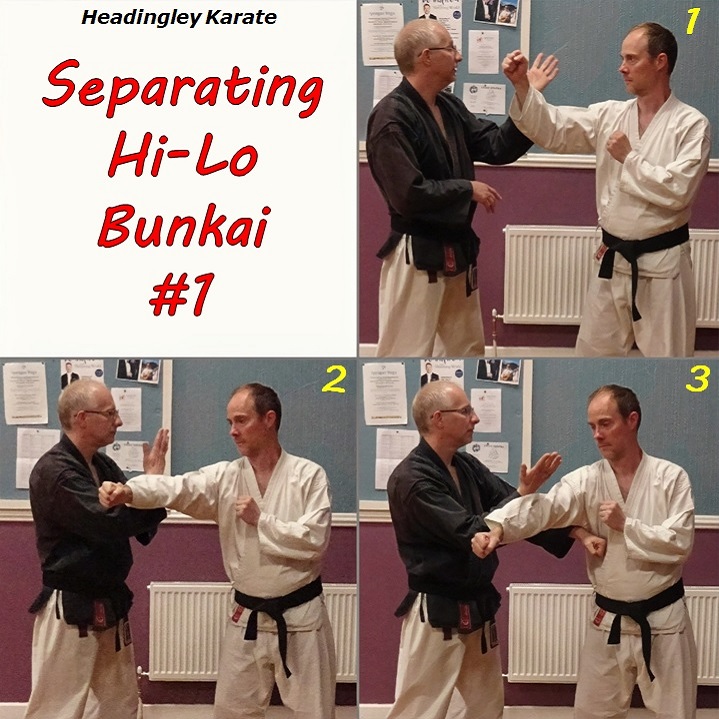
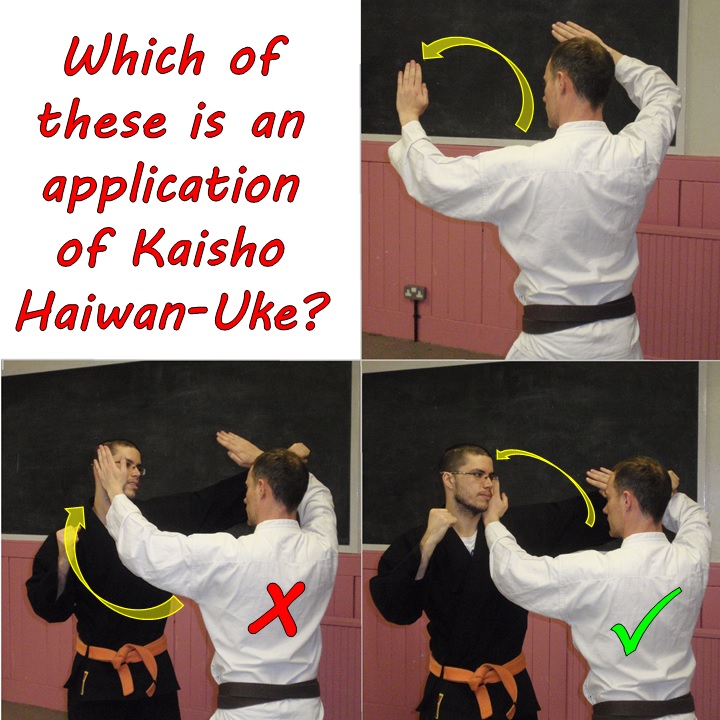
Guess what? Blocking a low attack to one side and a high attack to the other, at the same time, isn't what this technique is about. That would be ridiculous! You could have had a million fights and never had to do this.
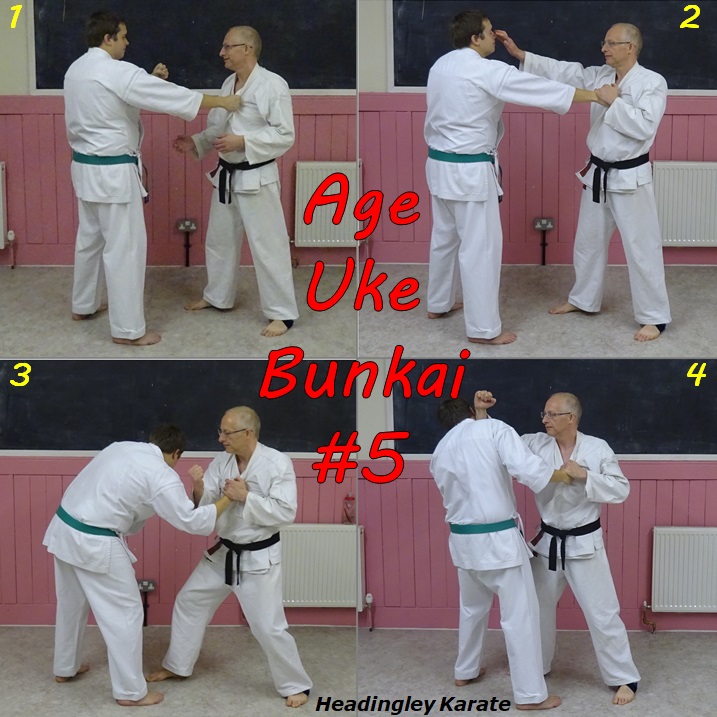
The clue to application is as I described earlier in the week - the feeling of pulling the arms apart. Imagine that I'm minding my own business, paying insufficient attention and with my arms by my sides, when an assailant thrusts deeply towards my abdomen. If the range is close enough there isn't time to raise my arm and block downwards, there isn't time to step back. Instead I pivot to my lead side and sweep my lead arm across my body, checking the incoming limb with the back of my forearm. At the same time I lift my other hand in preparation for what is to come (see pic 1).
I drop my rear hand to capture their wrist. Assuming that they're still thrusting forwards I simply turn to face the same direction as the enemy and start to draw their arm in the same direction its already going. I simultaneously raise my lead in preparation for my counter (see pic 2).
I now separate my arms as per the kata movement. One hand draws their attacking limb out while the other arm 'blocks' to their head with the elbow. If necessary, to make up the right distance, I can slide towards the enemy as I do so.
Note that I don't bend my striking arm deeply to hit with the elbow. This actually produces a blunter tool, ie. a larger striking surface. Bending the arm as in age-uke limits the striking surface just to the tip of the elbow.
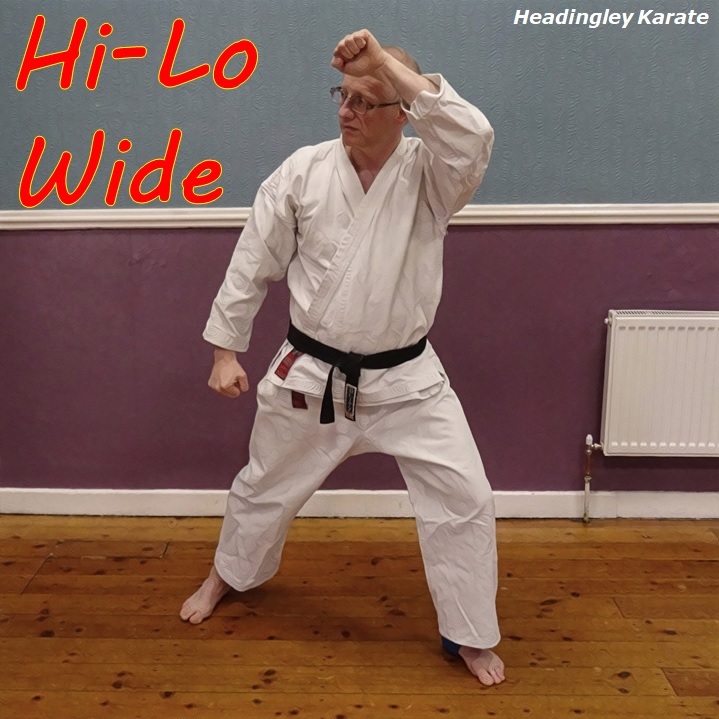
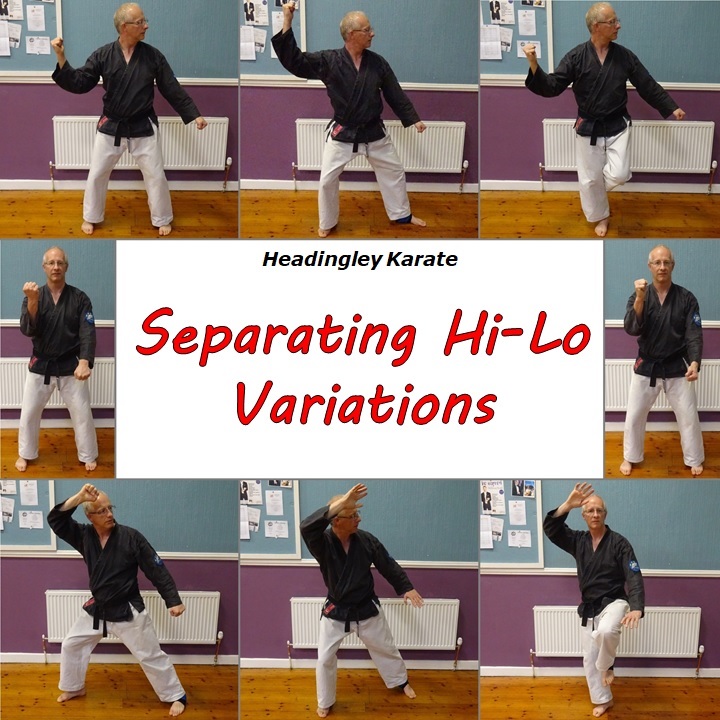
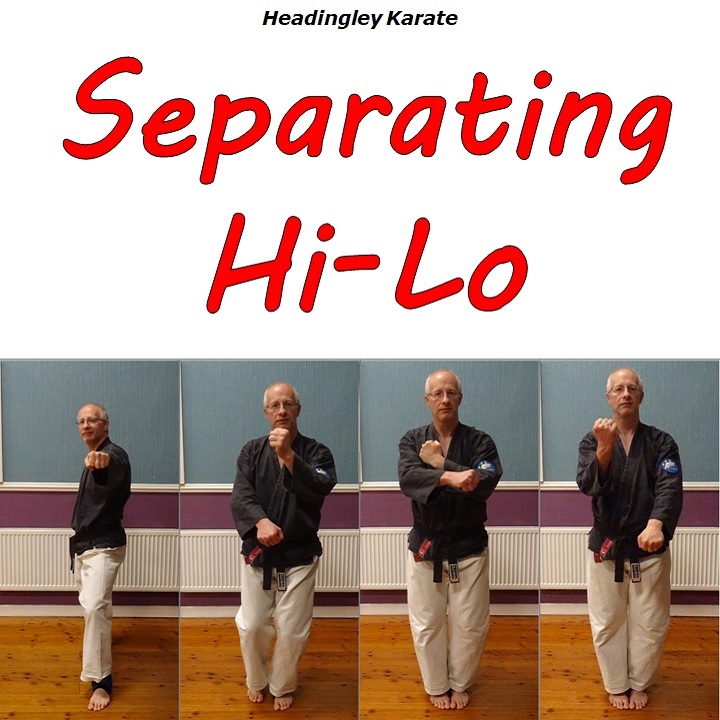
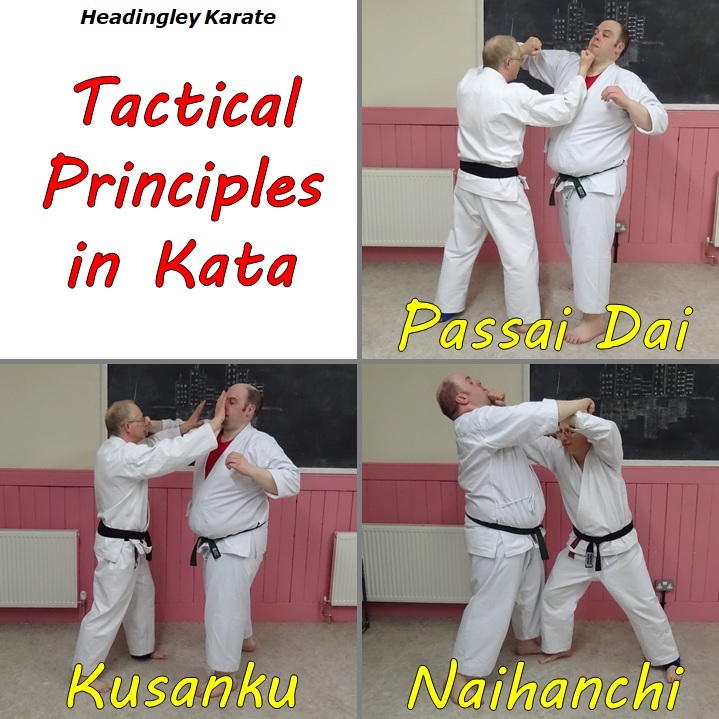
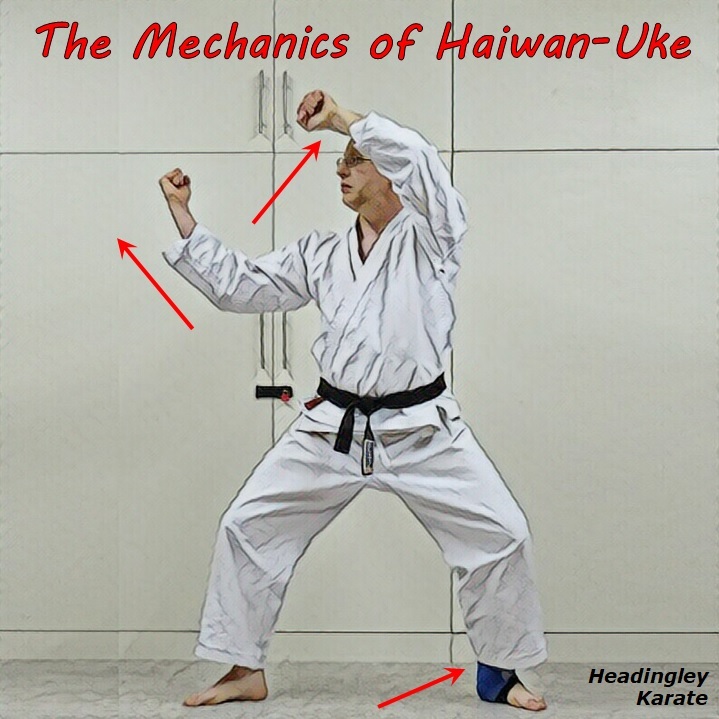
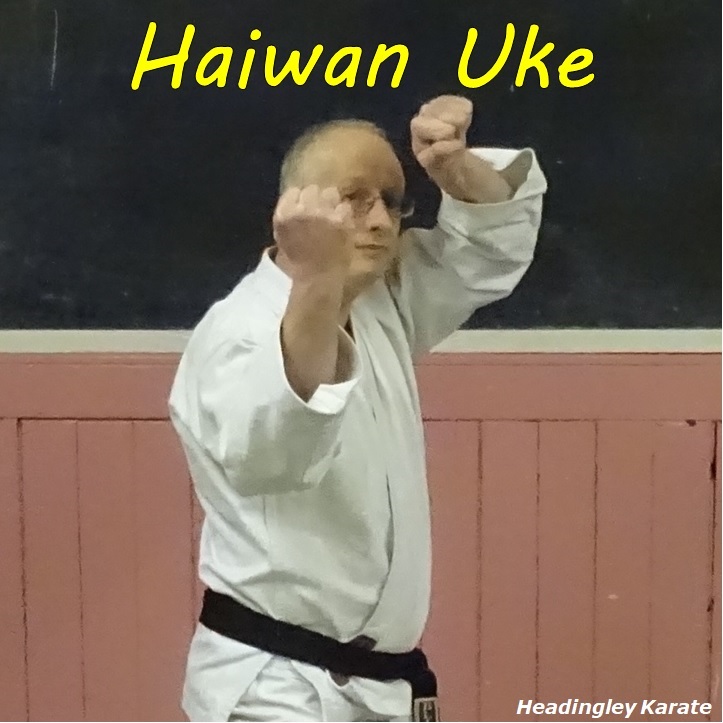
This is the next move in Pinan Daikou. I call it 'Hi-Lo Wide' as it’s a variation on the theme of 'Hi-Lo' as already seen in this kata and in others, Naihanchi for example. The standard Hi-Lo consists of a downward sweep and a midsection outward 'block', both to the front. Hi-Lo Wide is similar but has several variations. The 2 'blocks' are performed to the sides. One is a downward sweep, the other is a high 'block', but than can be outward or rising. In the version shown here a rising 'block' is used. The stance too can vary in different kata and different styles - sometimes back stance or straddle stance or, as shown here, forward stance.
From the previous posture in the kata, morote-uke, drop your rear hand hand slightly and move it forwards underneath your lead forearm. At the same time begin to draw your lead hand back towards the opposite shoulder in preparation for the downward sweep. As a result the arms pass through the classic x shaped chamber position.
Now complete the arm movements of the 2 'blocks', pivoting towards the rear leg as you do so, so that this becomes the front leg.
In terms of generating power the action of each ‘'block' is just the same as the in the basic kihon except, instead of working in opposition to the hikite (hand pulling to the hip), the 2 'blocks' work in opposition to each other. The overall effect is a feeling of pulling the 2 hands apart. As usual, this should give a clue as to application.
Variations of Hi-Lo Wide can be found in different kata. In our system we have the outward 'block' version in Passai Dai and Kusanku, and the rising 'block' version in Rohai.
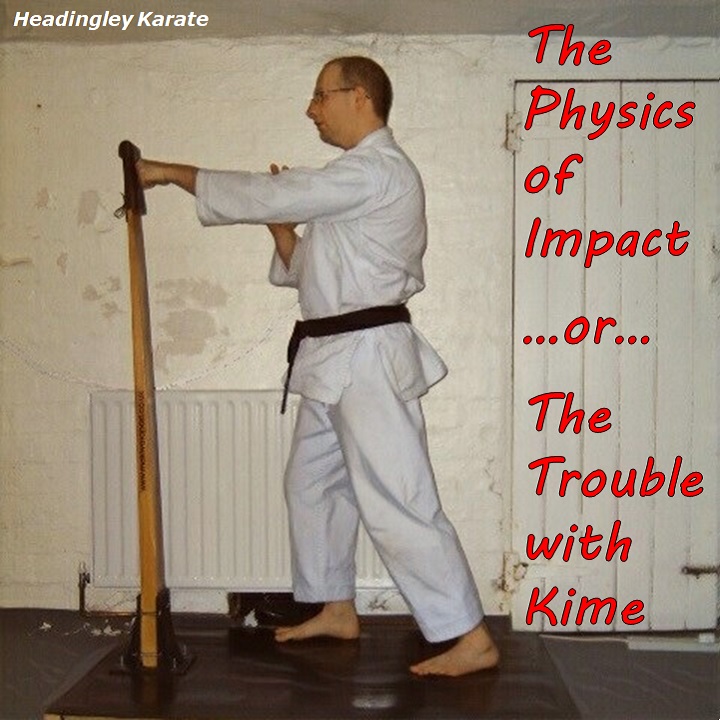
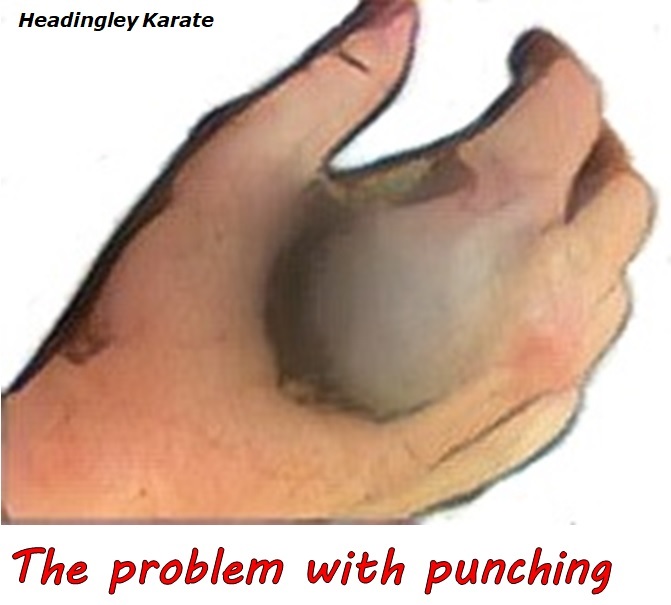
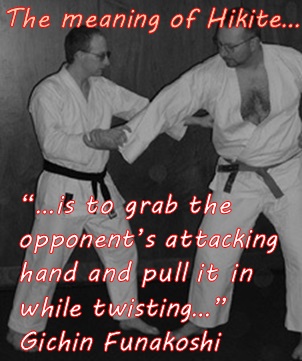
Punching isn't just a matter of generating as much power as you can. Its also about what you do with that power. About what you can do to maximise its effect on the enemy.
Perhaps the most obvious way of amplifying the effect of your blows is to augment them with hikite. The act of holding the enemy in place with one hand as you strike with the other means that the force you generate is not partly expended in pushing them away. Its all brought to bear on the task of deforming their anatomy, ie. damaging them. Pulling the enemy in, rather than just holding them, increases the overall force further - adding in the effect of their movement in the opposite direction.
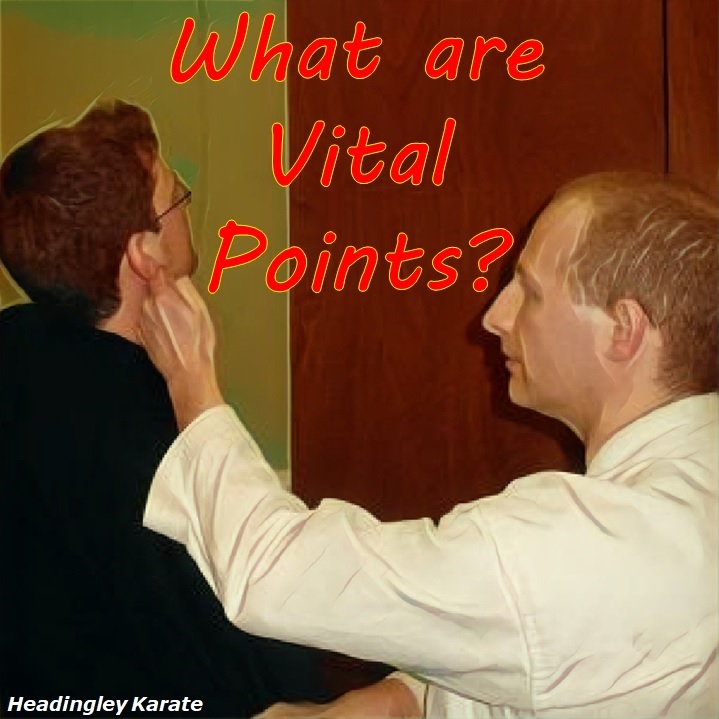
There's also the question of where to strike. Attacking the body's vital points (or vulnerable areas) will cause more damage than just randomly applying your fist anywhere.
And then there's the surface area of the weapon. We're often taught in Karate to strike with just the first 2 knuckles - reducing the surface area increases the pressure on the target, for the same overall force applied. This is a good thing, though there are other striking surfaces we could use to reduce the surface area further, eg. single-knuckle fists. Care needs to be taken not to damage the weapon in the process.
Disrupting the enemy's balance before you strike also increases the potential for damage. Its very difficult for them to tense the right muscles to resist the effect of a blow if they're off balance. Similarly, having their posture compromised (eg. crumpled up or bent over) makes it difficult to resist the blow.
Above all, always seek to break the enemy's balance with every strike you deliver, to keep them off balance and to keep the initiative.
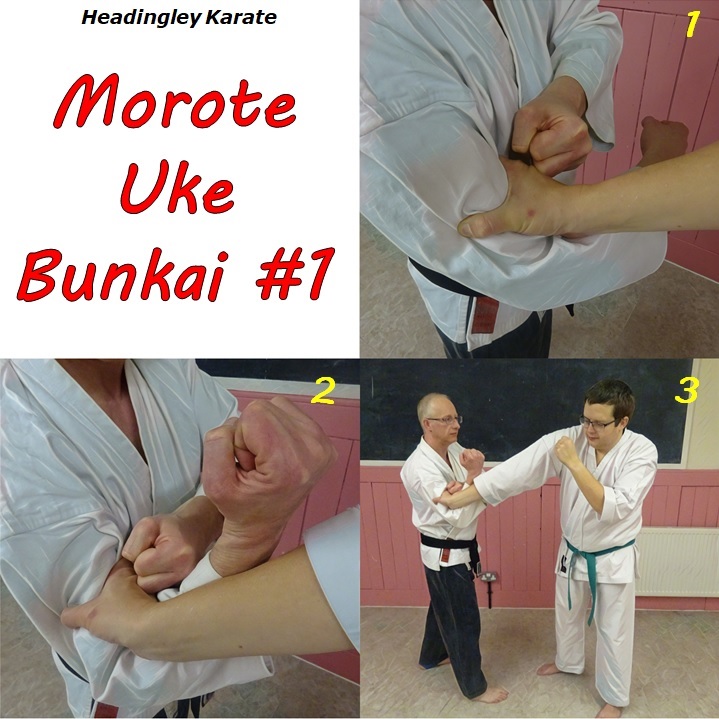
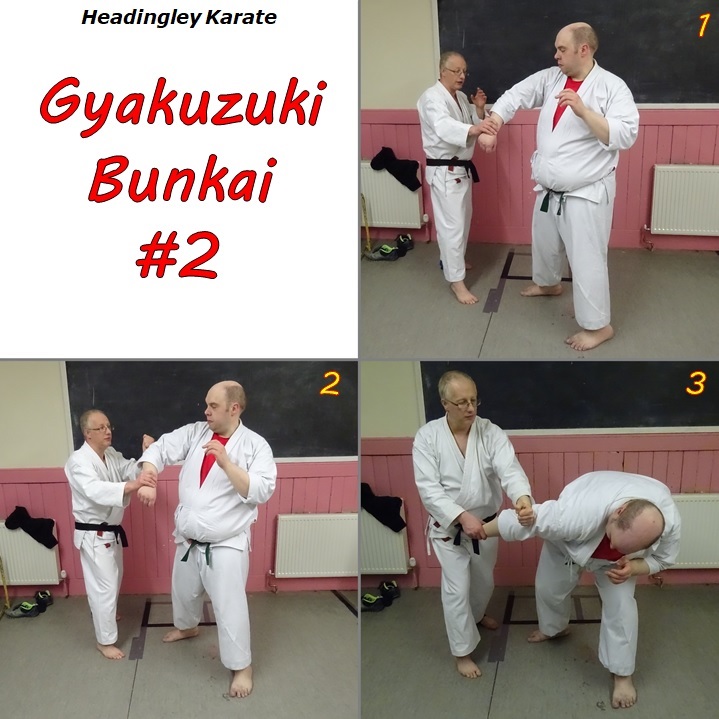
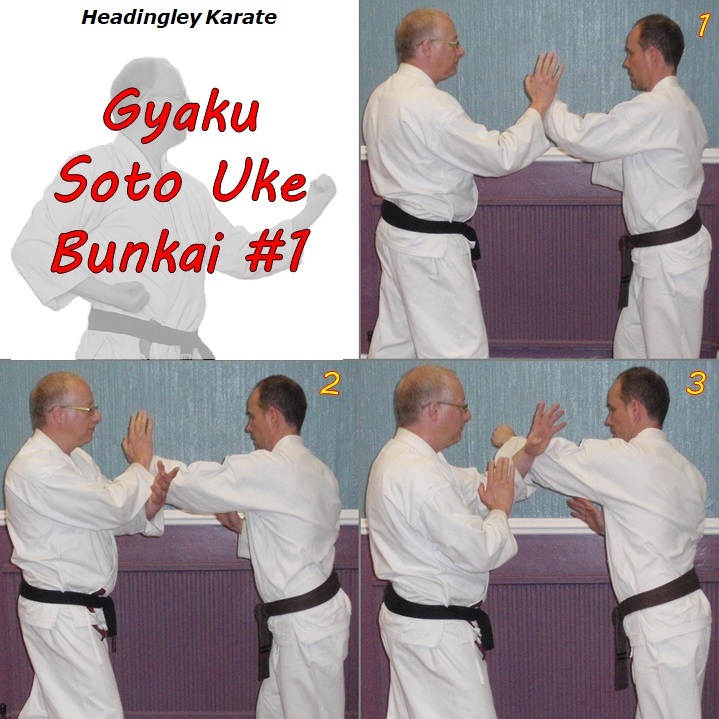
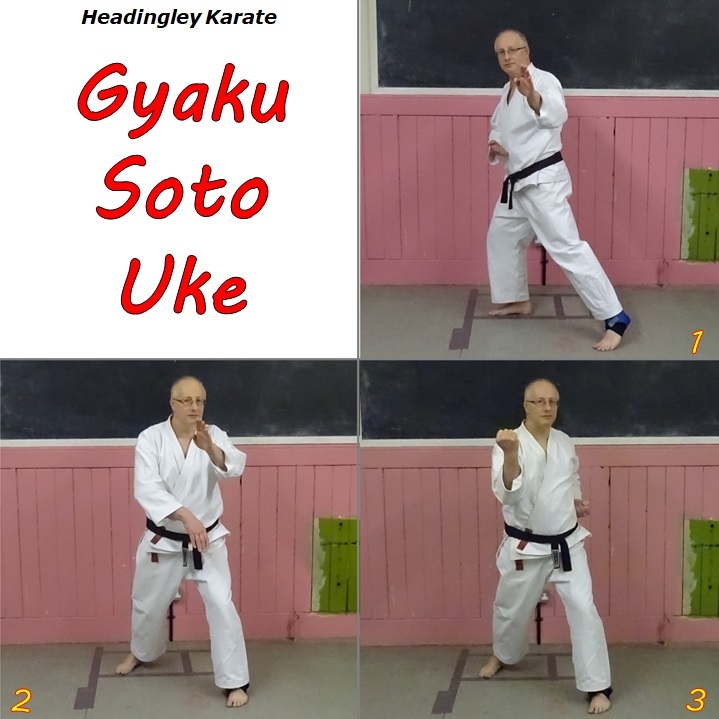
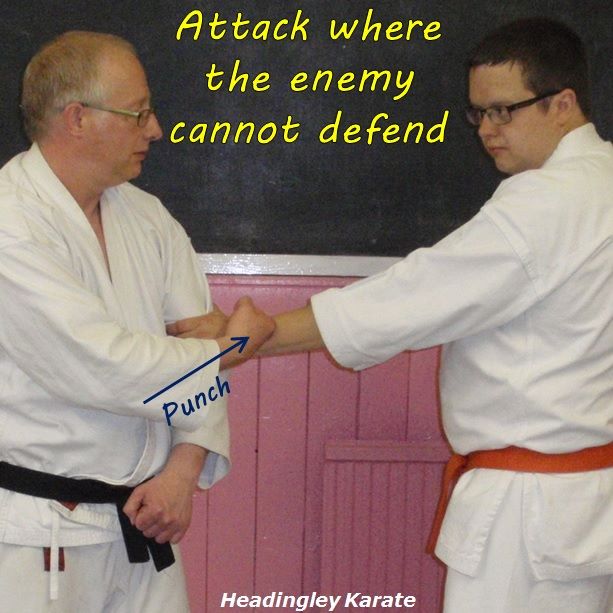
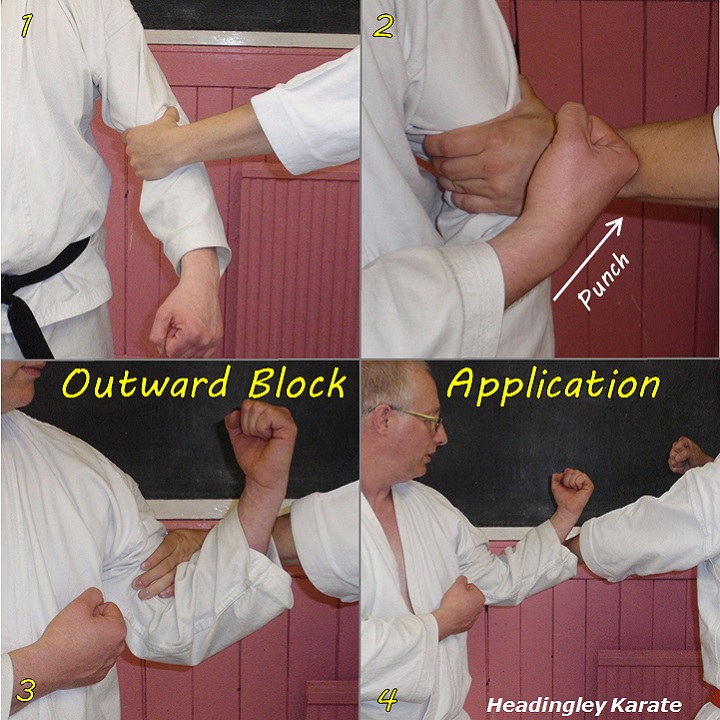
Our introductory application for morote-uke is, not surprisingly, similar to our introductory application for soto-uke. That technique is in response to a cross-arm upper arm grab. The attacker starts by grabbing the right upper arm with his right hand. The defender immediately punches to the wrist with their left fist, to bend the wrist prior to executing the soto-uke outward block movement. In this technique you start by pressing with a single-knuckle fist into the back of the attacker's hand. See picture 1.
Keeping the fist pressed into the attacker's hand as shown enables you to bend their wrist simply by turning your body to the right. As you do so, execute the outward 'block'. This both bends their wrist and temporarily traps their hand. See picture 2.
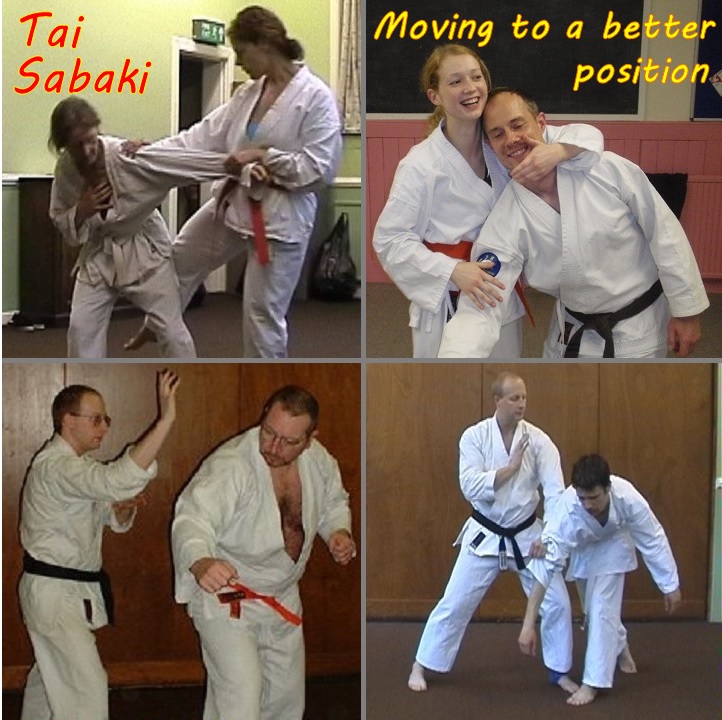
Continuing to turn slightly to the right, and pressing slightly forwards with your stance, partially locks their wrist and forces them to turn their body away - making it extremely difficult for them to strike with their free hand. You have achieved superior position (tai-sabaki) not by moving your body to their blindside, but by making them turn away. See picture 3.
At some point their wrist is probably going to slip out. But that's OK, because you're ready and waiting for that. Whether they slip out or not, you're in a position to capitalise on their inferior position.
And it is, of course, morote-uke rather than soto-uke because the arms work together in the same direction, throughout the movement. Contrast that with the application for soto-uke, in which one hand strikes then moves back out of the way while the other executes the 'block'.
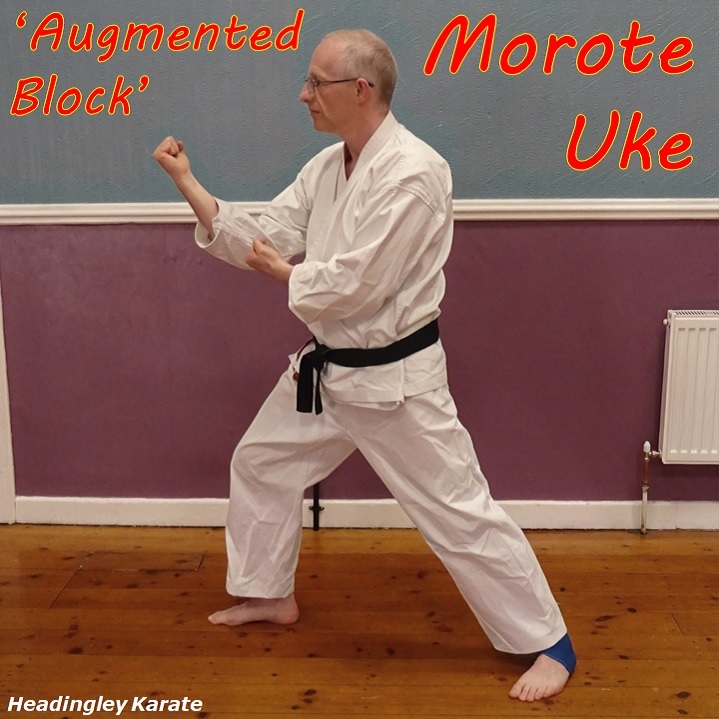
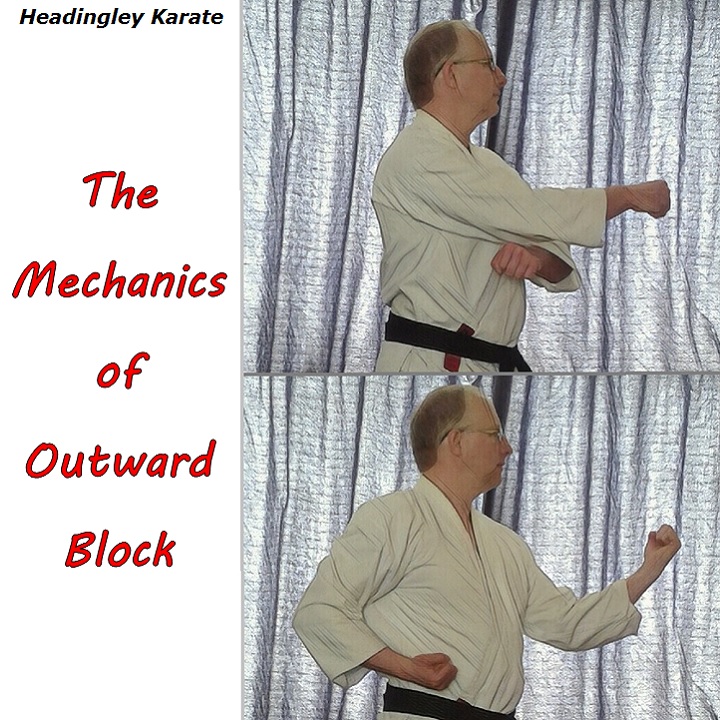
The next move in Pinan Daikou is morote-uke, augmented block. It is very similar to soto-uke, outward block. The stance is the same (zenkutsu-dachi, forward stance). The action of the 'blocking' arm is the same. Its just the movement of the other arm that's different. In soto-uke the 'non-active' hand executes hikite, pulling back to the hip. In morote-uke the 'non-active' arm moves in the same direction as the 'blocking' arm. In other words it augments the active arm. People often think that this means it has to touch or even press on to the active arm. That is a complete misnomer, the fist of one arm just needs to end up close to the elbow of the other. Touching, or pressing, isn't necessary. Augmenting simply means that the arms travel in the same direction, they both push, or they both pull, etc. Contrast that with the hands working in opposition, ie. hikite - one hand pushes while the other pulls. So 'outward block' can be executed with the arms working together (morote-uke) or in opposition (soto-uke). In terms of the mechanics there are similarities and differences. Likewise in application there will be similarities and differences.
As for its origin, morote-uke can be found in both Pinan Yondan and Pinan Godan, but its also seen in much earlier kata. Depending on which version you do, you might consider it to be related to a couple of techniques from Naihanchi (although the orientation of the forearms may be different). Or you might recognise it from the first move of Gojushiho - in our version you start by kneeling down with morote-uke.
"You wouldn't be able to make it work in a real fight!"
I've addressed this already but its worth revisiting and expanding upon. So you think joint-locks won't work in real life. Perhaps its not the joint-locks that's the problem, perhaps its you? Or rather, your understanding of how and when to use them. Now if you're a karateka with little or no experience in joint-locking then its entirely understandable that you lack the necessary understanding. That's OK. Pontificating in ignorance about their uselessness though, that's not OK.
Joint-locks were used for centuries by samurai. They've been used for centuries in a myriad of Chinese martial arts. And Korean arts. And Filipino arts. And so on. They emphatically work, but you have to use them in the right context, you have to wrap them up with the right combat principles (eg. kuzushi), you have to train them with realistic entries into the techniques. If you don't then you'll be right, they won't work.
So how do you get the right experience? Learning some bunkai is where a lot of karateka start. That's OK but it is only a start. Doing some occasional joint-lock oriented bunkai with a Karate teacher who's only done a bit of joint-locking themselves isn't going to set you very far along the path. If you want to get good at it you need to study reasonably regularly with a teacher qualified to teach the subject. You may have to look outside of Karate for that, or not, depending on your teacher's experience. It will, however, take time and effort on your part, just as it did when you learnt to kick and punch.
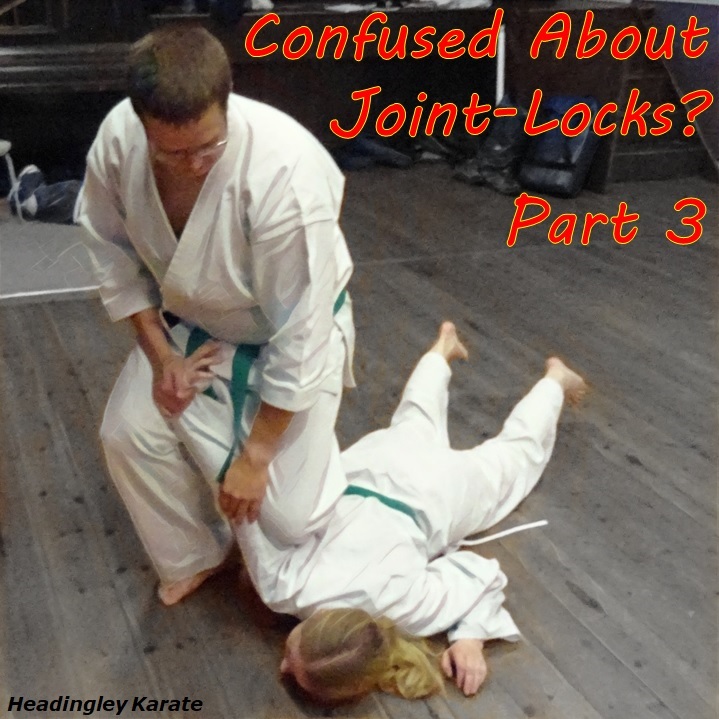
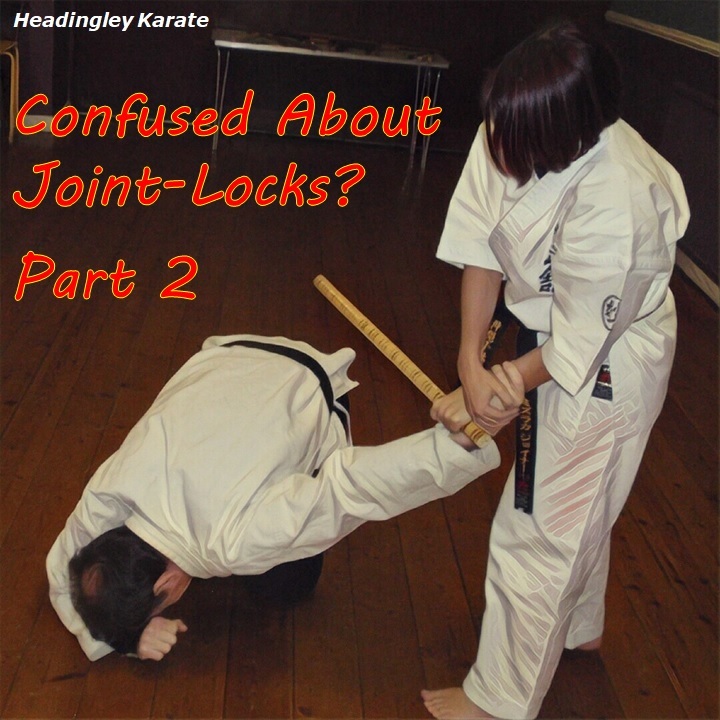
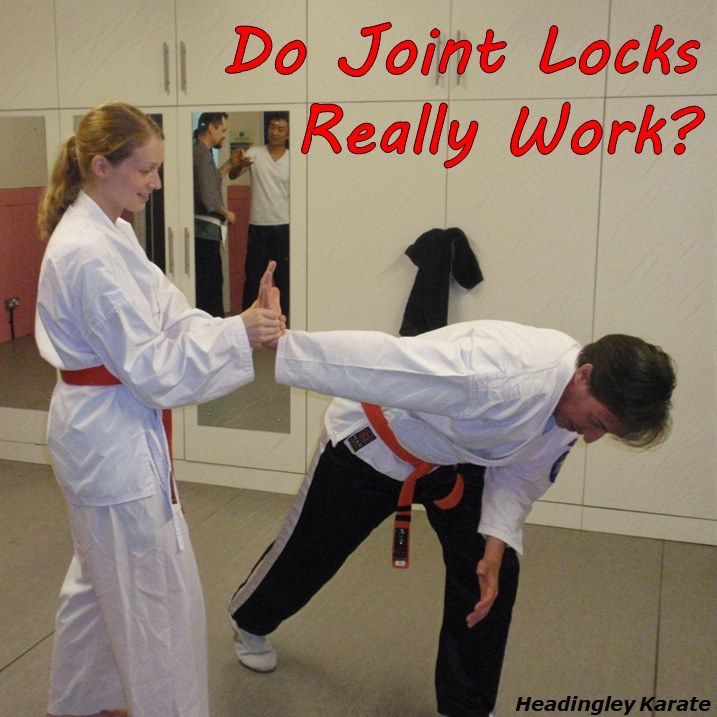
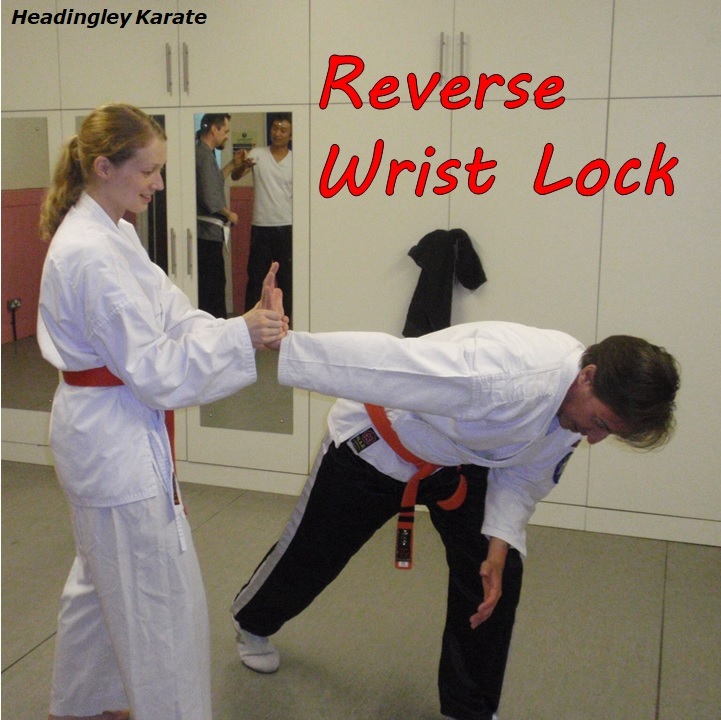
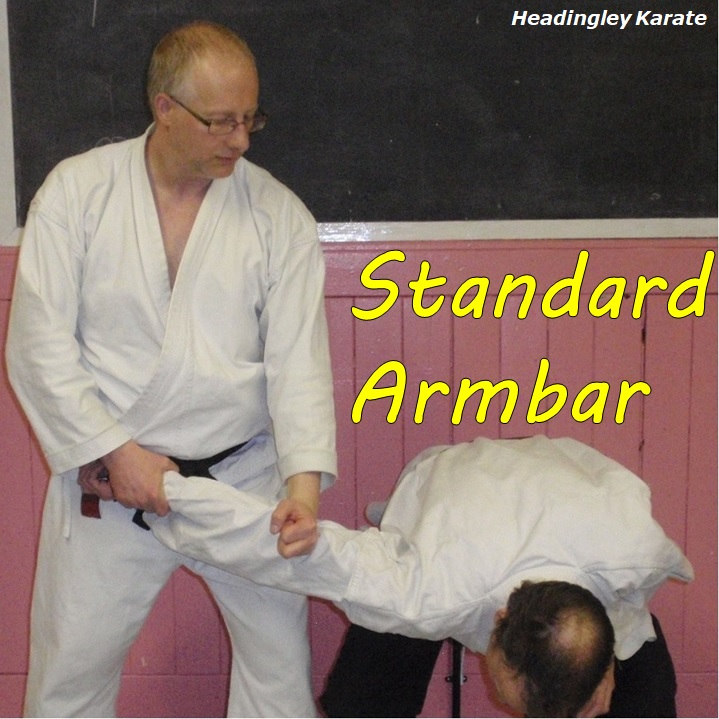
Who says I'm trying to hold the person in place? Look at the picture. The karateka on the right has applied a wrist lock, augmenting it with a stick. It certainly brought her training partner to his knees. But is she trying to hold him in place? Or is it a transition to something else?
Remember, 'joint-lock' doesn’t imply 'hold'. It just means you've taken a joint beyond its normal range of movement. There could be a number of things that you're trying to achieve: joint dysfunction, pain, to break balance, to disrupt posture, to move the person. Some locks, but by no means all, can be used to pin the person on the ground - in the right circumstances. Some, but by no means all, can be used as 'come alongs' to remove a person from a room - again in the right circumstances.
So when you look at a picture of a joint-lock don't jump to conclusions about what's going on. Don't be stuck in a one-dimensional view of what joint-locks are about. Consider the potential that the lock has as part of a continuous flow of techniques.
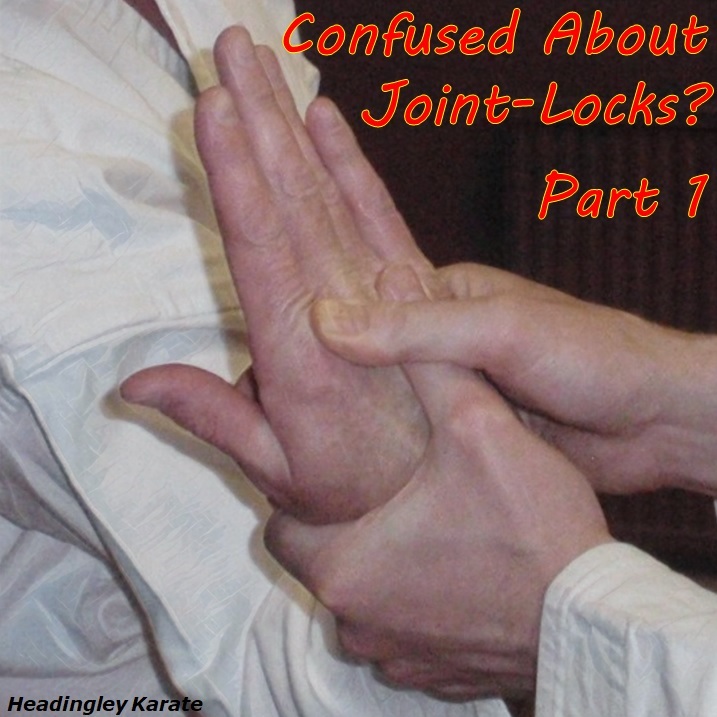
Often when I post about joint-locks I get a few predictable responses from some of the Karate fraternity. It occurs to me that this is due primarily to misunderstanding about what joint-locks are. So I thought I would write a few posts to address such misunderstandings. The first is:
"I'd rather do a joint destruction than a joint-lock!"
As I understand it, a joint destruction IS a joint-lock. I define a lock as simply taking a joint beyond its normal range of motion. Whether you 'destroy' it or not is just a question of severity. 'Destruction' means that you've taken the joint far enough beyond its normal range that damage has occurred. It is dislocated - soft tissues have been stretched or ruptured, rendering normal function of the joint impossible. Causing pain can be fun, but it's dysfunction that's important.
Let us look at to how joint-locks used to be applied by one group of people who loved them - the samurai. My understanding is that the samurai's approach to joint-locks was to dislocate the joint as a matter of course. That could be a fight finisher in itself, or the enemy could be controlled using the joint-lock. Its quite easy to control a person by ragging around an already damaged joint.
Of course, you can't do that in training. You have to tone it down for safety's sake. And you may choose to tone it down in self-defence if you think its not that dangerous a situation. The recipient may give in to the pain or just the threat of injury. However...
Never pick up a weapon if you're not prepared to use it. Equally, never apply a joint-lock if you're not prepared to damage the joint. If the enemy is determined to muscle through the pain then you will be obliged to injure them. Or let it go and face an unnecessary and ignominious defeat.
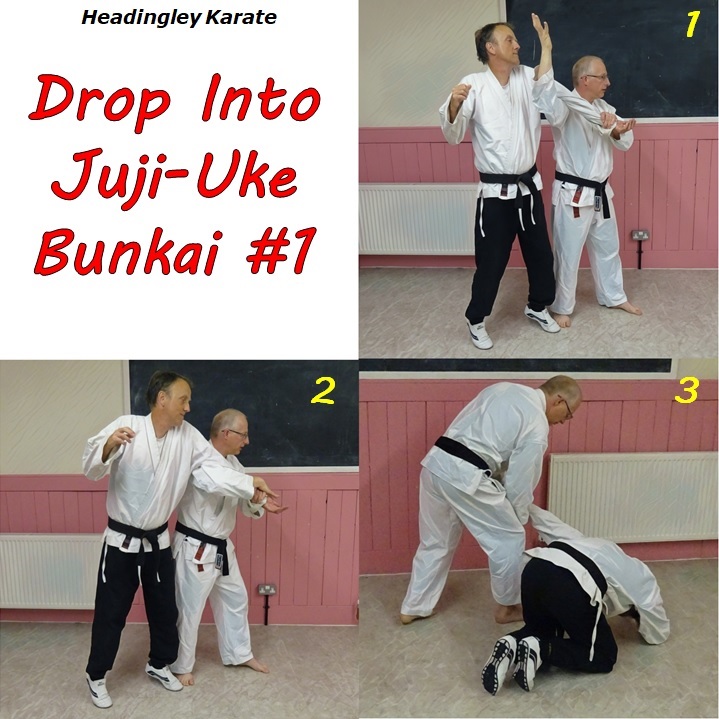
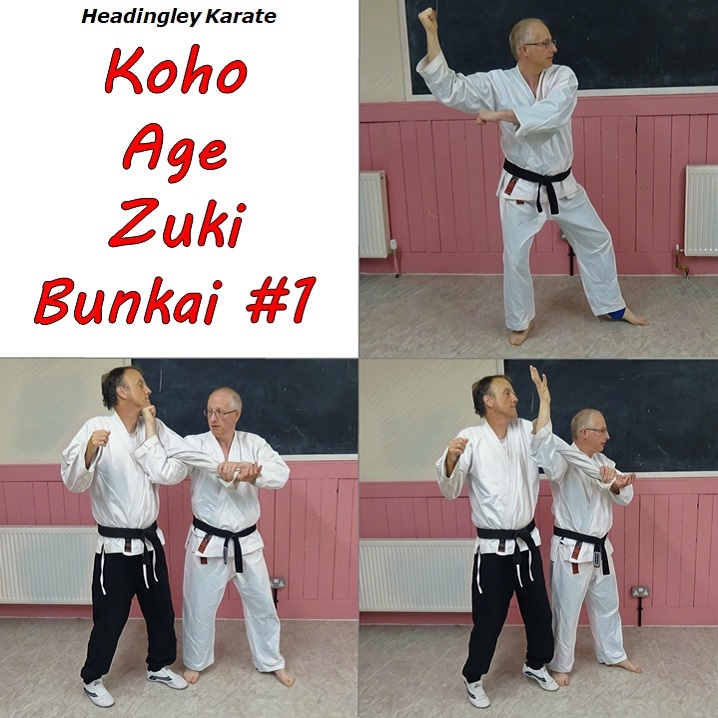
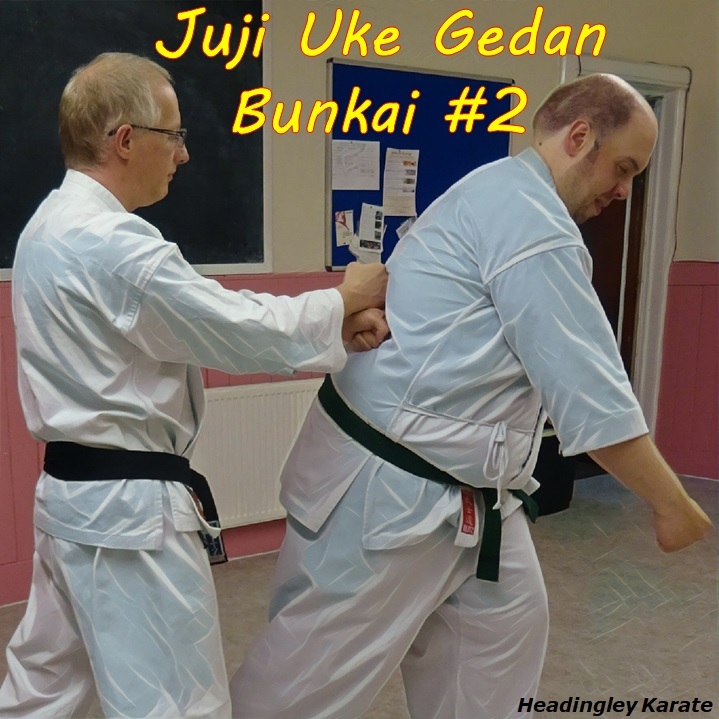
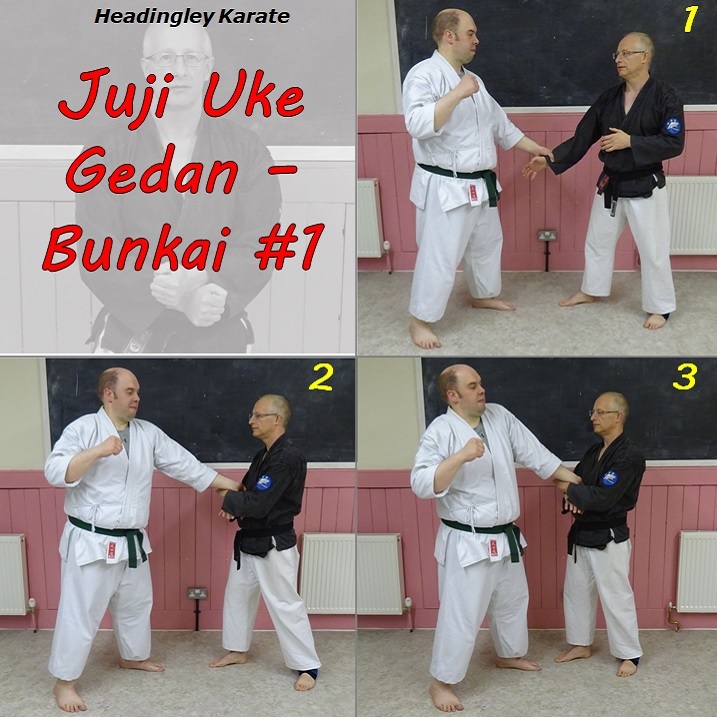
This application continues on from Koho Age Zuki. I blend with an overhead attack, capturing the arm and punching upwards to the jaw. That's followed by striking upwards with my biceps into their captured upper arm (picture 1). The idea is to either dislocate their elbow, or break their upper arm, or break their balance upwards in the attempt.
Now for Juji-Uke. In picture 2, I slap my right hand down onto my left and snap both hands down. This jerks their wrist down whilst their upper arm is still posted either on my shoulder or my upper arm. If their arm wasn't damaged already it should be now. The combined pressure, while they're stood on tiptoes, should cause significant damage. They will strive to move even further upwards, away from the pressure.
In picture 3, I step forwards. The force of this step is transmitted through my shoulder/arm into their arm. With their balance broken (even if their arm isn't) the pressure is irresistible. They must move up and forwards to escape the pressure. As I drop down they are driven face first towards the floor. If I step forwards to the left (as in the kata) they have even further to travel, making a graceful landing even more difficult. Its unlikely that I would need to drop into the cross-legged stance, but its there if I need to add even more bodyweight. The net result is that the enemy is lying face down with a broken arm or dislocated elbow. So really, this is only a technique for very serious situations.
This is not a throw, at least not a dynamic one that attacks the enemy's centre. The enemy unbalances themselves upwards in an attempt to mediate the damage to their arm, but to no avail. Just stepping forwards, once they're in the right position, will do the job.
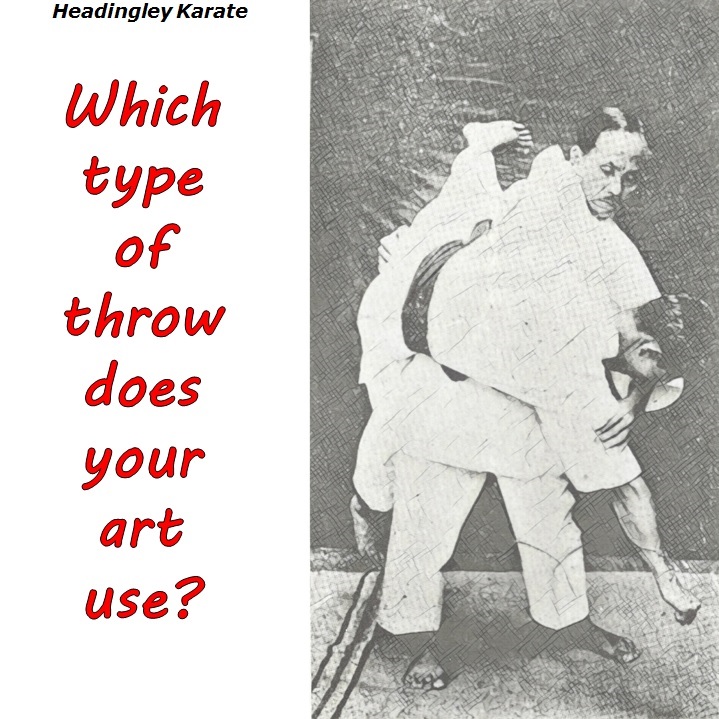
The inset picture shows the 'rising punch' prior to dropping in Juji-Uke, from Pinan Godan. Lets not give the idea of jumping and blocking sticks any serious consideration. Another idea, currently popular, is that you're executing a Seoi Nage shoulder throw. Its much more sensible, but I do have issues with it, both tactical and mechanical.
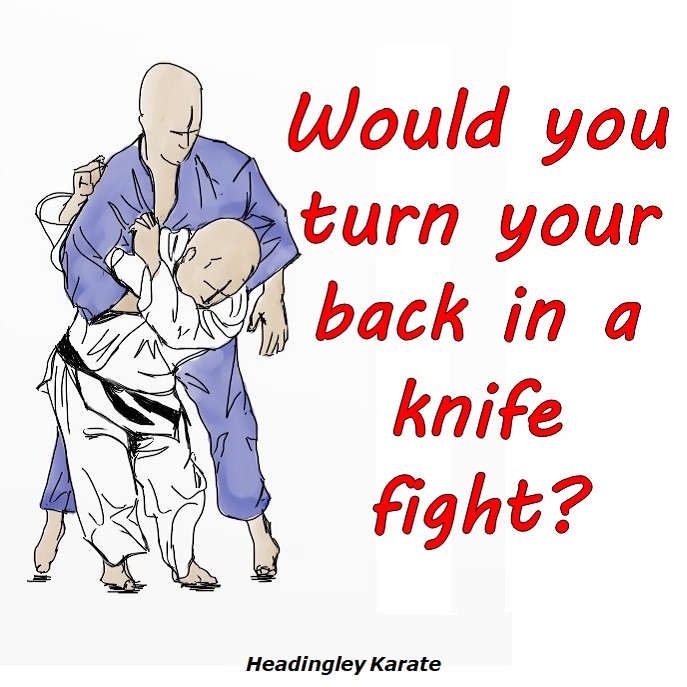
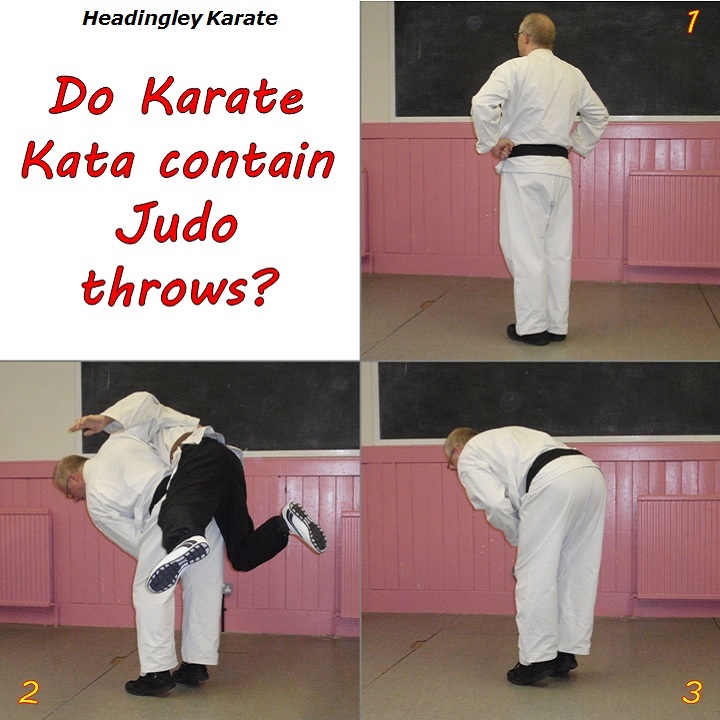
First, tactics. Seoi Nage is a 'do' throw, not a jutsu throw. The basic version involves turning your back on the enemy, leaving them with a free hand - not a problem in Judo, but it is a problem for self-defence. OK, a good Judoka can catch you off guard and have you over before you know what's happening, but equally a good Karateka could punch them in the kidneys or grab the head and thwart the throw. Don't turn your back if the enemy has a free hand!
Second, mechanics. Seoi Nage is a shoulder throw, but it has an element of hip throw to it. If you watch a Judoka do it you'll see that in order to complete the throw they bring their feet parallel, stick their hip out behind them and push their heels up in the air. This is great for executing the throw, as long as you don't mind the risk of going to the ground with the enemy - not a problem in Judo, but a big problem for self-defence. Its also most definitely not what the kata does. There are no postures in any karate kata that involve raising your heels and sticking your butt out. Karate kata are far too obsessed with keeping your feet firmly on the ground for that. Yet these are important aspects of Seoi Nage. Without these components, practising the kata will not improve your ability to do the throw. Which, in my view, precludes it from being bunkai for these particular kata moves.
So if this sequence in the kata doesn't represent Seoi Nage, what is it?
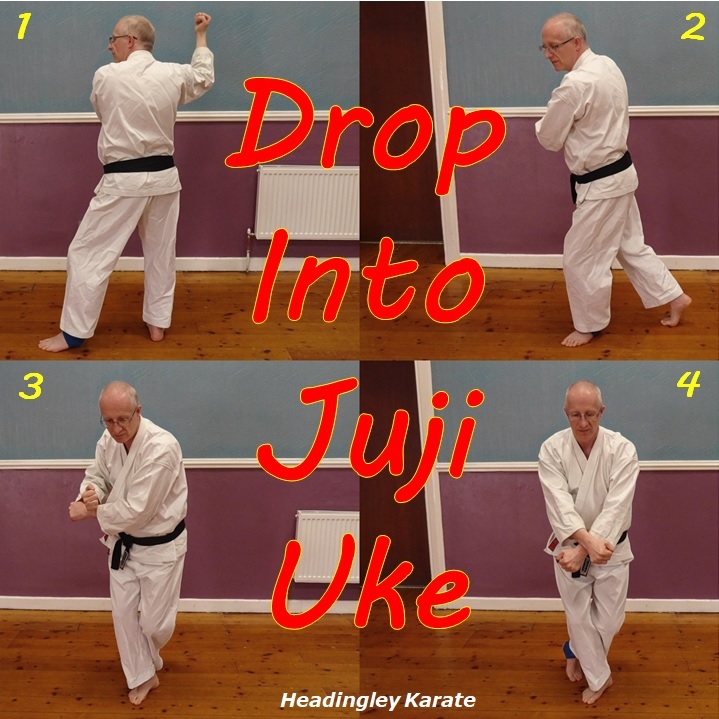
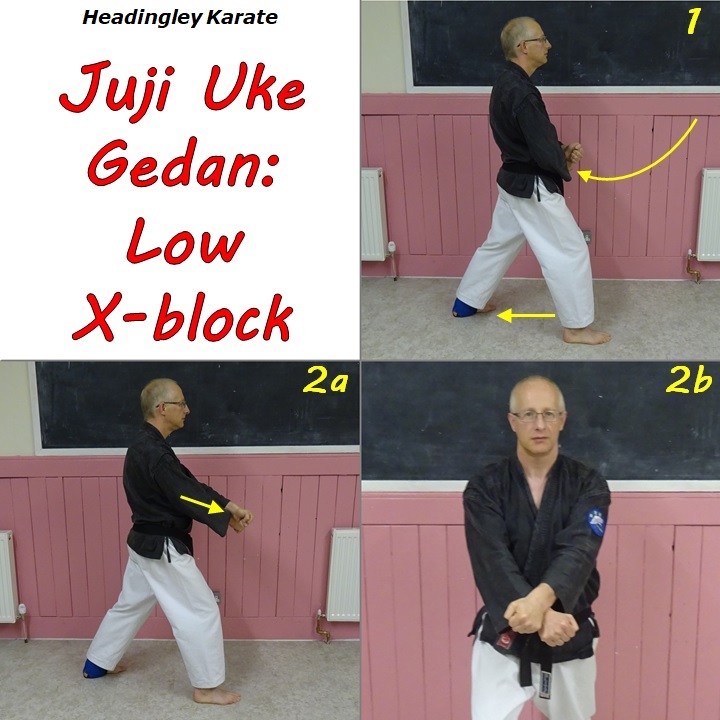
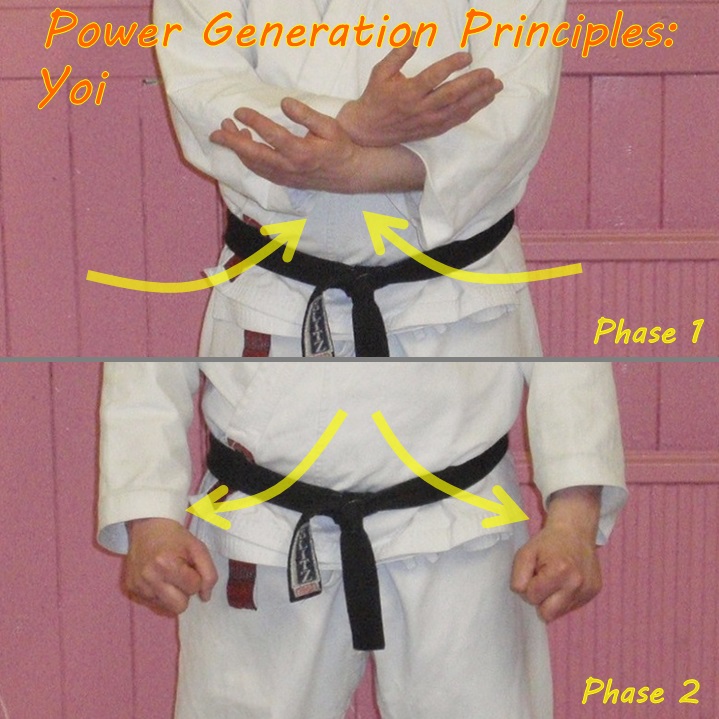
This is the next move of Pinan Daikou. It is taken from Pinan Godan but, unlike that kata, we don't jump into juji-uke. We just step into it. I believe this is closer to the original intent, which I think is taken from Chinto - the bit where you kneel down with juji-uke ('crossed wrists block').
So our version goes as follows. From the previous posture, kozo age zuki (lets say with the left foot forwards) step forwards with your right foot and round to the left. Drop into kosa-dachi (cross-legged stance), bracing your left shin against the back of the right leg. The point of the bracing, as in the last time we used this stance, is to be able to drop your weight but to stabilise your posture at the same time. As you drop drive both arms down and forwards, lowering your right arm so that your arms cross at your wrists.
The power generation principle at work here is about dropping your bodyweight down through your arms, via a process of stepping, turning and dropping into the kosa-dachi stance.
There are several possible entries to this technique, so I won't dwell too much on that. Suffice to say that you need to blend with the incoming attack. Lets say the attacker comes in with a downward left hand blow. Intercept the incoming blow with your left arm and raise your right arm up inside the attacking arm. At the same time pivot to your right to face the same way as the attacker. This enables you to shift out of the way of the attack and drive upwards with your right arm. Punch to the enemy's jaw, putting your bodyweight into the rising strike. At the same time your left hand controls the attacker's arm.
If the severity of the situation demands it you can continue the upwards movement, now driving your bicep into the enemy's triceps, at the same time pulling down with your other hand. There's a fair chance that this can dislocate their elbow or break their upper arm (humerus) so take care in practice. Note how (whether damage occurs or not) this should force them up on to tiptoes, which may give a clue as to where we might go next.
This is the next technique in Pinan Daikou. It translates as Turning Rising Punch. To recap on the starting position, the previous move finished in a cross legged stance with the hands in front of you, the right hand held as if you've just done an outward block.
From there, extend your left foot out behind you, pointing to your rear. At the same time look in the same direction. Now pivot on the right foot and raise your hands. The net result is that you've turned round into a thin, side-facing cat stance, but with your hands raised behind you. This involves pivoting on the foot that is bearing most of your weight. So if you have a knee injury you need to be careful and may even need to modify the technique in order to accommodate that.
There is no move quite like this in any our classical kata. I think that Itosu modified it from the hi-lo posture in Chinto, I base that belief as much on the following move as this one (in both kata) but more on that later.
In terms of power generation there are several things going on, all to do with driving the right arm upwards. Turning the body to the left drives the right hip to the right a little. That and having the weight on the right foot enables you to keep the right hip closer to the same vertical line as the right forearm. The left arm, depending on the application, can hold the enemy still or pull them in the opposite direction to the raising right arm. And finally, allowing the body to raise a little as you turn maximises the amount of bodyweight you put into the upwards push, which is what this technique is mostly about - driving the right arm upwards behind you.
I've come across numerous karateka who don't believe in the effectiveness of joint-locks. Recently I've even heard joint-locks referred to as 'fantasy bunkai', too fiddly and too complicated to work. Yet we know for a fact that karateka from before the rise of karate-do (Funakoshi, Motobu, Mabuni etc.) were familiar with and used joint-locks.
So what gives? Are joint-locks really useless for serious self-defence? If so, why did the old masters put store by them? Comparison with other martial arts may give us a clue. It is a fact that many old Samurai arts put considerable reliance on joint-locks. Similarly they have a long history in Chinese martial arts. Generations of oriental martial artists put faith in joint-locks for dealing with life-threatening situations. So if the problem isn't with joint-locks, maybe its with you? Or rather, with your understanding and execution of them?
Many karateka learn a few joint-locks, often in the context of studying bunkai. Learning the mechanics and the anatomy of a lock is a vital and necessary starting point. But it is only the start. Joint-locks are opportunistic. If a lock is going to work it needs to be applied in the right context - at the right distance and with the right orientation between you and the enemy. Critically, just as with throws, you need to first disrupt their balance. If they have their balance then there's a good chance they'll just muscle through it. It becomes a test of strength.
So you need to seize the right opportunity, or alternatively to create that opportunity yourself. Which is actually just the same for throws. And chokes. And strikes - its just that as a karateka you're so used to finding and creating striking opportunities you may not even realise you're doing it.
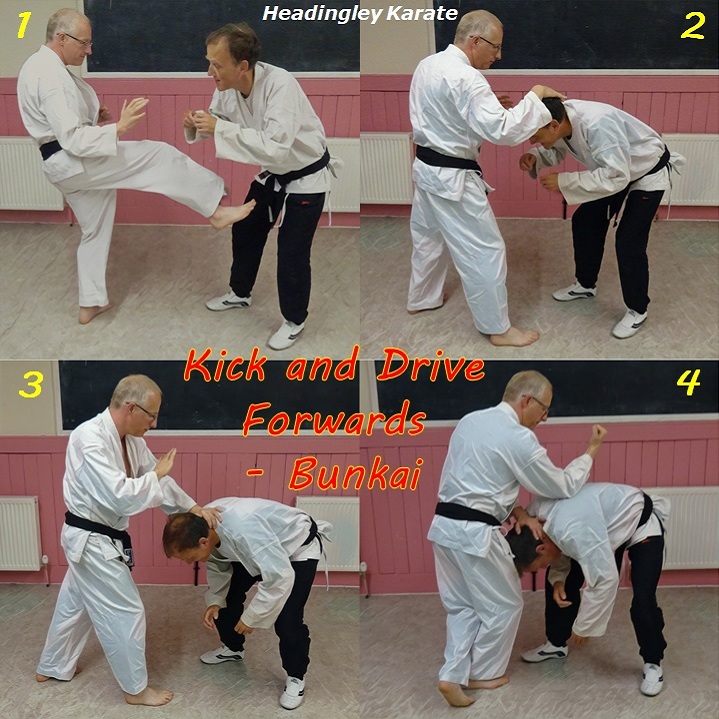
Imagine you've kicked someone in the groin, what will their reaction be? They might drop straight to the ground, but more likely they'll flinch backwards, their hips moving much further than the head. The net result is that they're effectively leaning over forwards. Even if your kick didn't connect properly theyre likely to flinch in this manner.
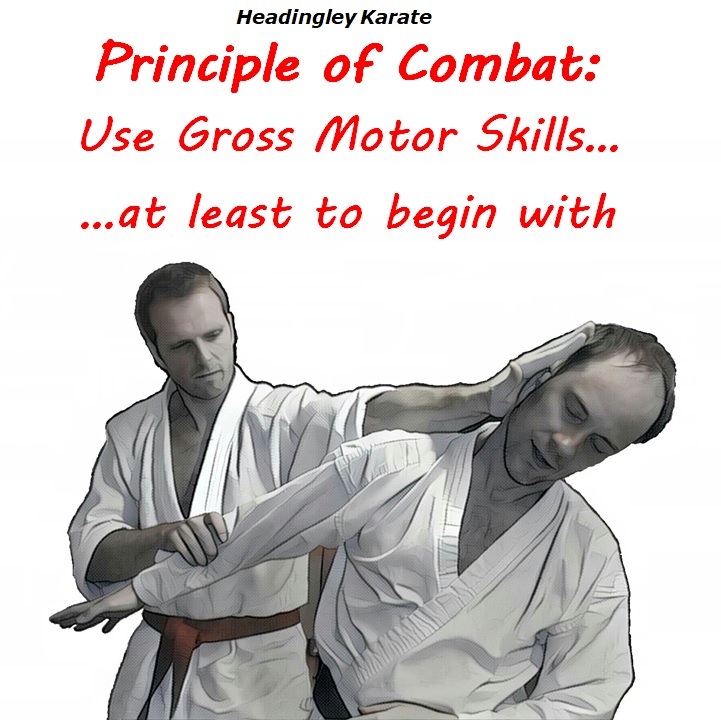
If you're going to capitalise on their reaction you need to do so quickly but, as they've already moved back, you'll need to make up some distance. That's where this technique comes in. Drive forwards before putting your kicking foot down. At the same time take advantage of their head projecting forwards - use your lead hand to press down on the back/top of their head or neck. As you draw your rear foot up bring the other hand over the top to keep pressing down on their neck or back. This pressure puts the enemy in a very compromised 'folded' posture - leaning forwards with their head being pressed back towards their knees. They may fall over backwards as a result. If not, complete your forward momentum by raising the lead arm and dropping the elbow down onto their back.
We can get a good sense of the mechanical principles expressed by the kata move from this example - that is to drive the weight of your whole body forwards and down. From a tactical point of view the kata is telling us 2 things - when to apply this principle, ie. immediately following a kick, and that you'll need to use your arms to control the enemy as you drive forwards.
As for its origins, this move is clearly related to the first line of Itosu Passai (as opposed to the Matsumura Passai that we practice). But I think its also inspired by a theme from Rohai, ie. rolling the hands forward in a vertical plane.
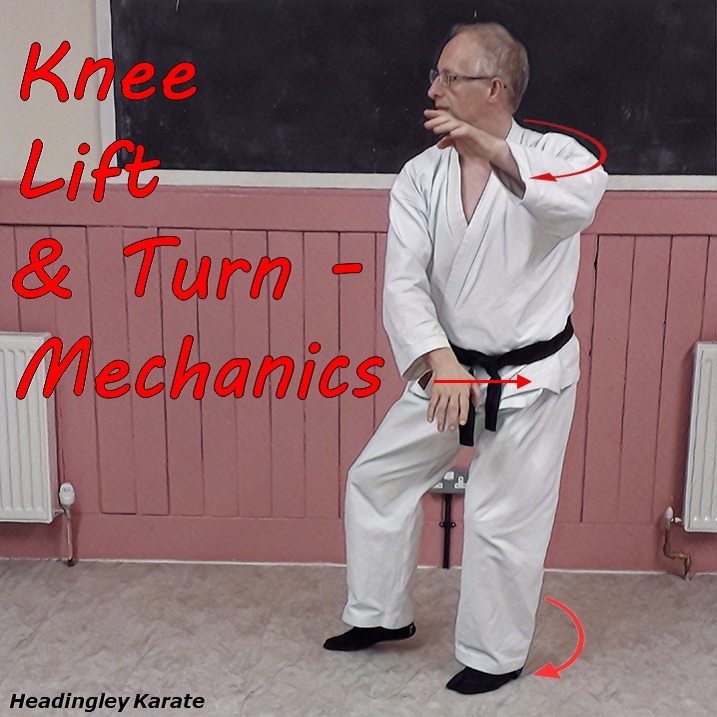
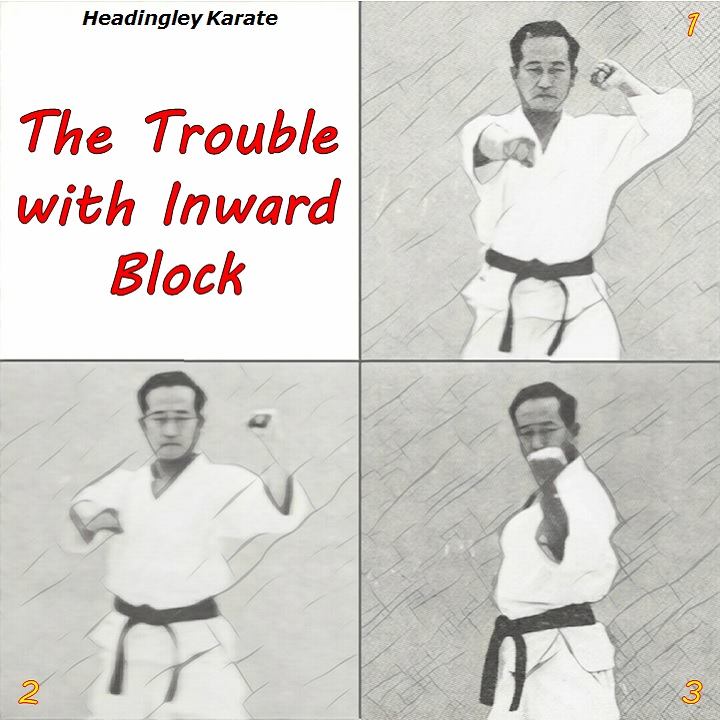
This next move in Pinan Daikou is one of the more technically demanding in all of the Pinan kata. From the previous posture fire a front kick with the right (rear) leg. As usual, in our system, this should be aimed at roughly knee height - below the waist anyway. Retract the kick to the opposite knee, as usual, but don't put your foot straight down. Instead drive forwards off the rear leg. Land on your right foot and draw your left foot up behind it into kosa-dachi (crossed foot stance). Some styles use a reverse cat stance here.
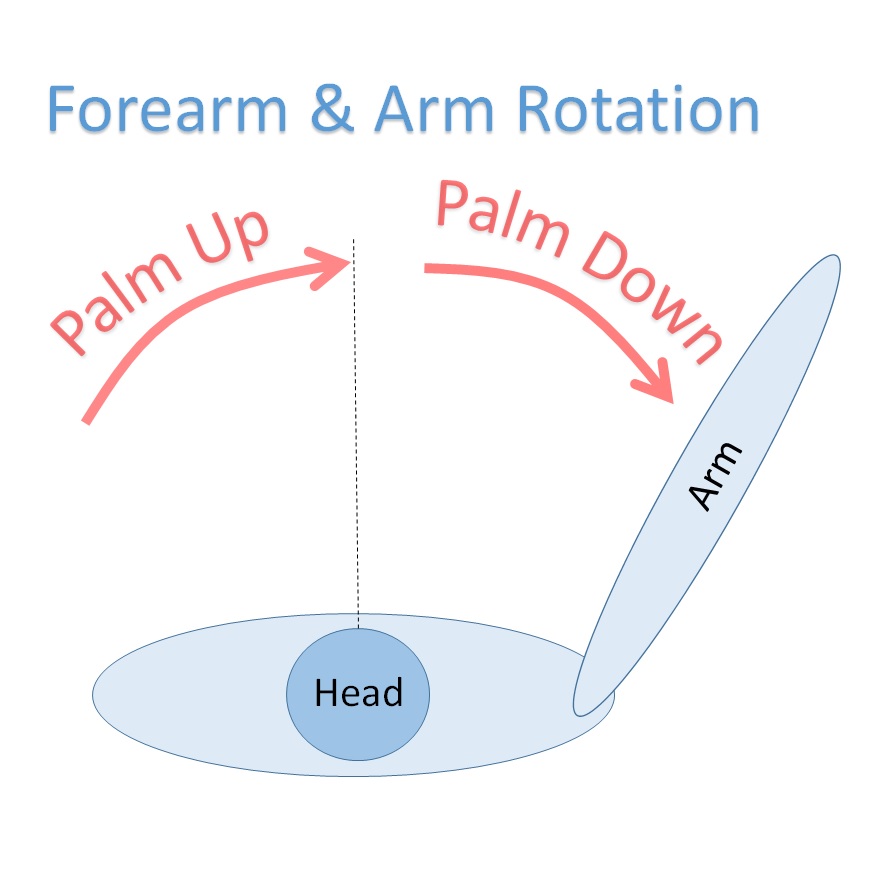
Now for the arms. During the kick just keep the hands as they were at the end of the previous move. Its as you drive forwards that the arm movements become interesting. Both hands work together, reminiscent of mawashi-uke, or 'switching' block. But instead of switching on a horizontal plane its now on a vertical plane. First press the palm of your right hand down in front of you. Next press your left palm down, over the top of the right, while the right comes back towards your centre. Stop the left arm movement as it becomes horizontal, clenching the fist. At the same time, perform a right vertical backfist (uraken) movement. The final arm position looks like an outward block.
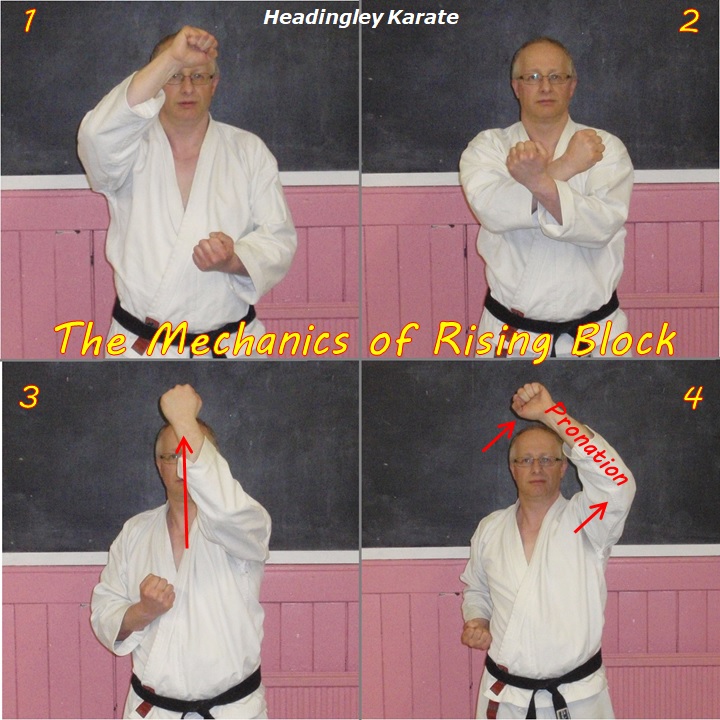
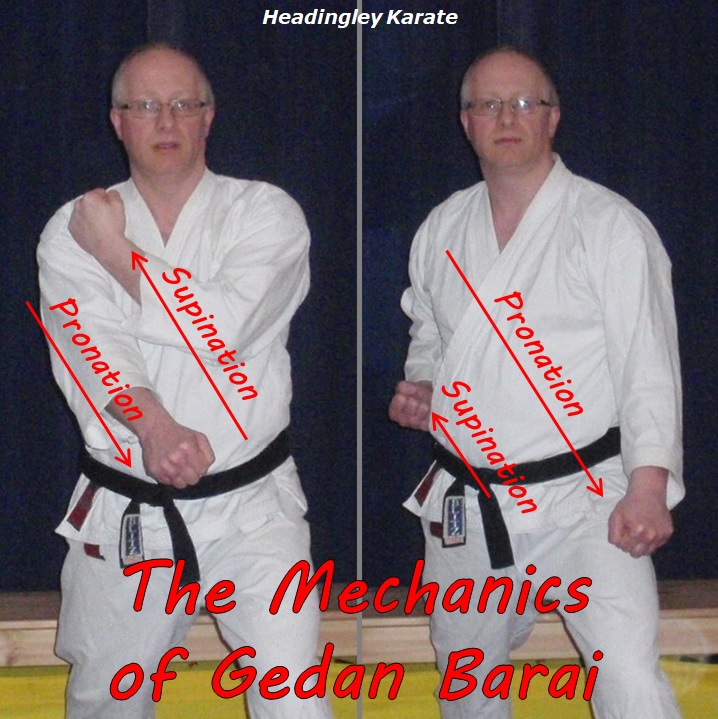
The arm and leg movements are coordinated so that they complete at the same time. I like to bring my rear leg up to the front leg so that the rear shin braces against the front calf muscle. This enables a stable but rapid deceleration at the end of the technique. Also note the position of the rear hand. Some styles use a full hikite but I feel this final morote-uke position provides for better balance (counterbalancing the rotational effect caused by the rear leg drawing up). Having the forearm pronated rather than supinated provides greater application potential.
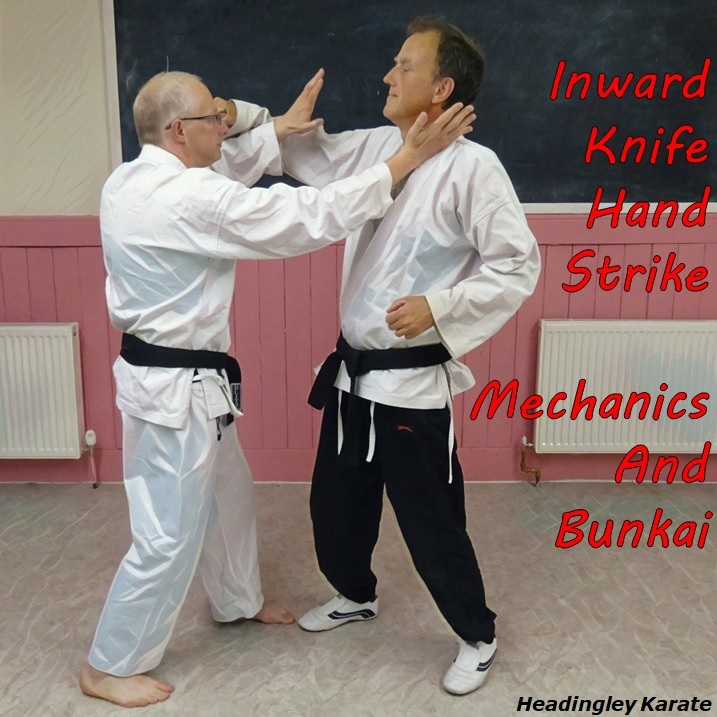
The mechanics of the inward knife hand strike are similar in several ways to uchi-uke, inward block. The arm moves inwards across the body at the same as the forearm supinates. This is combined with hip rotation. In addition, at this point in the kata, weight transfer is added to the equation. The weight is transferred from back to front and from right to left (assuming you're stood with the left leg forwards). This is achieved by a Wado-Ryu influenced stance transition, shifting the weight from one leg to the other. Finally there is the non-striking hand to consider, instead of executing hikite it draws back into a rising block. This could just be perceived as a tactical consideration (ie. blocking) but can also be thought of in terms of power generation. In this sense it is working in opposition to the active hand, potentially pulling the enemy's limb up and back, rather than back to the hip. Alternatively the arms can be considered as pulling and pushing in a circle, centred around the spine.
The introductory application should be obvious. The lead arm blocks a round punch to the head while the rear strikes to the enemy's neck. In this instance the knife hand strike is angled at 45 degrees and aimed at the base of the neck, ie. the line where the neck joins the torso. If you're going to strike the neck this has got to be the safest place to do so. But never downplay the serious nature of such a strike. Never strike your partner's neck in practice. In self-defence only use it if your life is in danger.
There are a confusing number of different Japanese names for this technique, so I've just stuck with English. The other common name is the 'Karate chop' which seems odd given that - outside of kata - you don't see it practiced much in most Karate dojo.
It's the next move of our Pinan Daikou kata and is lifted direct from Pinan Yondan, with a couple of small modifications. In Pinan Yondan the preparation for the technique has the left hand low and right high. On completion, the hands change place, in terms of their height. In our version both hands start high. The lead hand comes back towards the head with a rising block. The rear hand goes out from the head to sweep inwards across the body. The other difference is in the orientation of the striking hand. Some styles have the hand palm-up at the end of the technique, as if striking horizontally. Others have the hand lower down, palm vertical, usually implying that they're blocking a kick. I've long thought that, for that to work, the kick would have to be so far away that it wouldn't actually hit you! We angle the hand inwards as if striking down and in at 45 degrees.
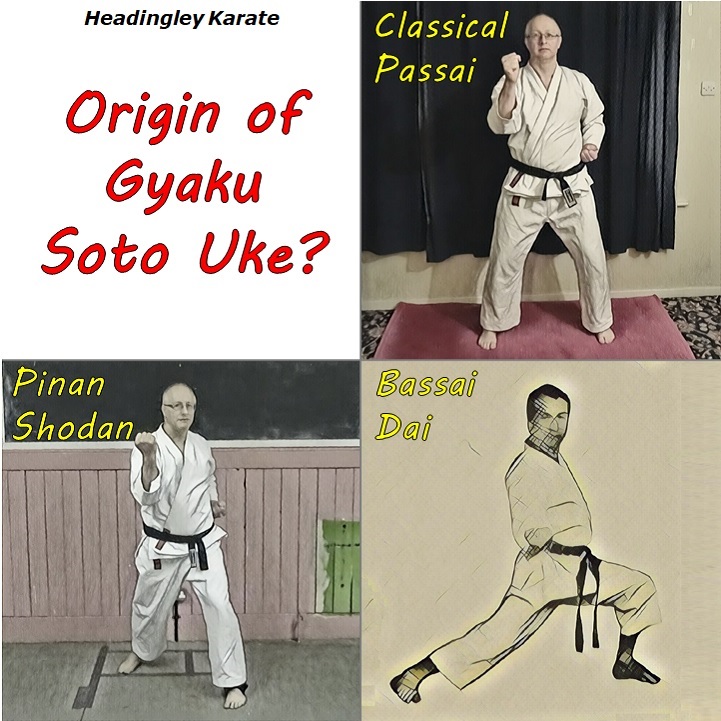
Our variation has precedent, I haven't just made it up. Both differences (described above) can be found exactly as seen here in one of our classical kata - Passai Dai. The only thing that's different is the stance. You won't recognise it if you practice a modern version of Bassai Dai. It's the bit near the beginning where you do a series of inward and outward blocks. In many Shorin Ryu styles these are open handed and usually involve the other hand doing something other than hikite. In our version we see exactly the same arm movements as shown here (so I think that Passai is its origin) - a far cry from the standard uchi-uke and soto-uke.
In this introductory application I want to look at the primary mechanic in this movement. That is, as previously discussed, the separating action of the arms. The turn can wait til another day.
The most straightforward application is simply to block and strike at the same time. I'm stood left leg forward and the enemy throws a big left round punch to my head. I block high with my right (rear) arm and at the same strike with my lead (left) hand. I could use a palm-heel to the face, that's certainly a useful option. But in this instance I'm opting to strike with an elongated (thrusting) shuto, ie. a knife hand strike.
The top picture shows the simultaneous block and strike, but the strike is inevitably rather obscured by the enemy's punching arm. The next picture shows a close-up but its still difficult to see where I'm striking. So I'll explain specifically. I'm striking the anterior border of the sternomastoid muscle with the little finger edge of my hand. If you want to know where that is, but don't know from the description, then I'll leave it with you to go and look it up. Remember that striking the neck is inherently dangerous. You may aim for a relatively safe target but you could easily hit something more vulnerable close by. Never strike the neck in practice and use appropriate restraint in self-defence. Better to leave this technique for life and death situations.
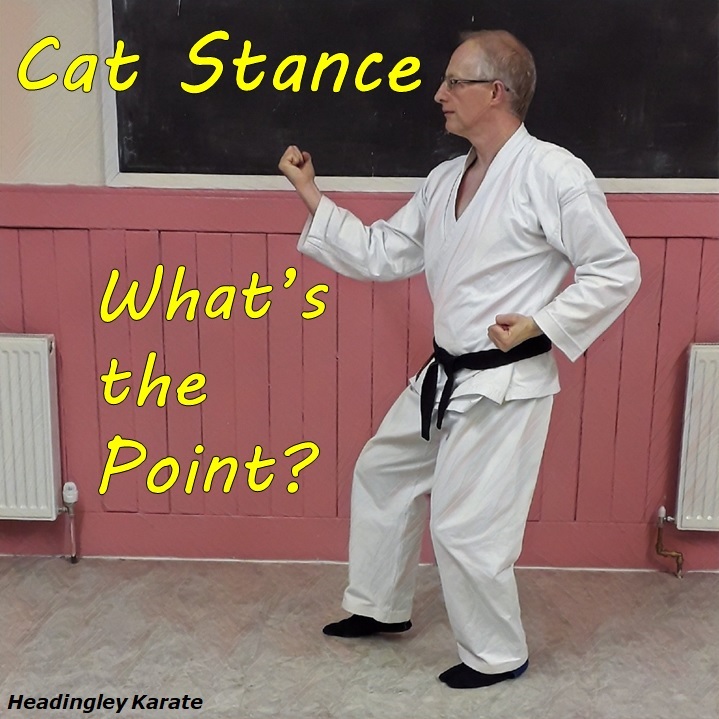
Why cat stance? 2 reasons. Dropping into cat stance can help you to duck slightly under the attack, guiding it over your head if need be. Also, depending on relative height, it can present the edge of your hand at a clearer angle to the target, reducing the risk of blunting your strike by accidently catching the jaw instead.
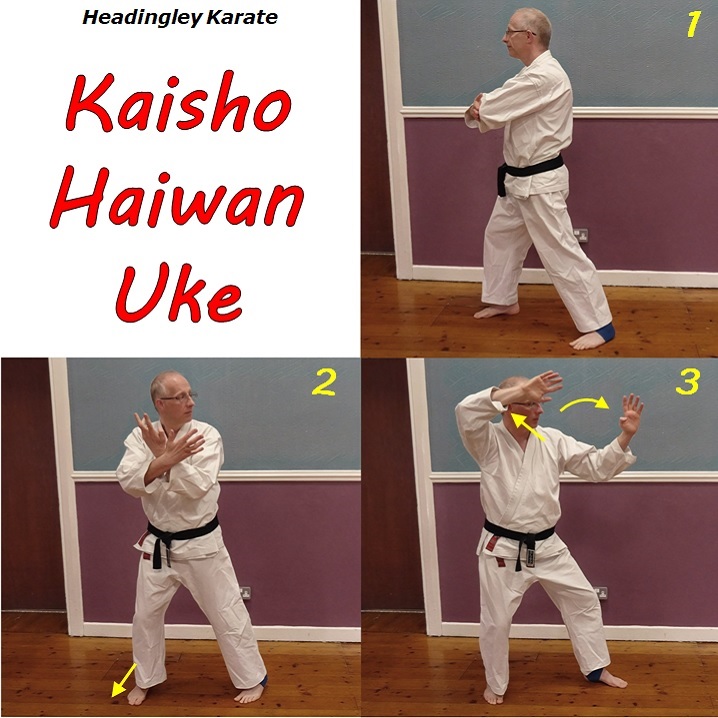
The name means 'open-handed back-hand block'. It's the first move of Pinan Yondan and the next move in our Pinan Daikou kata. We execute it a little differently in our version. For a start the stance used is a side-facing cat stance, not the larger back stance seen in most modern styles. Another difference is the starting position, as shown in picture 1. From there move your lead foot across to be in the same line as the other foot, then turn the head (to the original rear) and the hips sideways. This is similar to other versions, the differences are simply due to the different starting position.
The main difference is in what the arms are doing. I've deliberately changed it from the way I learned it as a child. The rear arm is doing essentially the same thing, executing a rising block. But the lead hand executes a variation on shuto. Instead of the usual sweeping motion, this shuto has more of a thrusting (tsuki) quality than a sweeping (barai) quality. The wrist is bent so that you can drive forwards with the edge of the hand. The overall feeling is of separating the 2 arms. This is the important mechanic here. Its similar in principle to 'Separate Hi-Lo' in which simultaneous outward and low blocks work against each other (mechanically speaking). But here we're 'Separating High' with both arms. This has as much in common with 'separating on the right/left foot' in Tai Chi as it does the technique seen in most versions of the Pinans. It doesn't occur in any classical kata that I know. I think its actually descended from the 'viewing the universe' move at the beginning of Kusanku - just the bit where the hands are separating. But unlike Kusanku, we're separating to one side rather than in the middle.
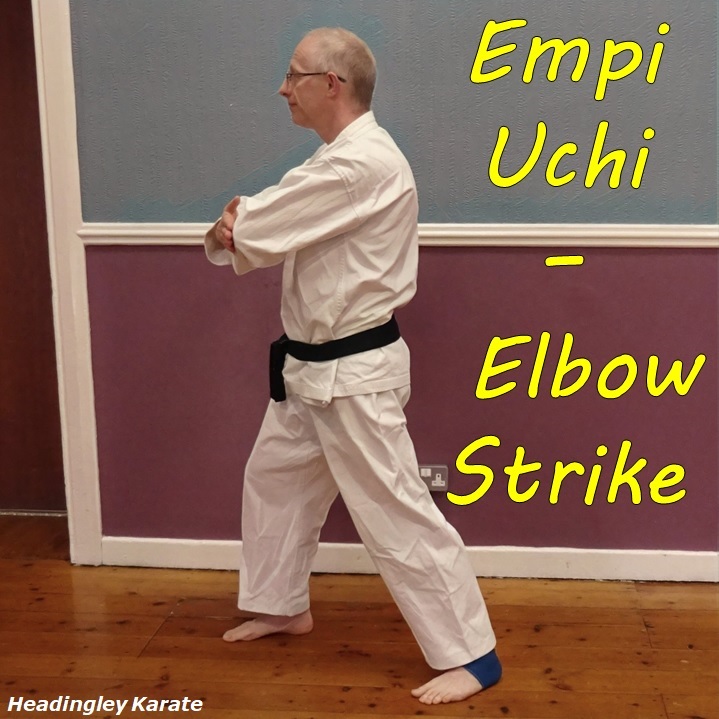
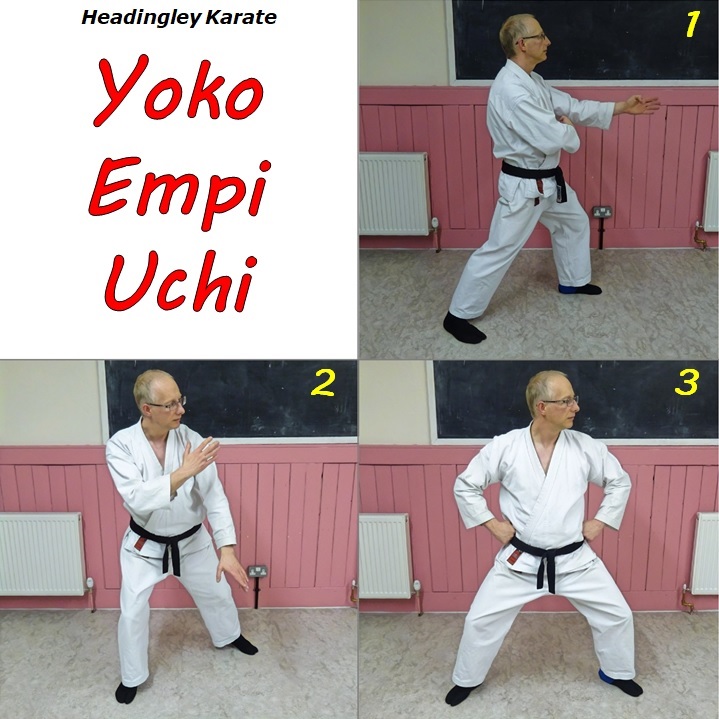
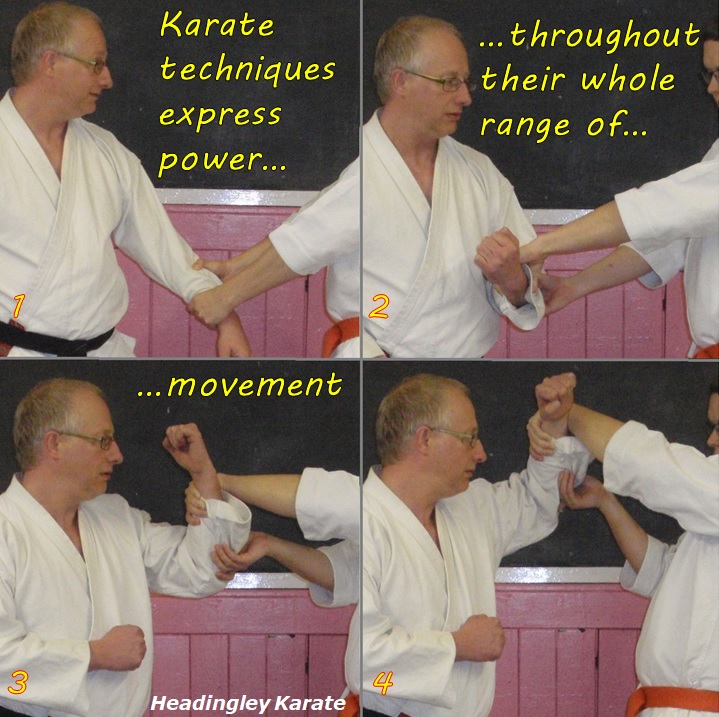
I've explored the mechanical principles involved in empi uchi, the basic elbow strike. The basic idea is to retract the other hand along the same 'hip/shoulder' line on which the elbow goes out, using the power of both arms working against each other. Contrast this with the use of hikite, which pulls the non-active hand back along its own hip/shoulder line. In that context, although the arms work against each other, they're pushing and pulling along their own hip/shoulder lines and so a circular component is applied to the force generated. Not so in empi.
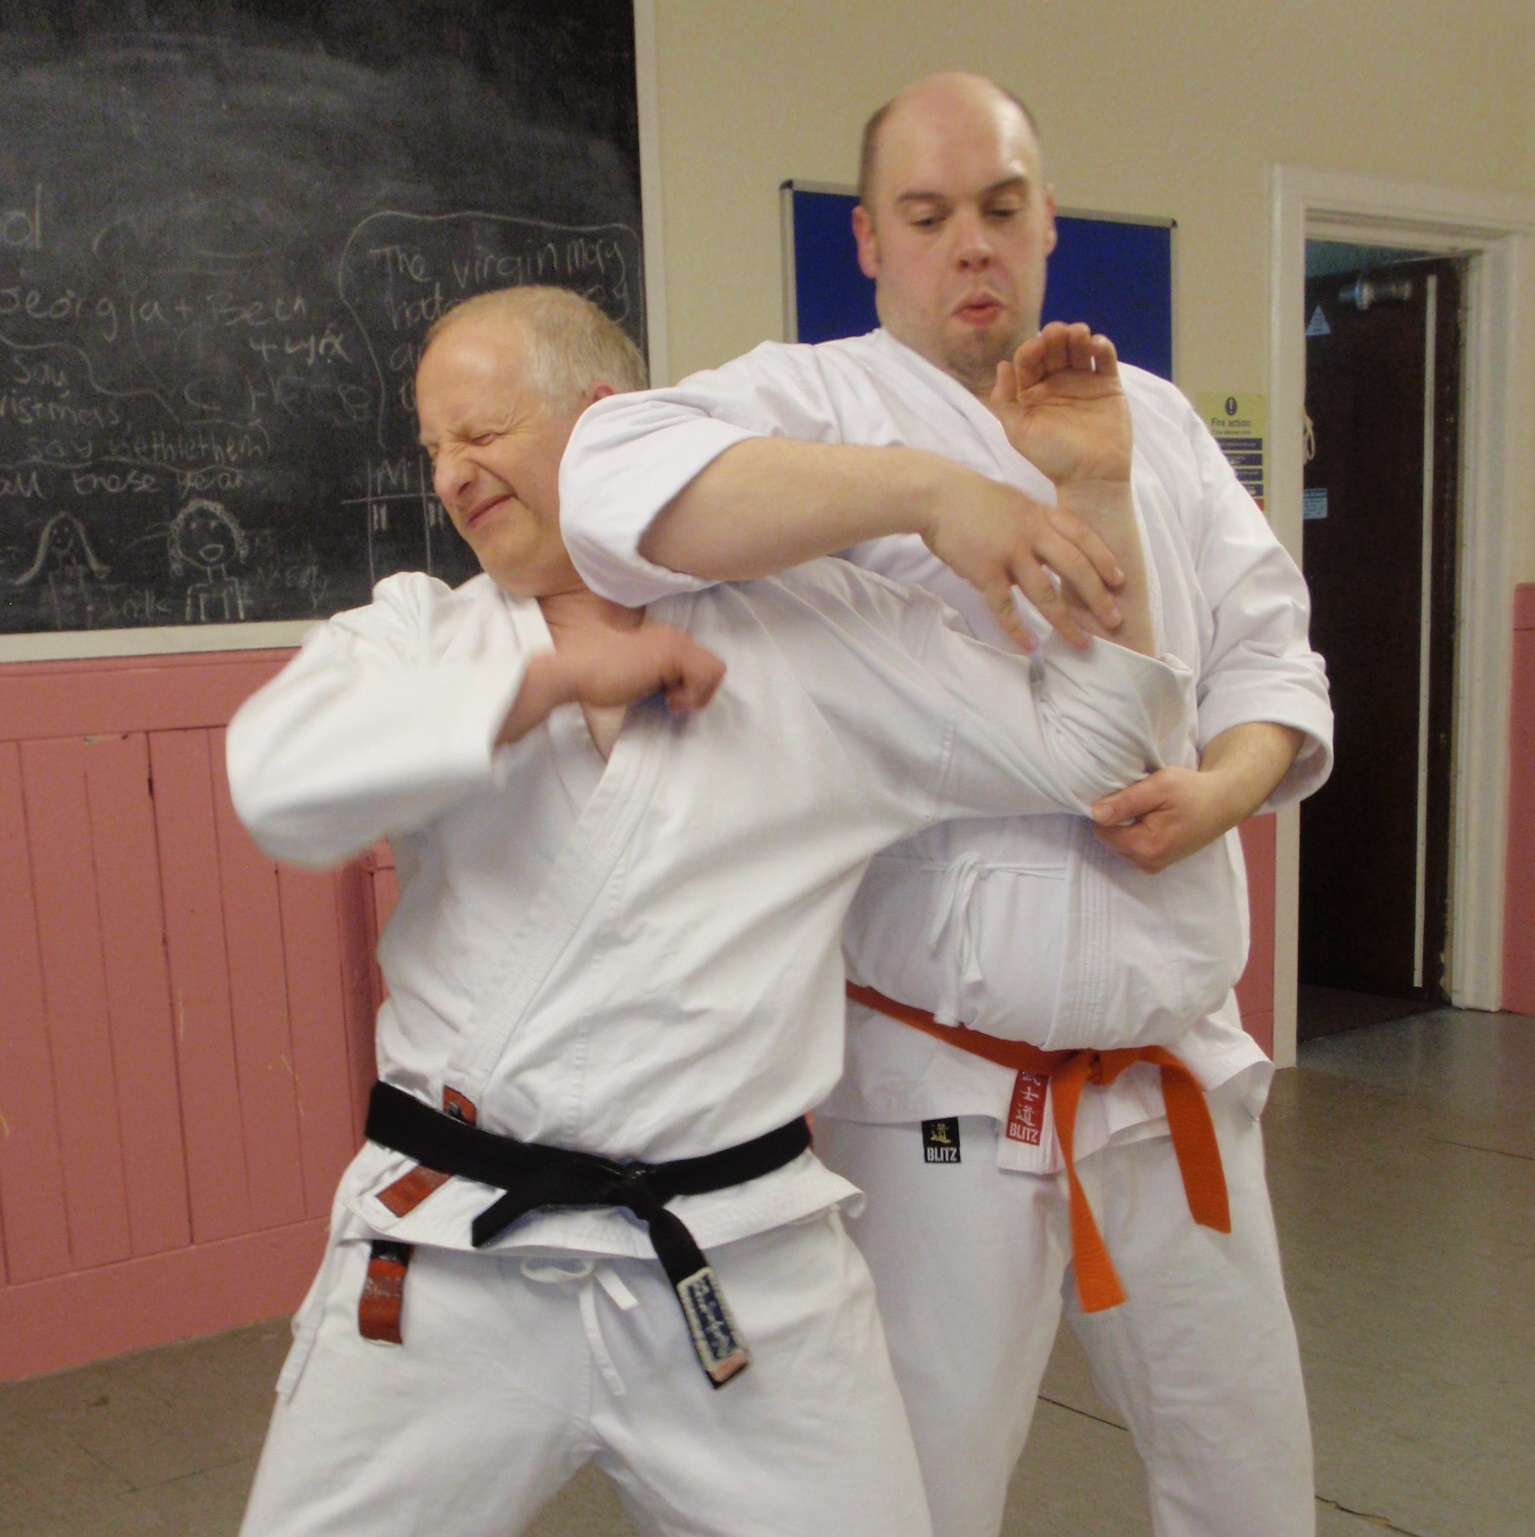
So how would we apply the empi principle? The obvious method is to strike with the elbow while pulling the enemy in with the other hand. There are variations on this theme but a basic one is as follows. From a clinch, when an opportunity presents itself and you have your hand on the back of the enemy's neck, you can pull the enemy into your elbow strike. You need to jerk them towards you for it to work. Pulling steadily and smoothly won't work.
That's OK. You've dramatically increased the power generated by pulling the enemy in while thrusting with the elbow. But it can be improved upon. You can encourage the enemy to throw themselves into the elbow strike. In photo 2 I've actually been quite specific about where I'm grabbing the enemy's neck. I've dug my fingertips into a kyusho or vital point - the vertical groove between the trapezius and rear border of the sternomastoid muscles, before jerking my hand back towards my left shoulder. Typically this produces a reflexive response in the enemy - they jerk their head forwards away from the stimulus. Then a slight change in the direction of my pull draws them towards my oncoming elbow. Mechanics and Neurology working together!
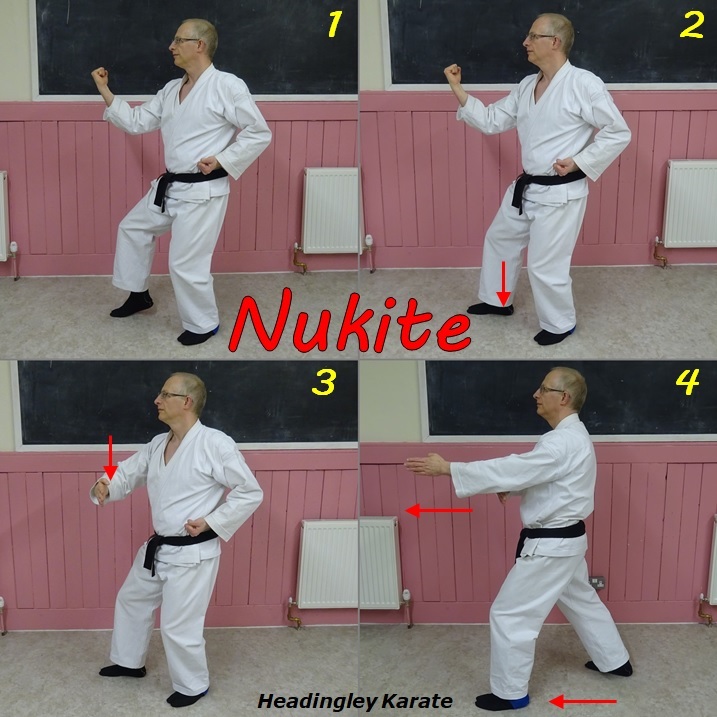
The next move in Pinan Daikou is empi uchi, an elbow strike to the front with the rear elbow. Its straightforward enough - as the elbow drives forwards the extended opposite hand comes back to meet it.
This move is found in Pinan Yondan, but its clear that the sequence in which it occurs is copied direct from Kusanku. Basically the same elbow strike occurs in Naihanchi and a variation (on a different stance) occurs in some versions of Passai.
But do you really need a kata to help you learn how to do an elbow strike? Probably not. At least not if all you're doing is striking with the elbow. But what about the other hand? The retracting hand comes back towards the same hip that has fired the elbow strike, ie. the opposite side to the standard hikite. In this respect empi is more similar to nukite than it is to tsuki. In other words, the power generation principle being practiced here is that of the arms working in opposition - one arm extending to present the elbow to the front while the other hand moves in exactly the opposite direction. And that therefore is what the bunkai should do, which I shall explore in my next post.
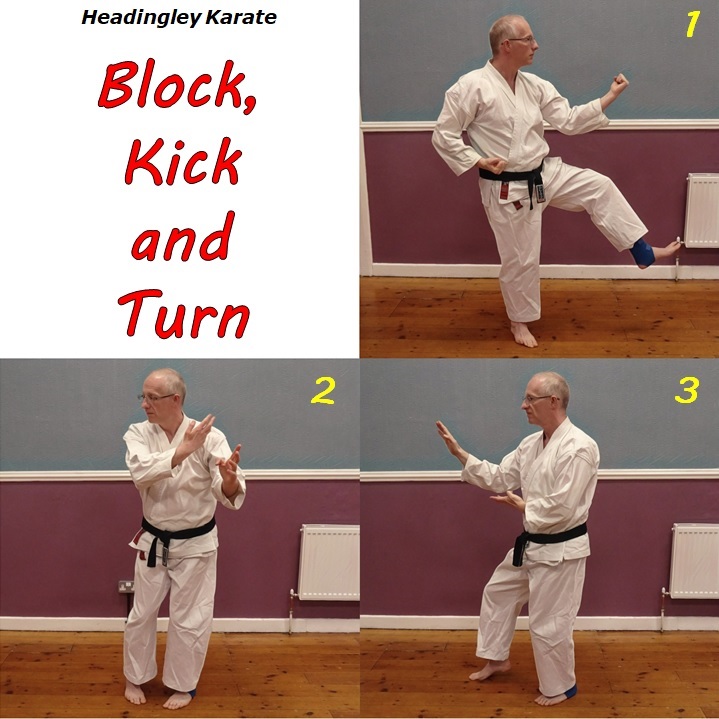
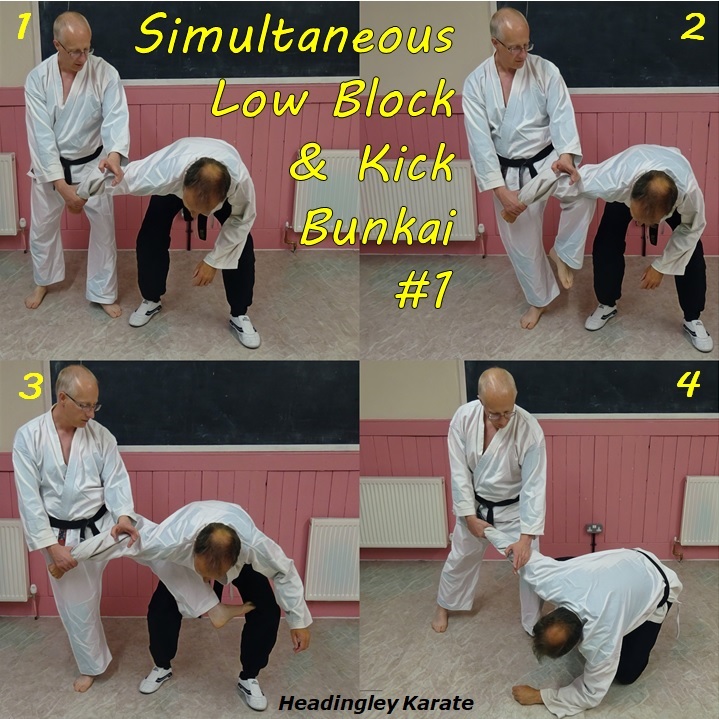
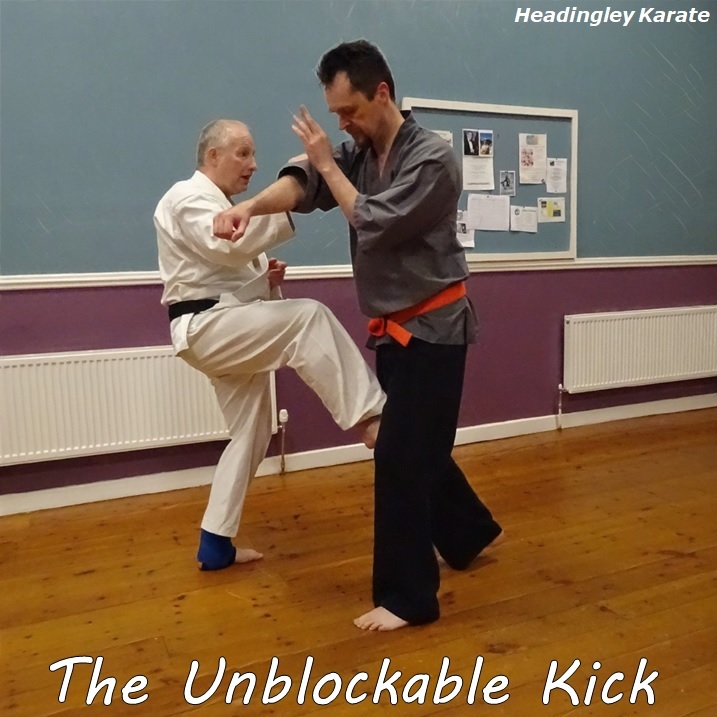
The mechanics of this move are straightforward. Its just the 2 individual components put together. The only question is how to put them together in a meaningful way.
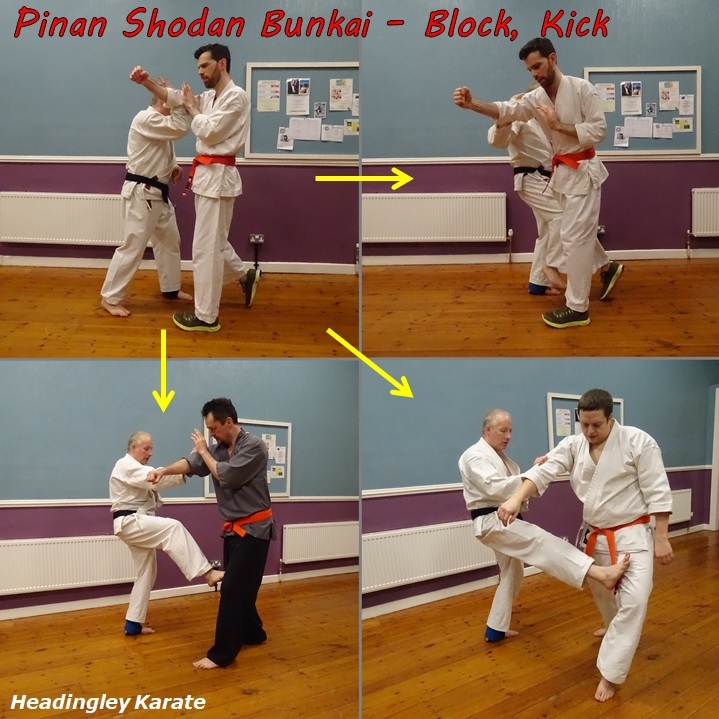
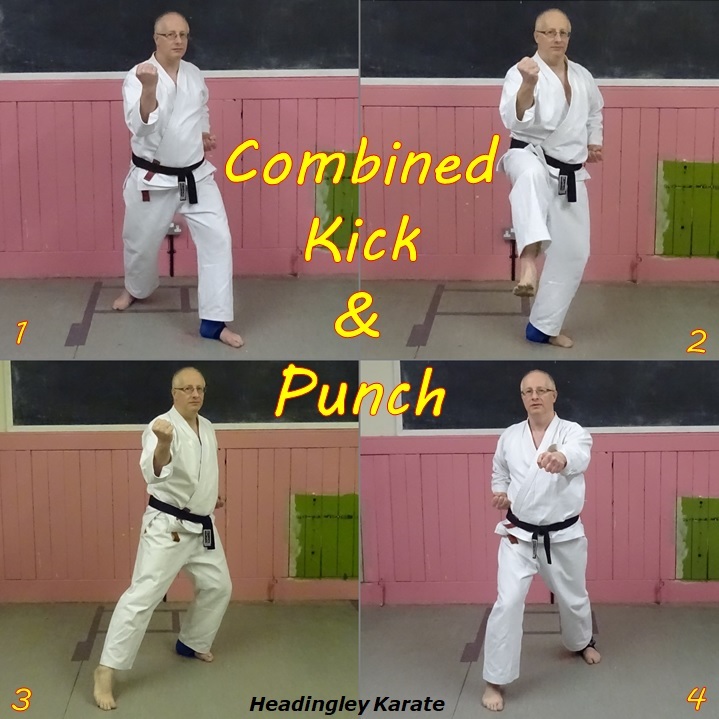
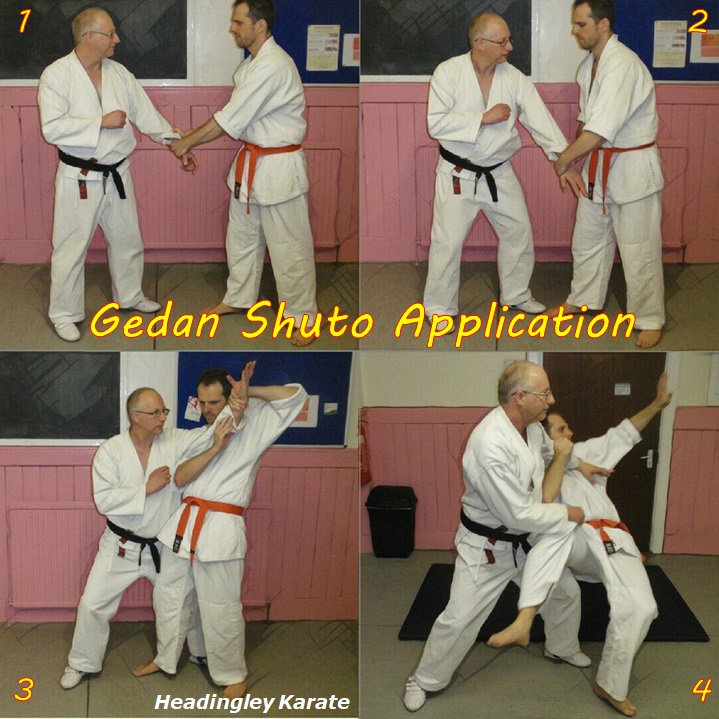
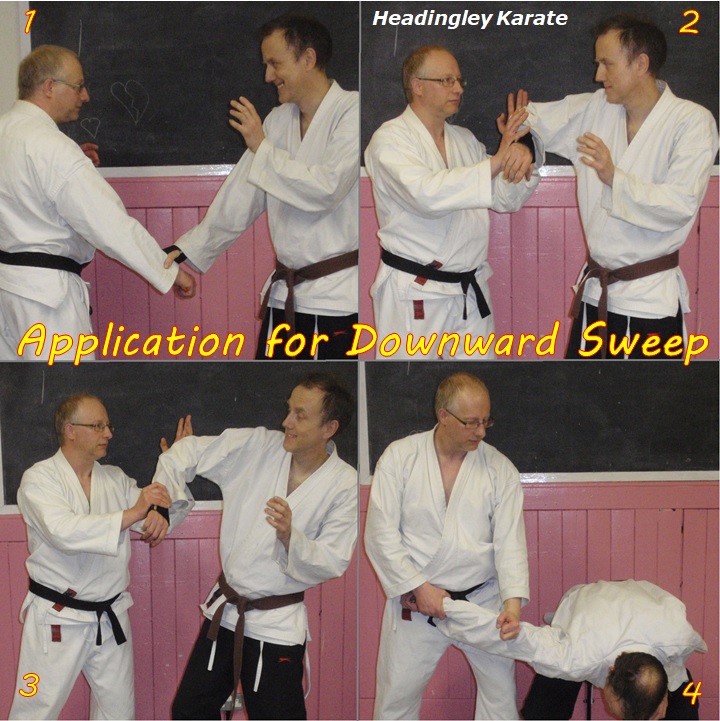
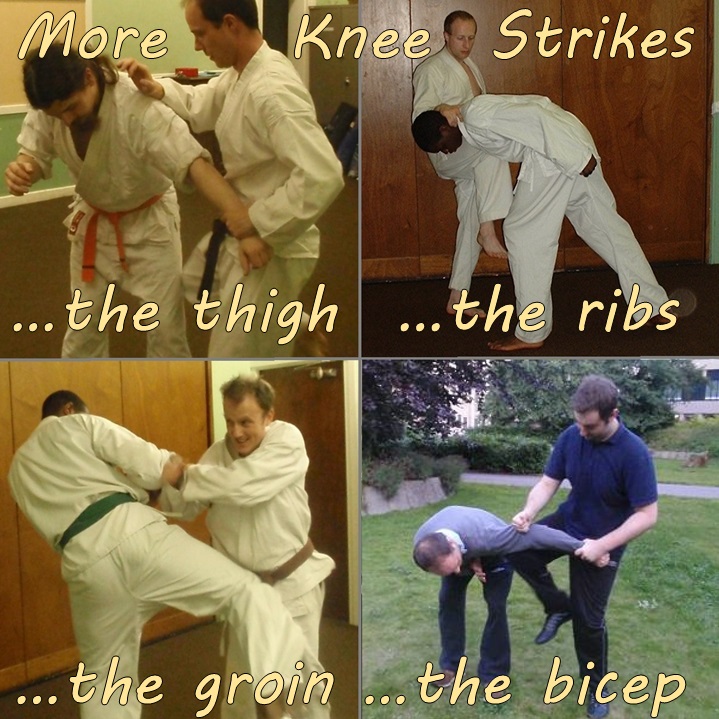
There are applications which use both movements simultaneously, but we can also offset the timing of the movements slightly. We could start to kick and then block, or vice versa. Its this idea that I want to explore here. In photo 1 I've started with one of my go-to applications of the downward block, that is an armbar used to drive the enemy forwards face down towards the ground. But I'm struggling, I haven't been able to lock their arm out straight and there's a serious danger that they're going to slip out of the lock.
Instead of just grinding away at the armbar, I change tack. I slide in and kick with my front leg. The target depends on the specifics of the situation. I could perhaps knee to the thigh or ribs to break the enemy's balance. Or the shoulder or bicep to disrupt their ability to keep their arm bent. In this instance, in photo 2, I've struck their bicep. I've followed it up in photo 3, without putting my foot down, by kicking the far leg in order to totally destroy their balance. This is by no means possible every time, but it was in this case so I took the opportunity.
Finally, in photo 4, I've put my foot down and carried on with the armbar. This time they don't have a hope of resisting.
Note that this is not 'block, kick, block'. The downward pressure with your arm should be maintained throughout the whole technique. It is the combined pressure that makes the 'block' and kick simultaneous, making the whole thing work. Indeed, the pressure can be really ramped up as you're putting your foot down after the kick, adding to the power of the technique.
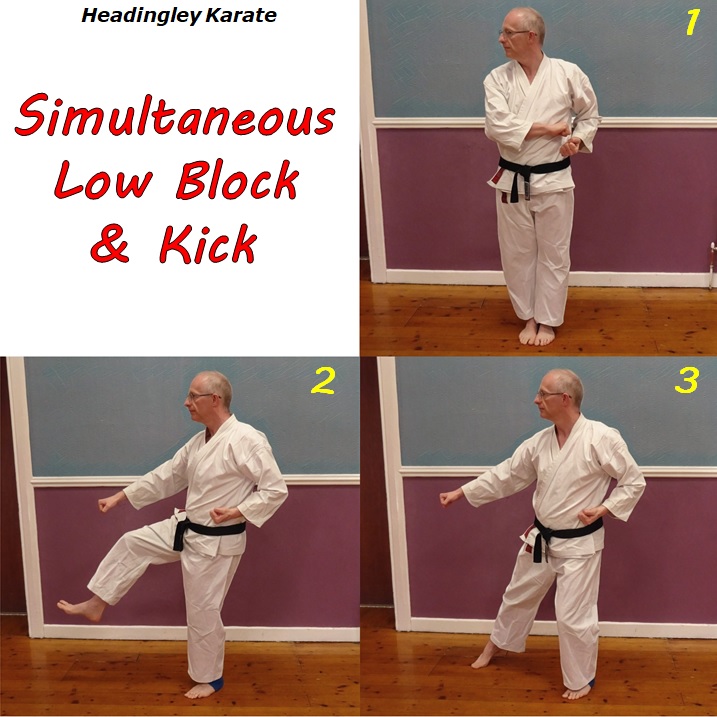
Back to our breakdown of the Pinan Daikou kata. This next move combines together a downward sweep and front kick. They are executed simultaneously to the side, starting from the 'stack hands at hip' position with the feet together. As the hands start together at the hip the usual chambering motion associated with gedan-barai (downward sweep) is not used. Instead the 'blocking' hand just sweeps across and down from where it is. The hikite stays where it is on the hip without moving. The head turns to face the target just before the technique begins. Whether, or when, you pivot on the supporting leg just depends on you. You can do so before, during, or after the kick - whichever works best for you at that moment. I've included here a photo of the recovery position, after the kick, to emphasise a few important points. Note the following: a) the ball of the foot touches down before the bodyweight is transferred onto that foot, b) the kicking foot is turned inwards slightly as it lands, c) the hip turns away as the foot lands. The result is that you can land with balance, without committing unnecessarily and be in the right place to deliver power into the next movement.
This movement occurs in Pinan Yondan, but it can be traced back to several classical Shorin Ryu kata. It is found, as is, in Kusanku. Slight variations occur in Passai and Chinto. Arguably it can also be linked back to the low block in Naihanchi, which starts from the same 'stack hands' position, albeit in a different stance and without the kick.
It was a pleasure to welcome Paul and Michelle Enfield to our dojo this week, along with John and Elaine Johnstone, the UK tour organisers. And of course, not forgetting the seminar participants. Most had travelled to Leeds for this session, some having come quite a long way. So expectations were high and I'm confident that everyone had their expectations met.
Paul and Michelle took us through some of their connector drills, designed to teach some core skills but also to act as a bridge between free movement and your techniques / bunkai. Practising bunkai in a lively (yet safe) manner can be quite a challenge - one that I know many people struggle with. Turning your kata application from a stilted practice to something that you could actually use in the heat of battle is not easy and requires much practice. I think these drills can play a very useful part in that process. In our dojo we already use drills that serve that purpose, most notably tegumi, but I can see us augmenting those with some (all?) of the drills we learnt from Paul and Michelle.
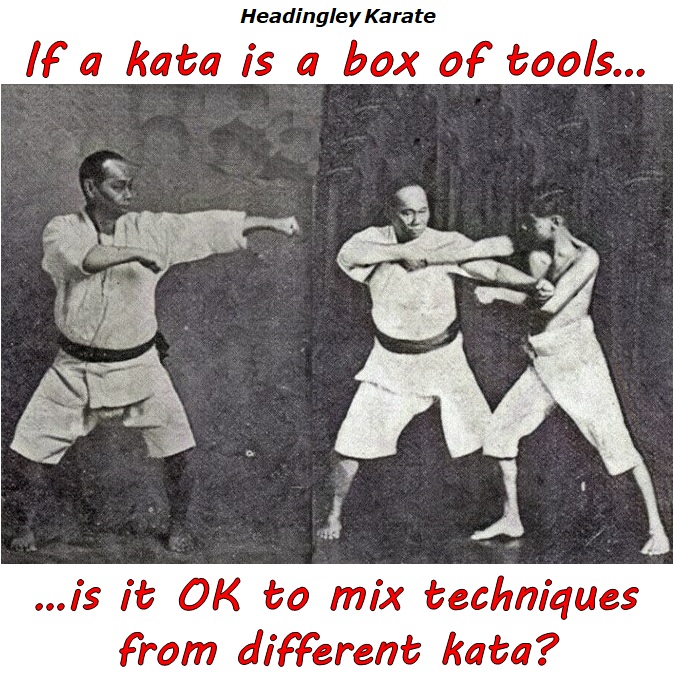
On to the techniques. For my club members some were familiar, some variations on a familiar theme and some completely new. However, Paul and Michelle went to pains to stress that the techniques themselves were not really the important part. You could do another style of Karate or another martial art, it wouldn't really matter. You could easily add techniques of your choice onto the connector drills. And that is the point - to help you develop the ability to apply your techniques in a realistic situation.
Many, but not all, of the seminar participants were Goju based. As were the instructors. The Goju focus not an issue for me, nor I think my students, despite being rooted in the Shorin Ryu tradition. What I saw, both the connector drills and the techniques, was absolutely in keeping with the principles and approach in our tradition. I think it was Choki Motobu who said that the only real difference between Shorin Ryu and Goju Ryu was one of training methodology - in terms of tactics they are the same. I agree with this, the principles and tactics of both traditions are the same, and this seminar was an excellent example of how to train those principles and tactics. If you're interested in practical Karate I would highly recommend training with Paul and Michelle Enfield. I certainly hope that we'll get the opportunity to do so again in the not too distant future.
More pictures can be found on our facebook feed here:
This post was inspired by a recent discussion on a facebook page, but it's a thought process I've gone through before. People talk about the artistic side of martial arts. They talk about creativity and self-expression, but is it really artistic?
Dictionary definitions of art certainly seem to involve the word creativity. But to me what really defines art is that it has, or is intended to have, aesthetic value. It pleases or otherwise stimulates the human senses.
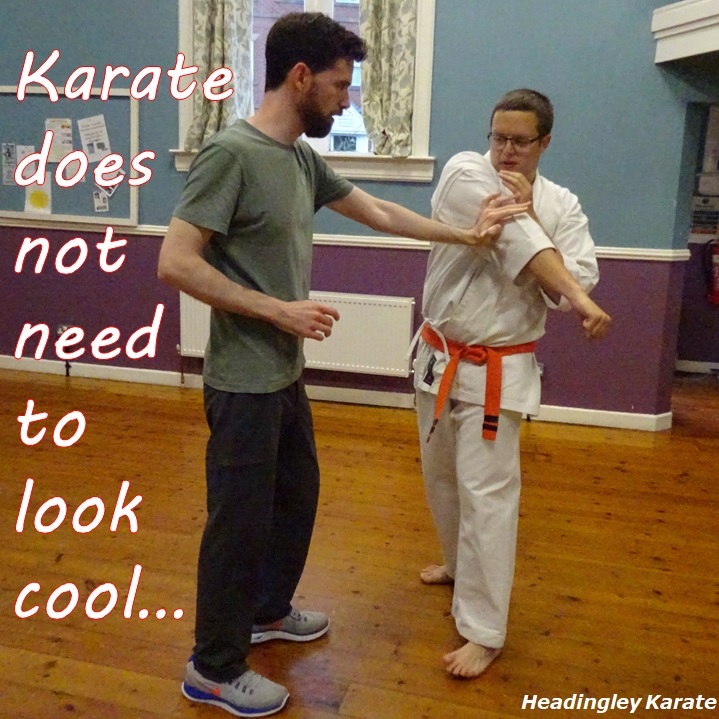
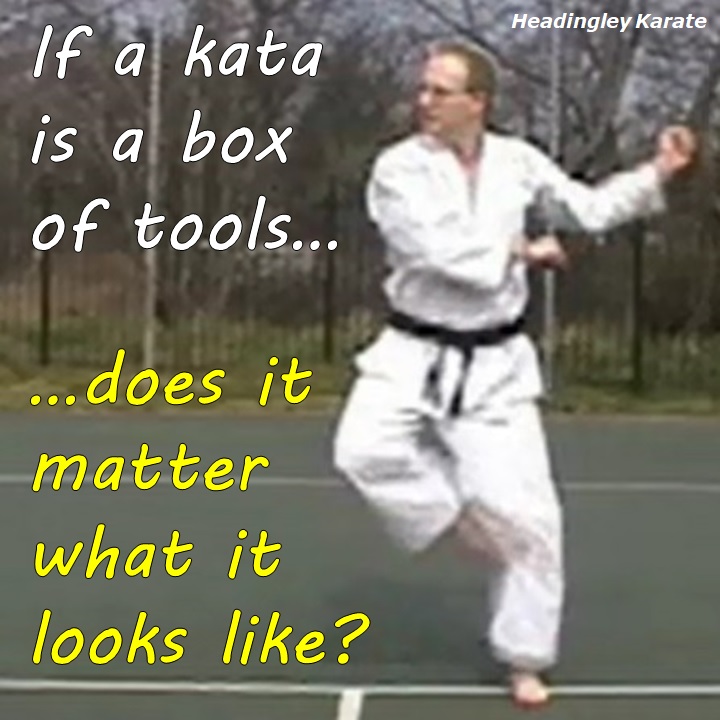
Now if you do Extreme Martial Arts I can see why you'd be concerned with aesthetics. Or if you do kata competition, then you'll need the kata to look precise and powerful. Or even points sparring, the techniques will need to look a certain way in order to score. But if self-defence is the goal then functionality is what's important, not aesthetics. I think a lot of karateka lose sight of that fact. They spend so much time concerned with how their Karate looks that they confuse its aesthetics with its functionality. They want to be able to defend themselves and 'look good' while they're doing it. This is pure fantasy.
I may express creativity in my martial art, in terms of how I combine techniques together, or my approach to bunkai, or even in the methods that I use to teach others. But that's not artistic in my opinion. Its concerned with functionality and also the beneficial health effects on the practitioner. There is no aesthetic intent - any aesthetic you may observe is purely in the eye of the beholder. I think there are better terms we could use to describe what we do. Civil defence tradition perhaps? Or martial science? But 'martial art' is, I'm afraid, the term we're stuck with. Even so, the only art in my martial art is the artwork.
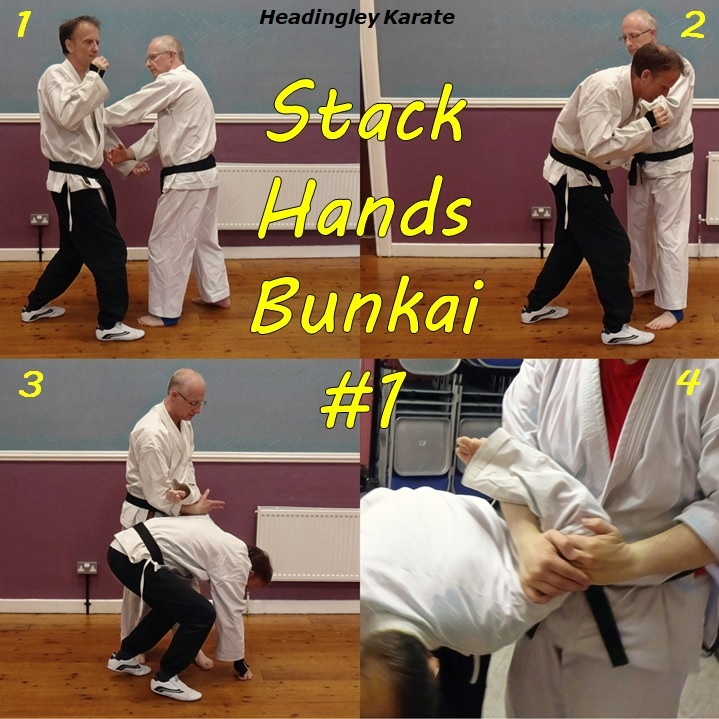
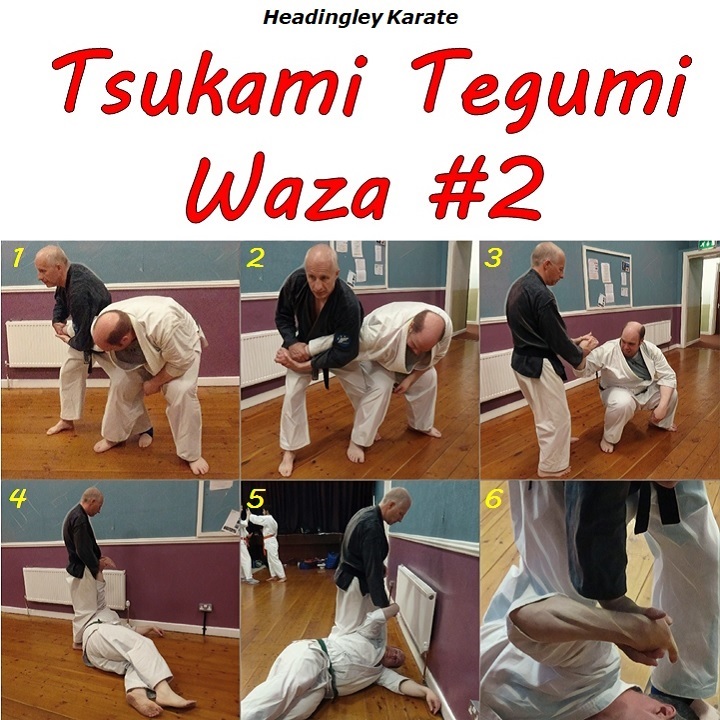
Like the previous move in Pinan Daikou, stacking hands is quite unimpressive to look at. It is neither athletic nor, at least to a casual observer, difficult to perform. Despite that it embodies powerful mechanics that have numerous highly effective and useful applications.
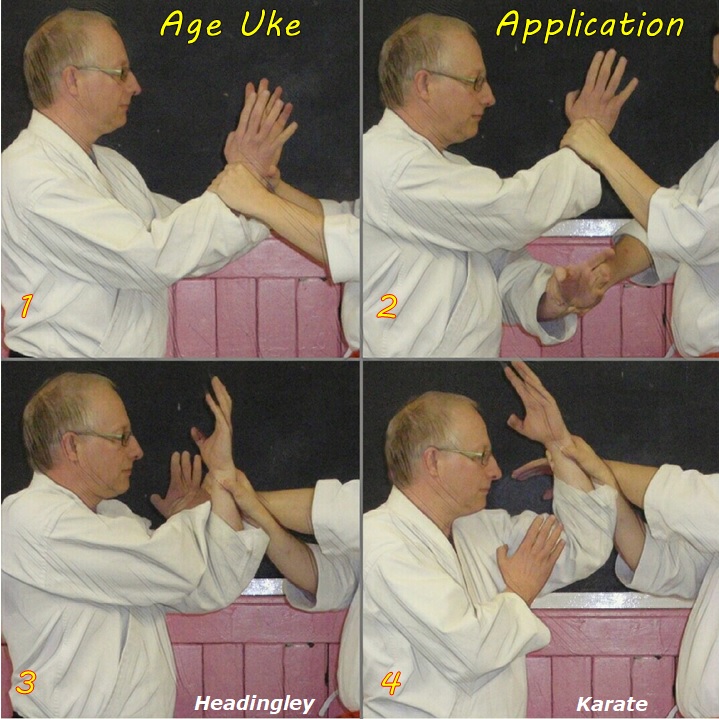
The mechanics I want to explore here are not about the initial stacking, but about moving the stacked hands from one hip to the other. Naturally this movement incorporates forearm rotation. The left hand, retracting to the left hip, supinates while the right hand, extending away from the right hip, pronates - all in accordance with established principles of power generation. At least as importantly, as the stacked hands move from right to left the body moves to the right and pivots to the left. The combined effect produces considerable power, done correctly it produces a feeling of 'creating a hole' for the enemy to fall into. It's great for manipulating something close to your centre, such as one of the enemy's joints.
In this application the joint I've chosen to manipulate is the enemy's elbow. Having blocked their left uppercut and struck them in the face I take control of their elbow by seizing it from the outside with my left hand and from the inside with my right. I move my hands from my right hip to my left, combining this with the body movement, to control and partially lock their elbow and shoulder. This should drop the enemy to their knees. Pictures 1-3 don't show the arm movement very well but they do show the correct foot movement - first stepping forwards with the right foot, then pivoting to the left. Picture 4 shows the stacked hands position from a different angle, bending the enemy's arm and controlling their shoulder.
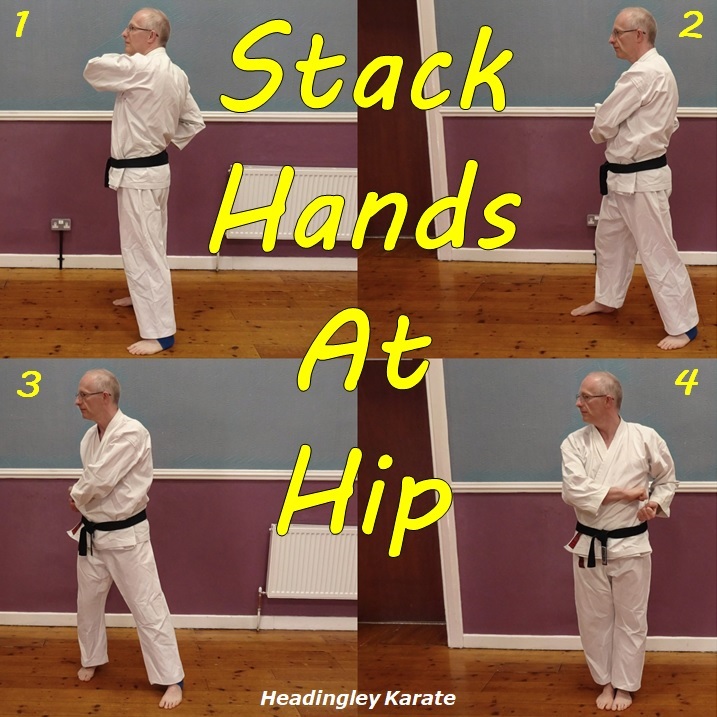
This next posture in Pinan Daikou is one that should be recognisable to any Karateka. It is of course the 'stacking hands' at one hip posture. There are several different ways to get into the posture, both in terms of what the hands are doing and what the feet are doing. We see it in several different places in the Pinan kata, especially if we include its very close relative the 'hook punch' near the start of Pinan Godan. It can be found in many of the classical kata.
I practice it here as follows. From the previous posture (picture 1) I drop my upper hand straight down on to the other hand, this is the first instance of stacking hands (left on top of right). From there I immediately step forwards with my right foot (picture 2). I then pivot, turning left through 90 degrees as I draw my left foot to my right, at the same time moving my stacked hands from my right hip to my left. As my hands move across both forearms rotate so that their orientation reverses.
The arm movements are principally inspired by Pinan Godan in which, in some versions, the fists stack on one side of the body before moving to the other side. The footwork is also inspired by the same move but its equally inspired by the Goju Ryu kata Saifa. Combining the fist stacking with the step forwards and turn I'm sure will be instantly recognisable to Goju Ryu practitioners as the opening move from Saifa.
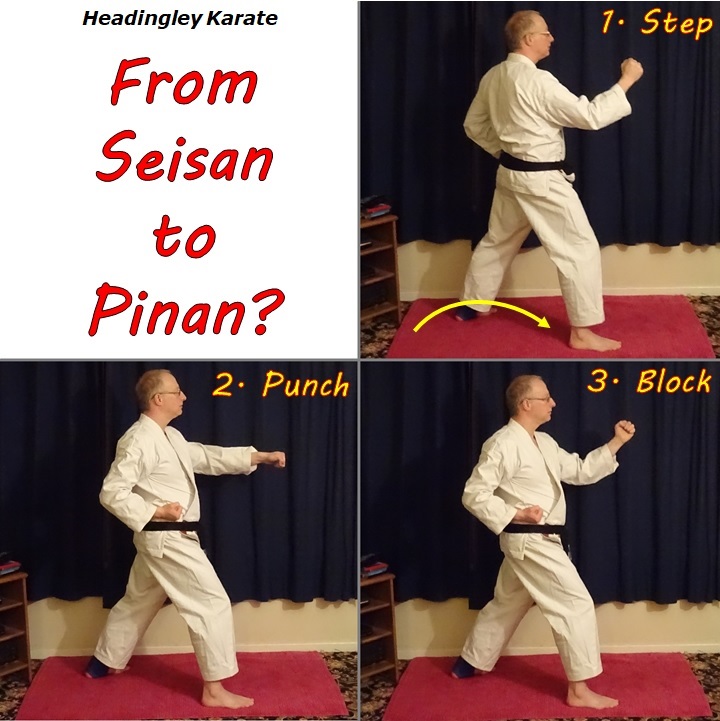
I recently posted a description of this move from Pinan Daikou (also Pinan Sandan). It didn't get many social media likes. And why should it? Who wants to see an ageing geezer like me step forwards and turn round? It wasn't athletic. Nor difficult to perform. Frankly there was nothing sexy about it at all.
Here's the deal - Karate wasn't designed to look sexy. Not athletic, not impressively difficult to do, not cool, not exciting. None of those things are useful in self-defence.
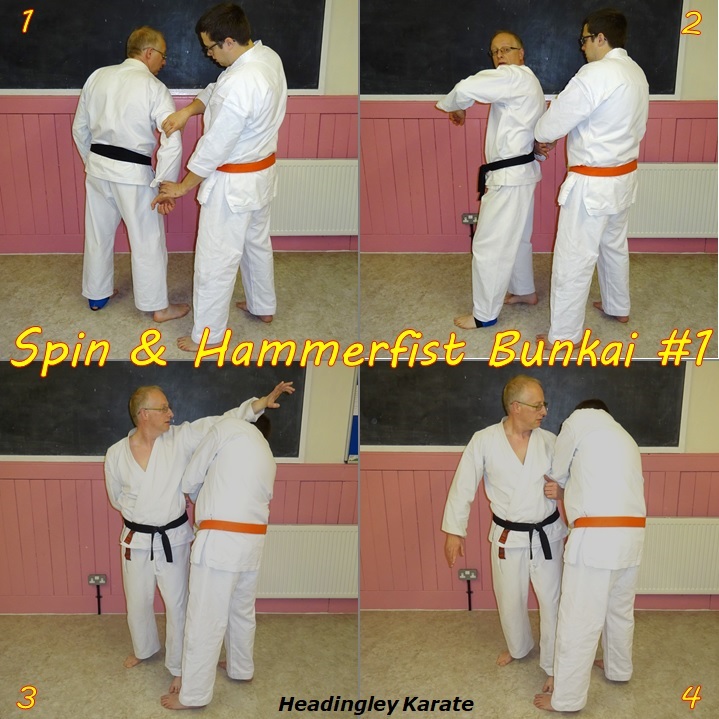
But if we look at application perhaps we'll find that's where the magic happens. Imagine you're trying to apply an armbar, as in picture 1. You've already stepped or driven forward with your left leg but, for whatever reason, you can't make the armbar work. Immediately change tack. Pivot around your left foot, turning your whole body to your right. Instead of the left arm being the prime mover it now becomes a pivot point for the attacker's arm to move around. Your right hand pulls the attacker's wrist around in a circle to the right, not with the strength of your arm but using the rotation of your whole body.
Its very difficult for the enemy to resist, partly due to the amount of force that can be applied in this manner, partly due to the sudden change in direction and partly because, as you pivot, the direction of force constantly changes. The movement itself, done solo, may not look impressive but its effect is, as photos 2 – 4 show.
So it's the mechanics of the spinning footwork that's most important here, rather than what the arms are doing. Although the arm movement is similar to the kata its not identical, however both involve moving the hands to your right in support of the body's rotation, before settling back into an application of gedan barai.
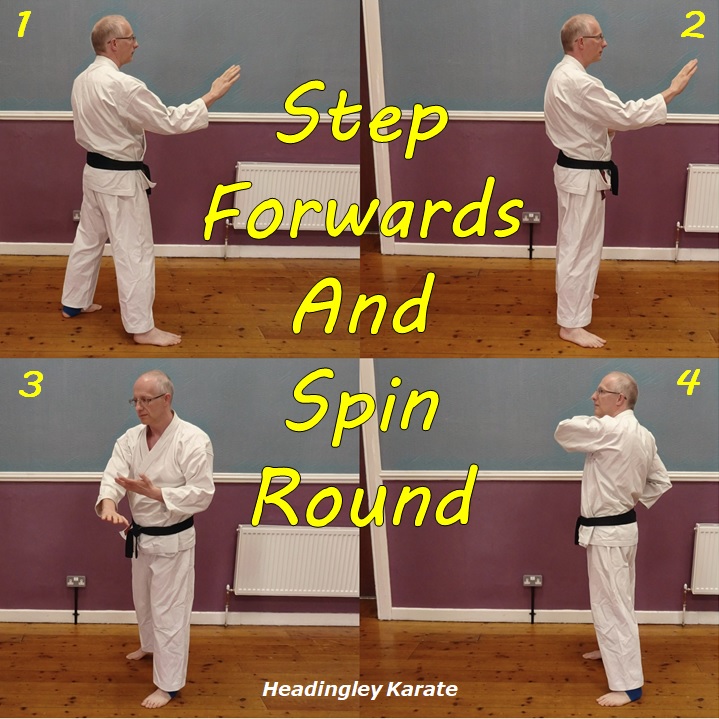
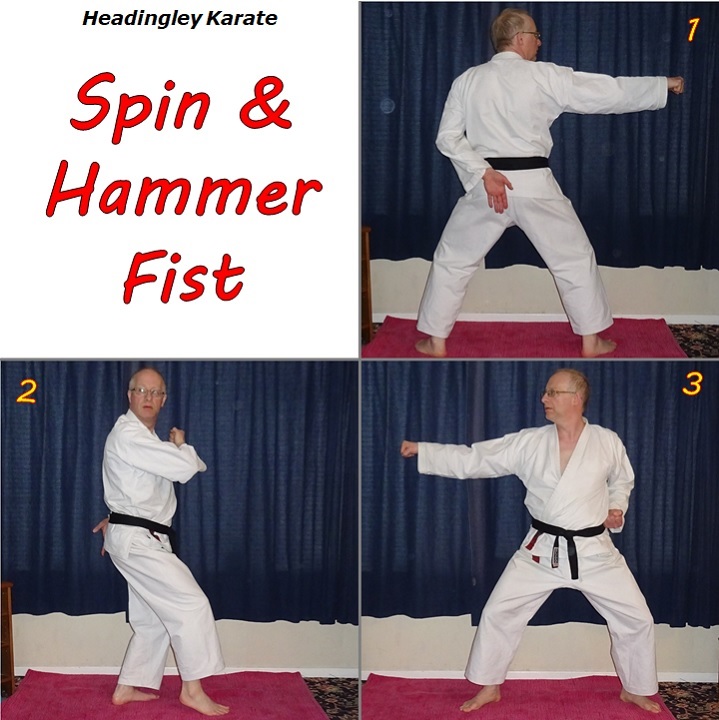
This next movement in Pinan Daikou is copied direct from Pinan Sandan. It's the turn just before the end of Pinan Sandan. The sequence here starts with the previous movement (shuto), in picture 1. From there step forward with the left leg into a parallel stance, feet shoulder width apart (picture 2). Then start to spin round to face the opposite direction, moving the right foot and pivoting on the left (picture 3). As you complete the move let the arms move in the same direction - the right fist retracts to the hip while the left fist comes up to the opposite shoulder, as if executing a left elbow strike (picture 4).
In terms of its origin this move is a mystery to me. I know of no precedent for it in any of the classical Shorin Ryu kata (that I practice) - either in terms of the foot movement or the arm movement. I think that the mechanics expressed in this movement were practiced in the Shorin Ryu of old, but not explicitly embodied in kata. So Itosu, or whoever it was that created the Pinan kata, decided to make it explicit in his kata. Exactly what that mechanic is will be the subject of my next discussion.
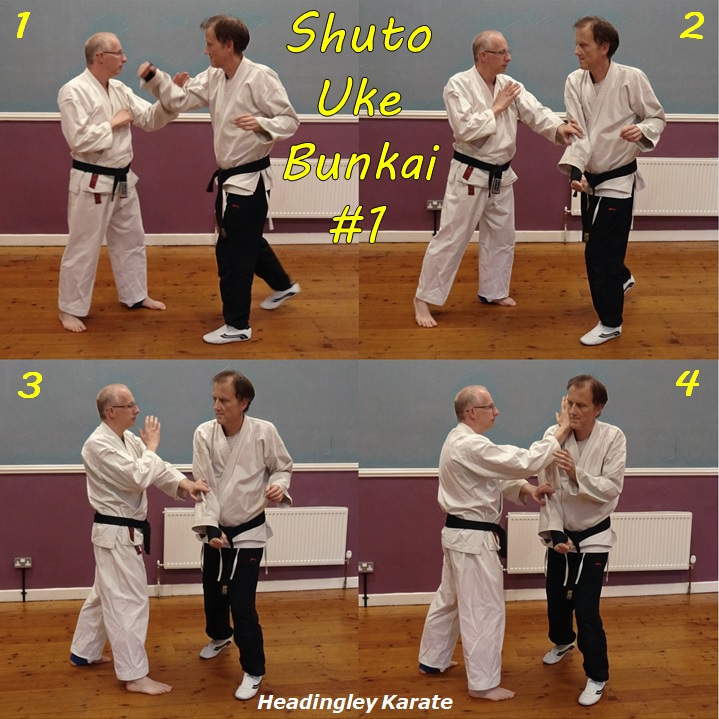
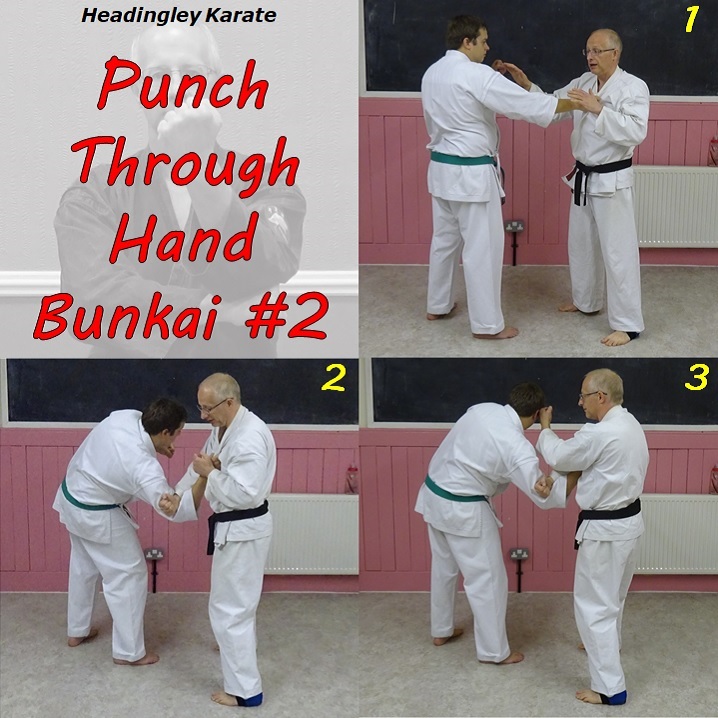
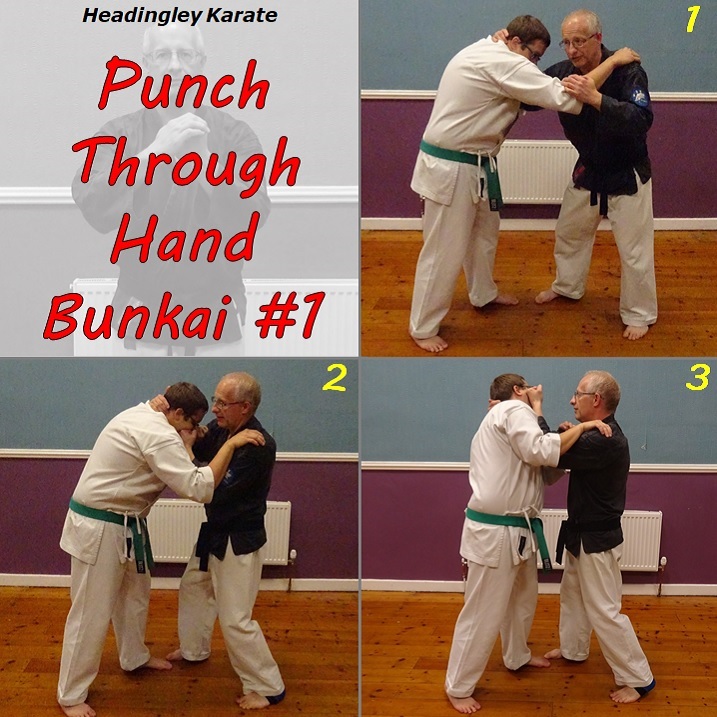
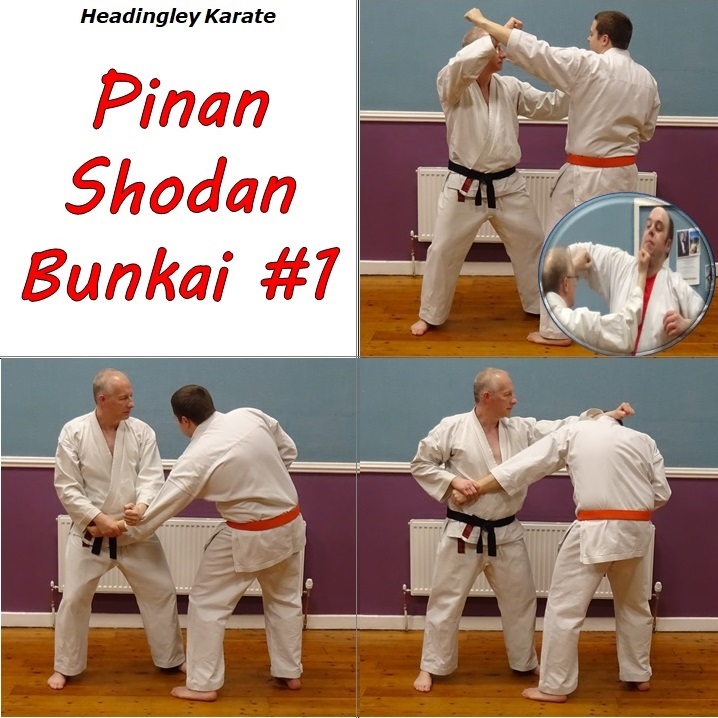
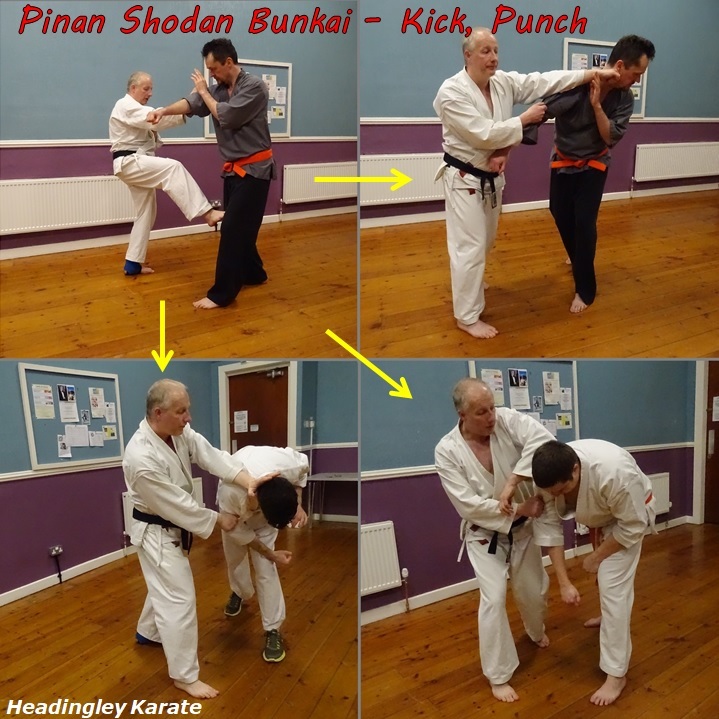
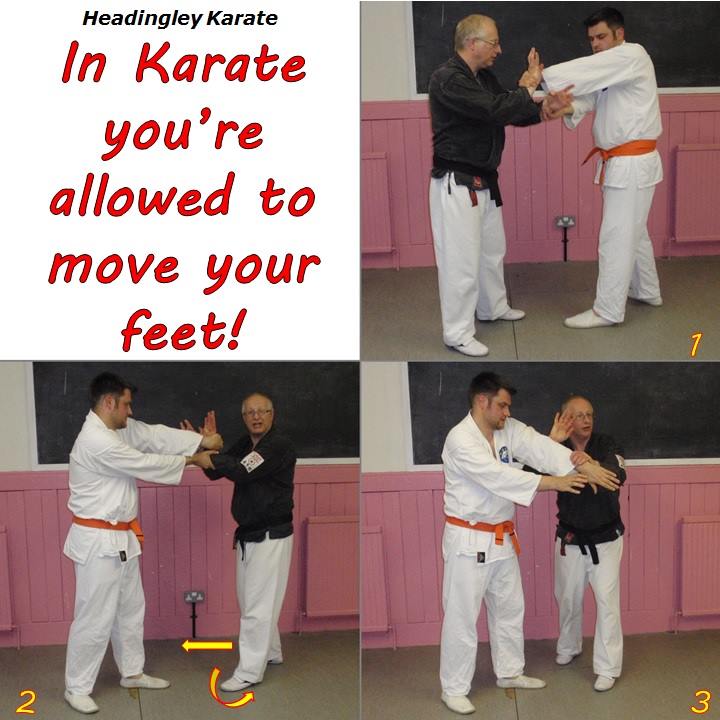
Imagine you're stood left foot forward and the enemy throws a straight right punch to the face. Check it from the outside with your left hand or wrist. Although you're likely to intercept their forearm you need to slide your hand to their elbow as the punch extends. Press their elbow, pushing it inwards across their body. This turns them away - if done correctly they will not be able to punch with the other hand. Step forwards, using the step to keep the pressure on their elbow. As your foot lands strike with shuto to the neck. Don't take your hand off their elbow as you strike. Instead, maintain the pressure.
Some points of note...
Firstly, remember the first rule of Karate Club - never strike your training partner in the neck. And the second rule - NEVER strike your training partner in the neck! Striking the neck is intended to kill or maim. Practice this technique with care, use appropriate restraint in self-defence. If its not a life or death situation better to change it into something else, a backfist to the temple for example.
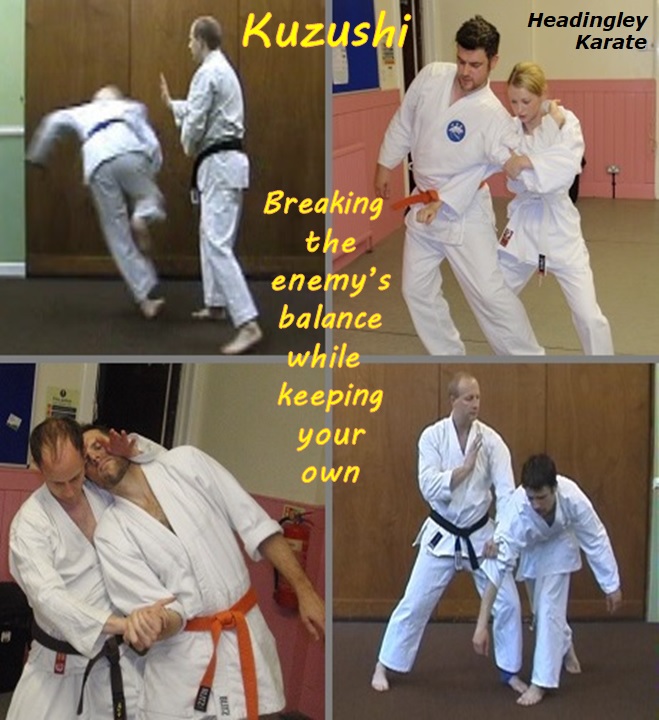
Secondly, control of the enemy's elbow is critical. It enables you to achieve and maintain both muchimi (sticking) and kuzushi (balance control). Note the use of the word 'maintain', to achieve it then lose it isn't good enough. Only by maintaining control as you step forward can you be confident of preventing a punch with their other hand.
Thirdly, it doesn't matter which part of your arm you strike with. It could be the edge of your hand or your distal forearm, whichever is at the right distance.
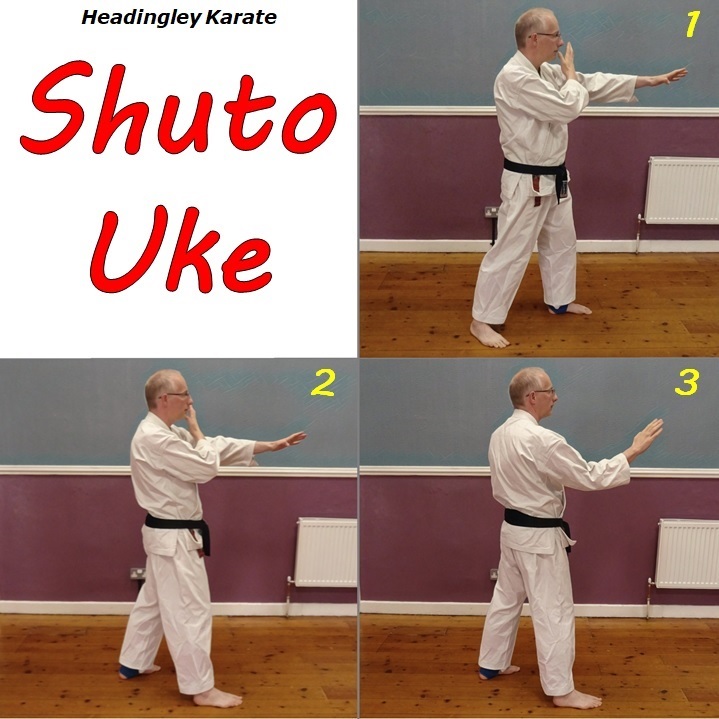
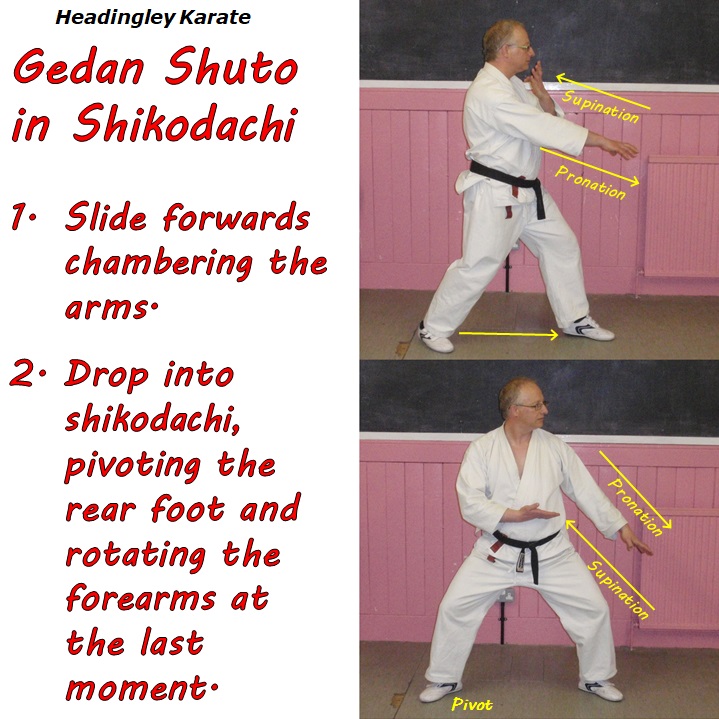
The next move of Pinan Daikou is Shuto-Uke, knife-hand 'block'. The mechanics of this move are quite straightforward. From the previous posture (shikodachi) begin to step forwards with the right foot. At the same time begin to extend the left hand, palm down, and draw the right hand towards your left ear, supinating it as you do so.
Step forwards into a short right forward stance, completing the above arm movements as you do so. The moment the foot lands fire the Shuto - retract the left arm to the midline, supinating it as you do so, and extend the right arm, pronating it. The end position for the right arm is bent at 90 degrees, with the hand at shoulder height.
The arm movements will be instantly recognisable to practitioners of most modern styles, but the stance probably looks quite alien. Modern styles often use back stance but you don't generally see this in the older Shorin Ryu styles. In Shorin Ryu a smaller stance is typically used - our standard version uses a small forward stance, but cat stance is appropriate for some applications.
Power generation can come from several different components - the extending right arm, the left arm can also assist by moving in opposition, stepping forwards can add the momentum of the whole body. That's why back stance isn't used - you can't project energy forwards in a back stance. Hip twist is not relevant here, other than to facilitate correct stance.
In terms of its origin, Shuto is clearly copied straight from Kusanku, in which you can find the same sequence of 4 Shuto's as appears in Pinan Shodan. But actually Shuto appears in a number of the classical Shorin Ryu kata. A slightly different version even appears in Naihanchi, the root kata. So Shuto can definitely be considered a ubiquitous principle in Shorin Ryu.
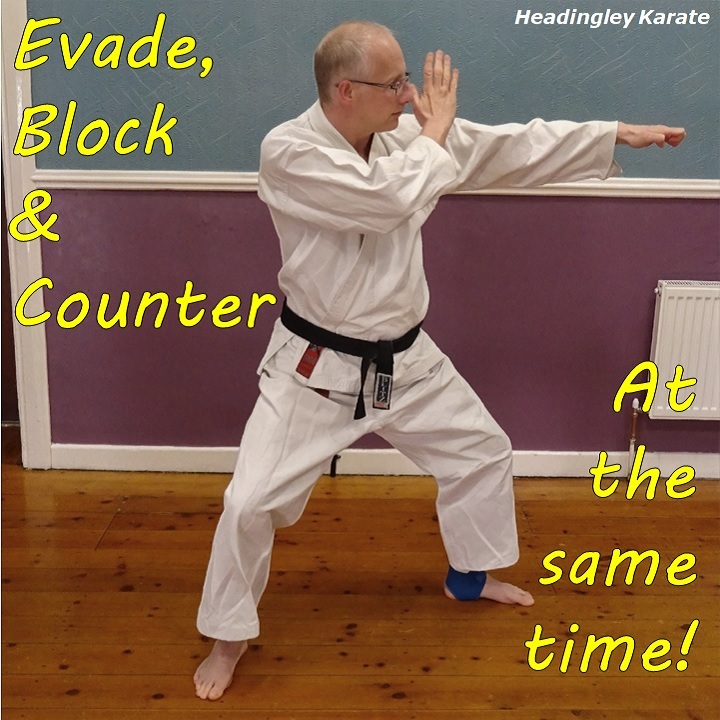
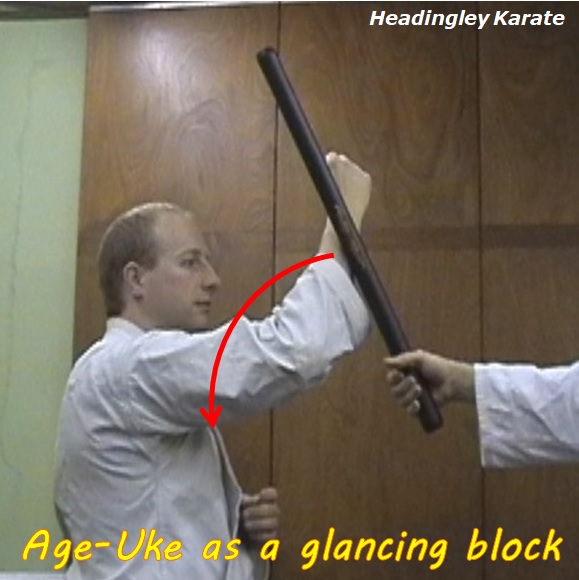
Well there's a clue in the name. As the photo shows, it is straightforward enough. As the enemy drives in with one or more punches slide back, preferably to the outside, cover the incoming punch with a rear hand glancing block, and punch. Not Ichi-Ni-San (1 2 3) but all together at the same time. The straddle stance, at an angle, gives us an advantage in distance for the counter-punch. However it is turning the body away to a degree, so it isn't the optimum way to orientate ourselves relative to the attacker. So the counter punch really needs to count in order to arrest the attacker's forward motion. I envisage this working well in an 'oh-sh*t' situation where you're partially taken unawares and forced to recover from that. If you can counter at the same time as shrinking back and blocking that's going to improve matters considerably.
A variation on this theme I think can work well for tall people with long arms. As you see the attack coming simply drop back, this time into a cat stance, and catch the oncoming attacker with a jab. Cover their punch but aim to hit them with your jab first simply by outreaching them. The cat stance helps to draw your head back slightly and down, away from harm's way, without impeding your punch. If you have the right physique for it this can work very well.
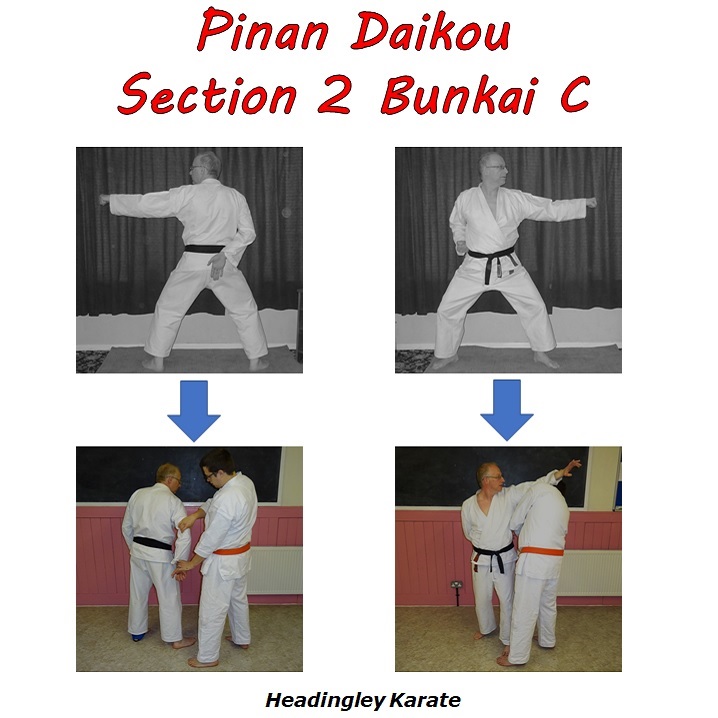
This is the second move of the final section of Pinan Daikou. Like the first move, its an alien - its not a technique from the original Pinan kata or even direct from any Karate kata. I've introduced the move myself to explicitly express what I consider an important principle - that is to simultaneously evade and block and counter-strike, all in one move.
The movement is straightforward and completed in one step. From the previous straddle stance, look to the left and step forwards with the right foot. This puts you in a straddle stance but at 45 degrees to the orientation of the kata. At the same time raise the right hand to perform an inward block, and punch to the left with the left hand. The stance and orientation to the oncoming attacker should create a distance advantage as they throw their punch, but I help this along a little by explicitly using hiraken (foreknuckle fist) to create that little extra reach. What fist you actually use should be determined in the moment by your choice of target and orientation to the attacker. And that's all there is to it.
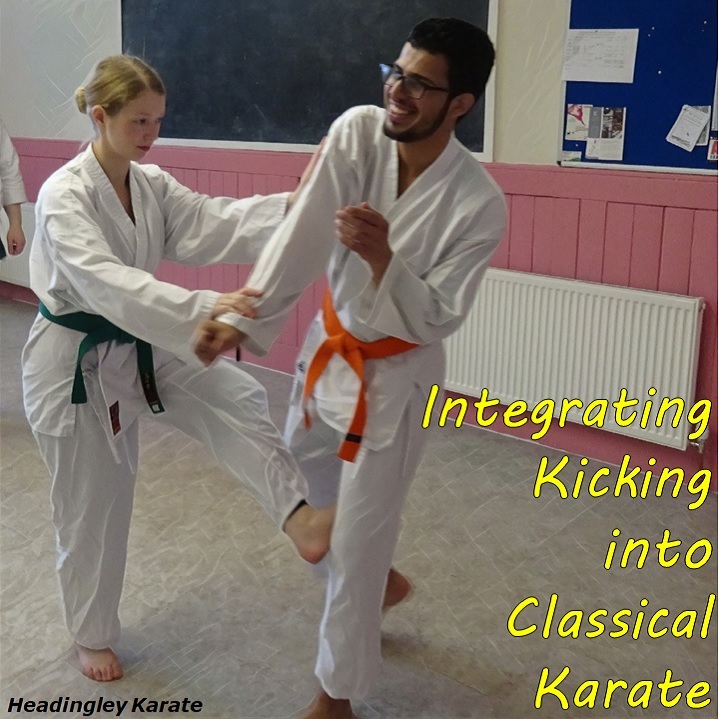
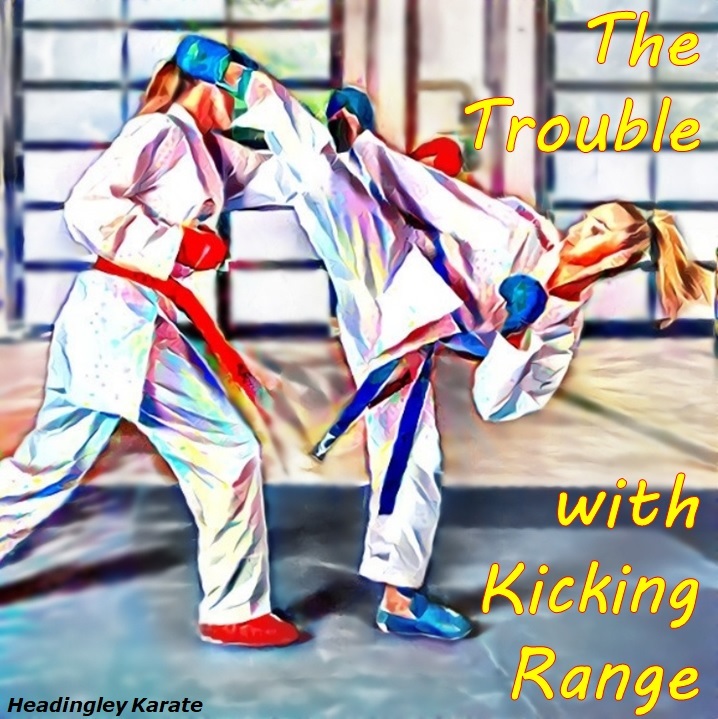
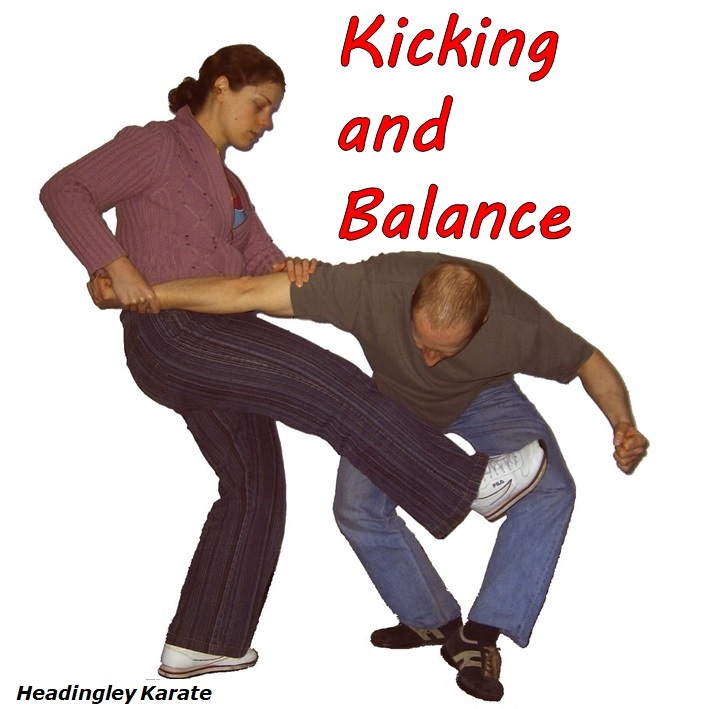
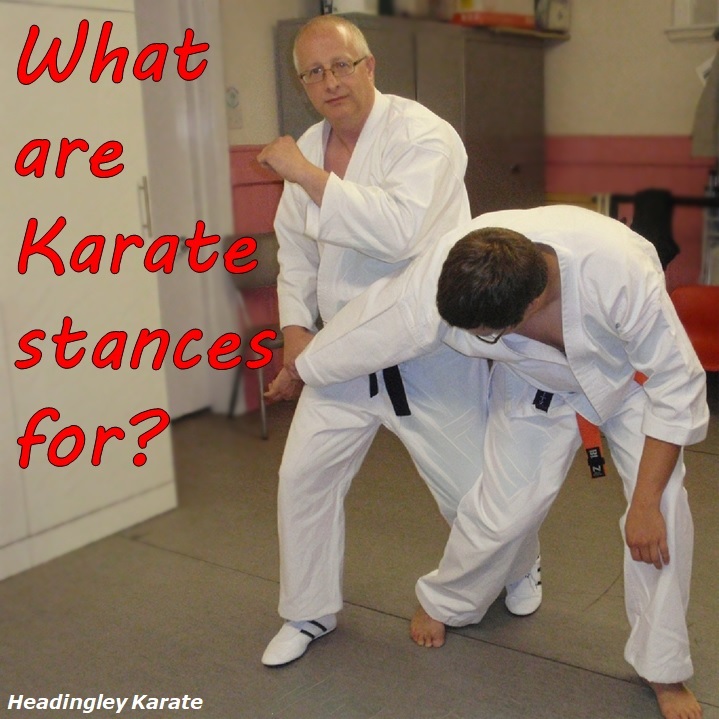
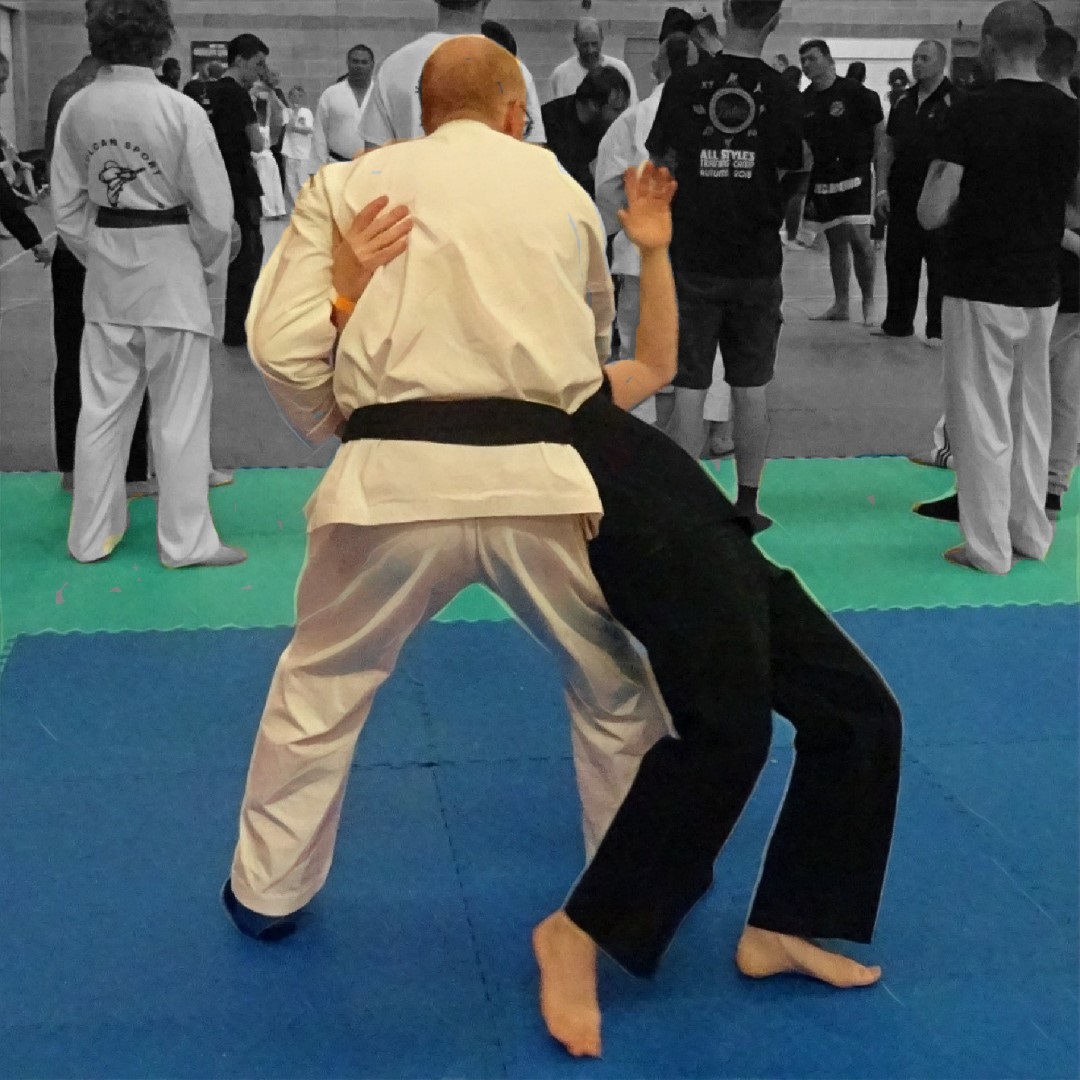
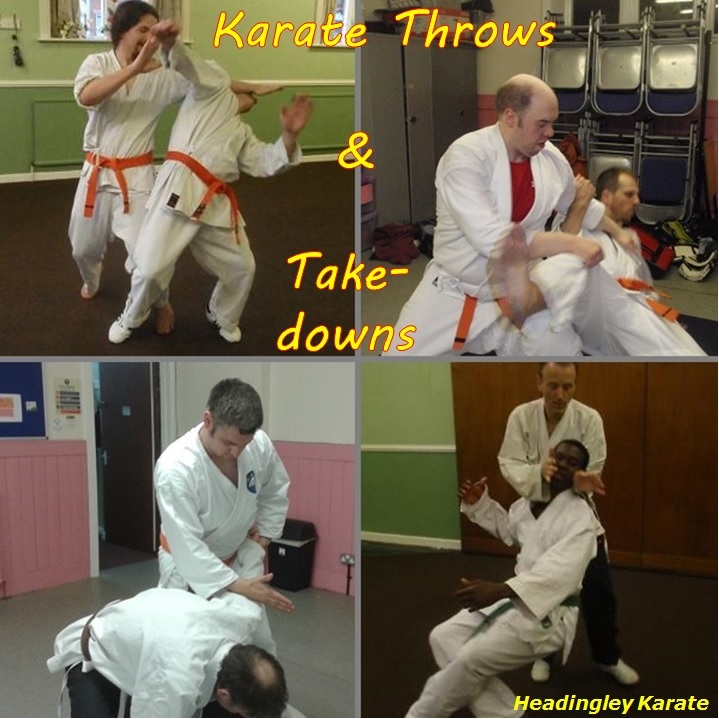
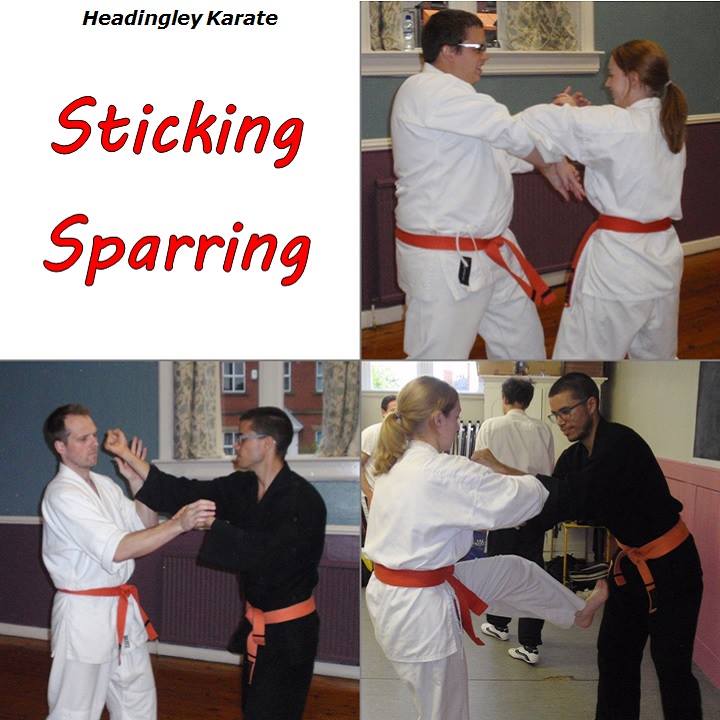
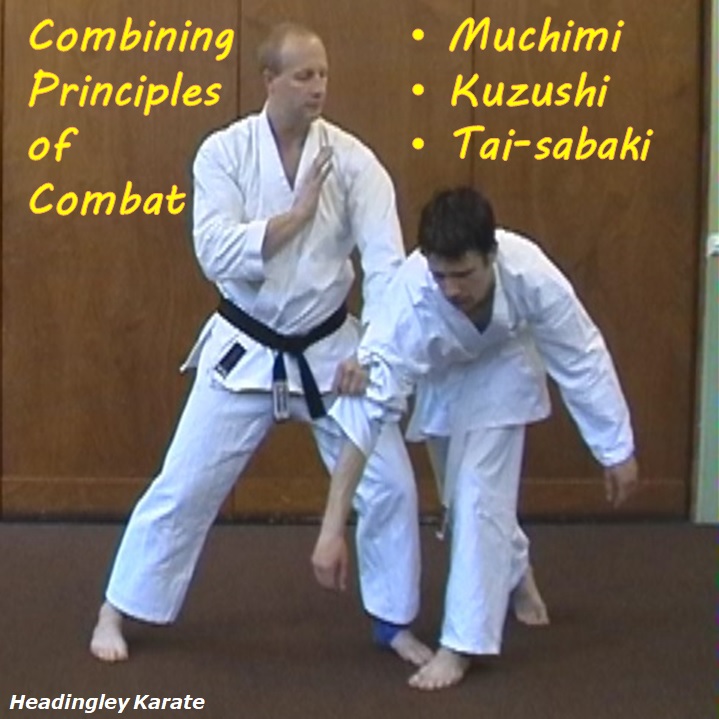
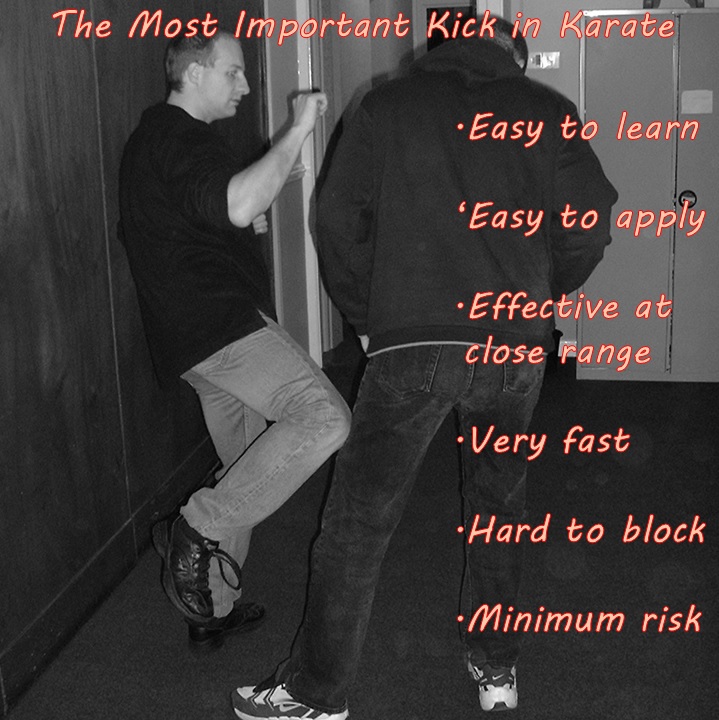
I've written several posts criticising high kicks for self-defence. This boils down to issues about balance and range. Anyone who follows us will know how much store I put on principles of combat, such as balance (kuzushi) - keeping your own, breaking the enemy's and then maintaining that situation. The higher you lift your leg and the longer it's off the ground, the less kuzushi you can achieve.
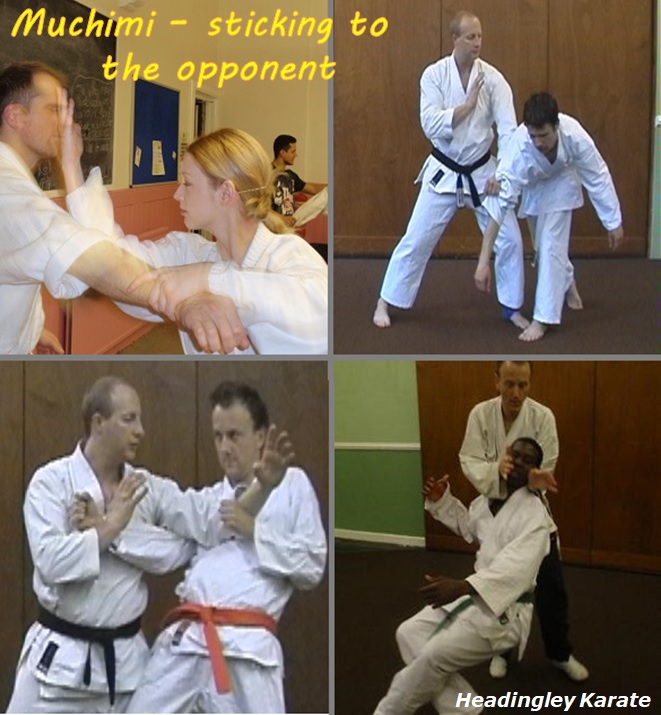
So high kicks seem incompatible with this particular principle of combat. What about other principles? Muchimi, or sticking, would seem a challenge. Generally speaking, the higher you kick (and the longer the range), the less well you can stick to the enemy. So high kicks really are at odds with our core principles. Which is why, I believe, they're vanishingly rare in the older versions of kata.
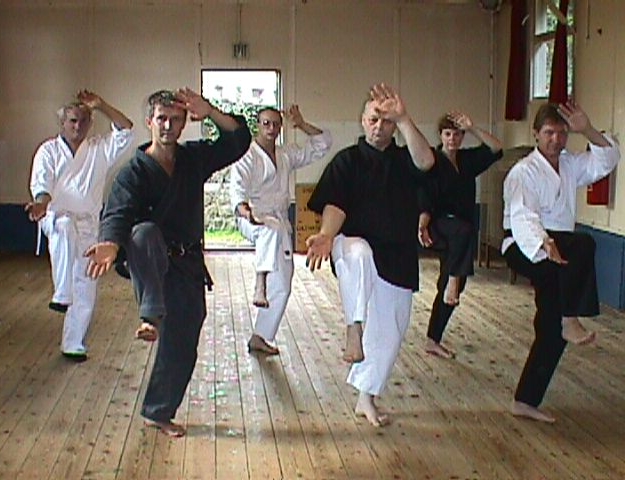
Is kicking completely incompatible with the combat principles of classical Karate? Not at all, the picture shows how it can be done. By kicking when we're already in contact with the enemy we can maintain muchimi. If we kick only after we've done something to disrupt their balance we don't have to compromise our own. The muchimi will ensure we can keep the pressure on - compromising their balance before, during and after the kick. And by kicking to the legs we can directly compromise their balance further, literally 'destroying their root'.
In this picture the defender first made contact with, unbalanced and blindsided the attacker (another principle). Only then did she kick, making it very difficult for the enemy to block or evade. And the kick itself, whether it damaged or just bent the knee, would erode the enemy's balance further. And finally, the kick done and over, she still had control of the enemy. And that, in my opinion, is how it should be done.
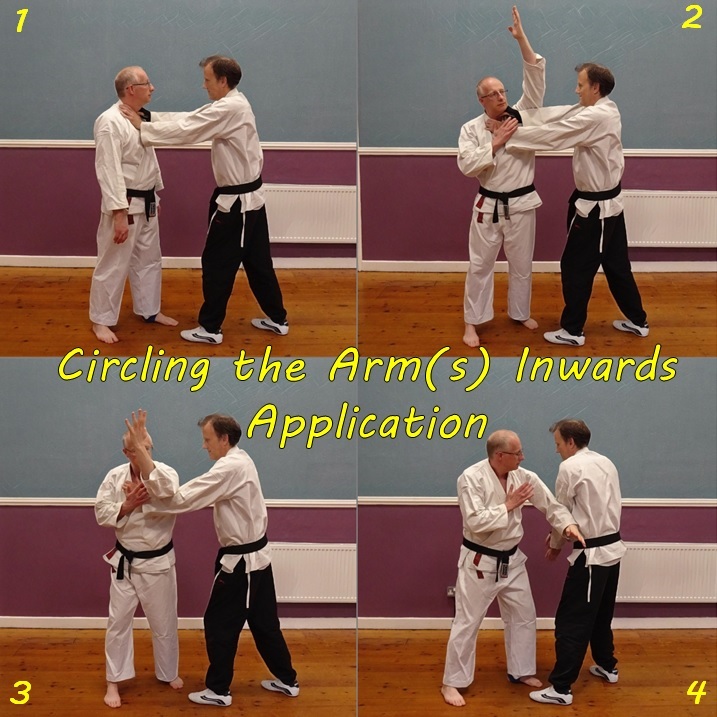
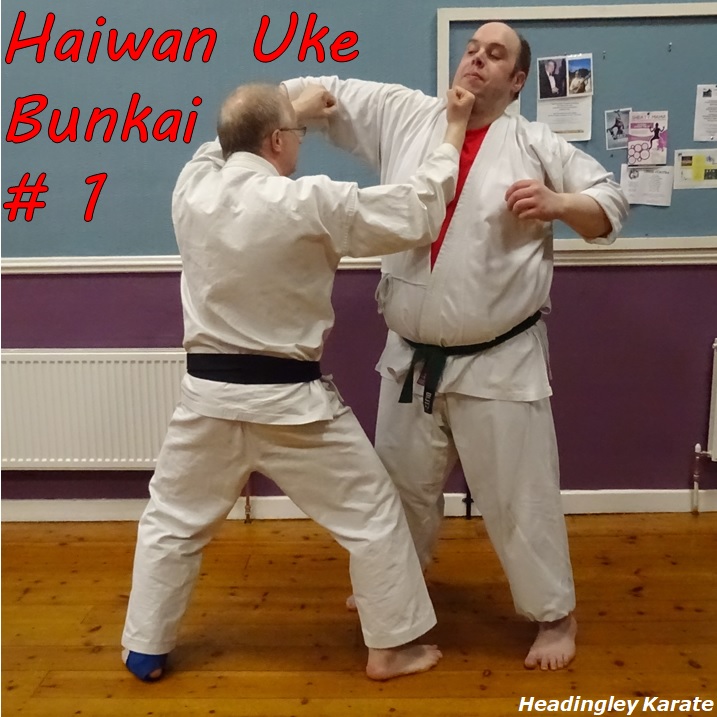
This is not rocket science. This application is in fact taken straight from my teacher's Shinsei kata. The attacker attempts a two-handed choke. Some regard this as an unlikely or unrealistic attack. Maybe so, but then its an unlikely attack that real people have actually used over many years. I respond by swinging one arm up and round from the side, at the same pivoting to the side to reinforce the movement. I also use my other hand to pin one of the attacker's arms in place.
I then swing my arm down through both of the attacker's arms to disengage their grip. Bending my arm and dropping it into the final 'inward block' position, supinating the forearm at the same time, adds power to the technique.
I don't stop there though. Picture 4 shows how I've passed straight through the final position, using a downward sweep (gedan-barai) to control the attacker's arm and blindside them. Countering from here should be easy, I'll leave it with you to work out the details.
This application only circles with one arm, assisted by body rotation. Others might circle with both arms, a subject for a future post . . .
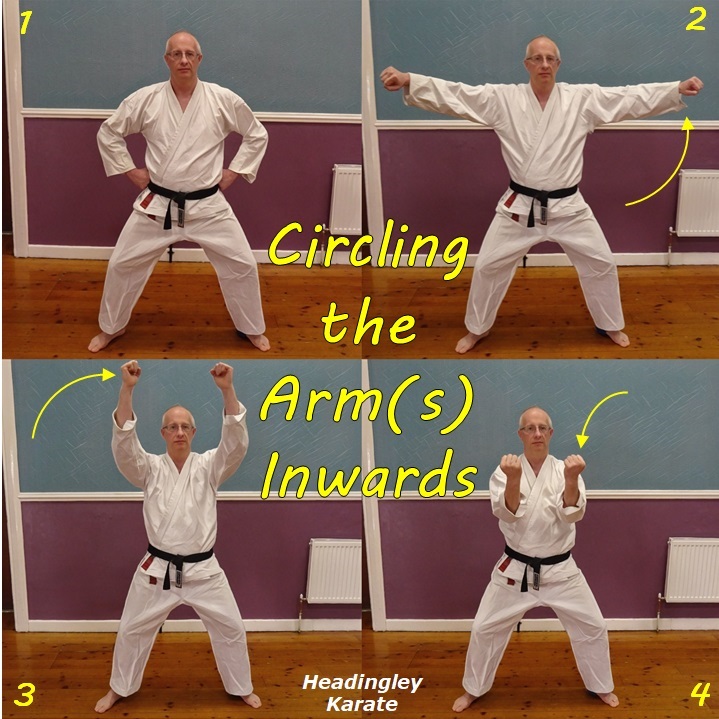
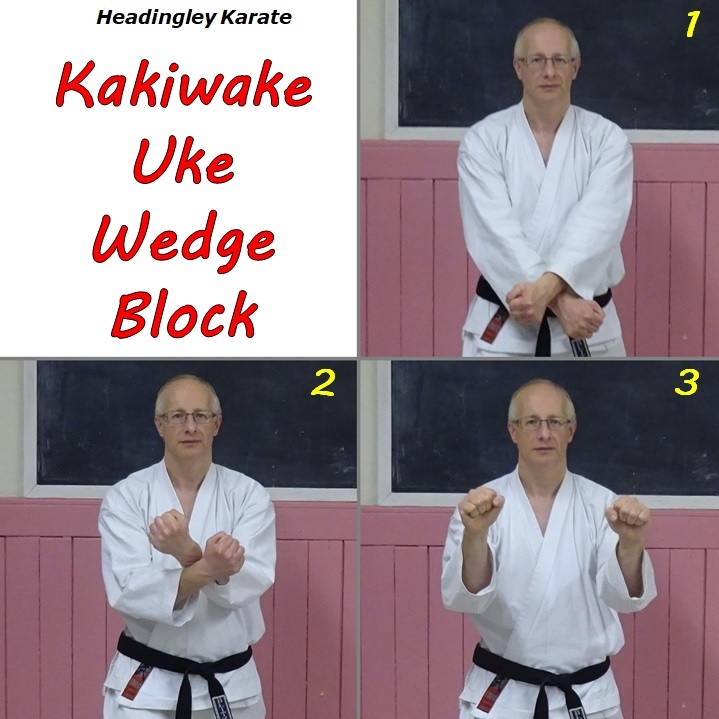
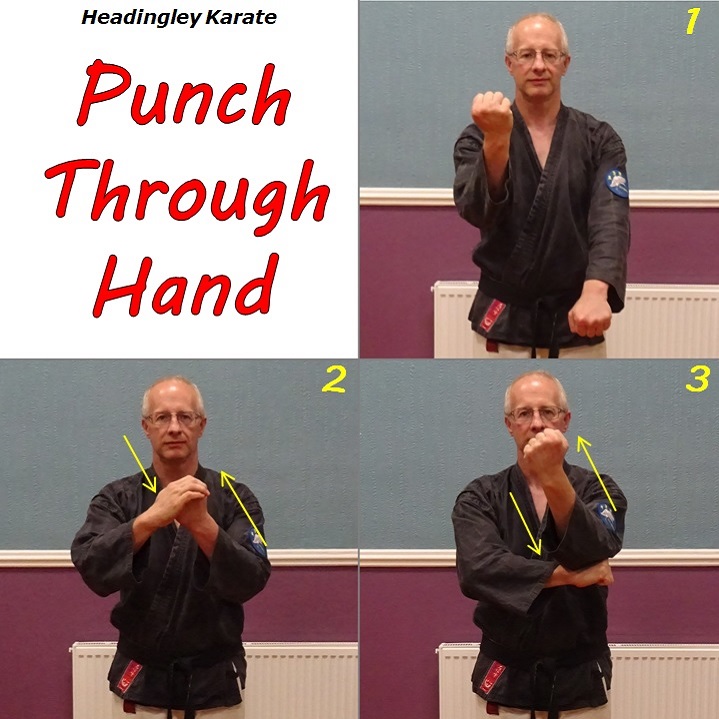
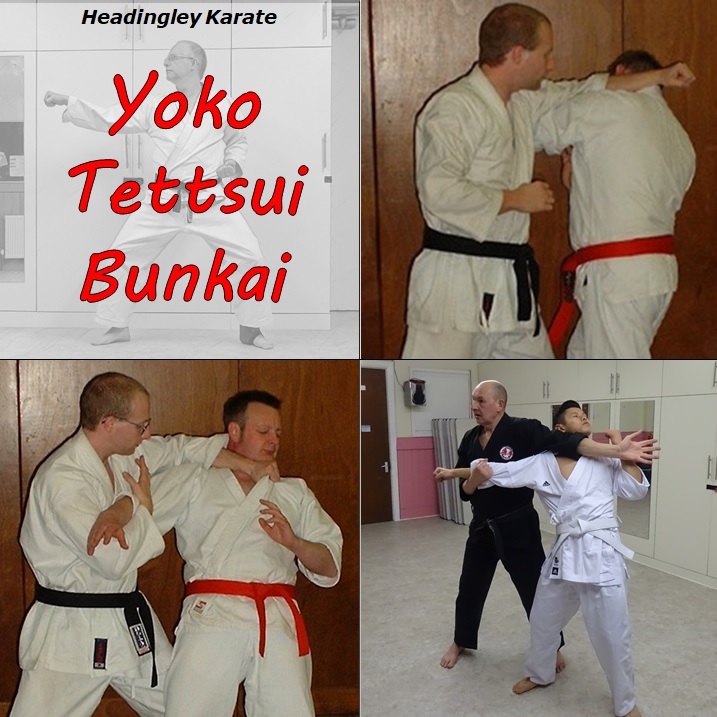
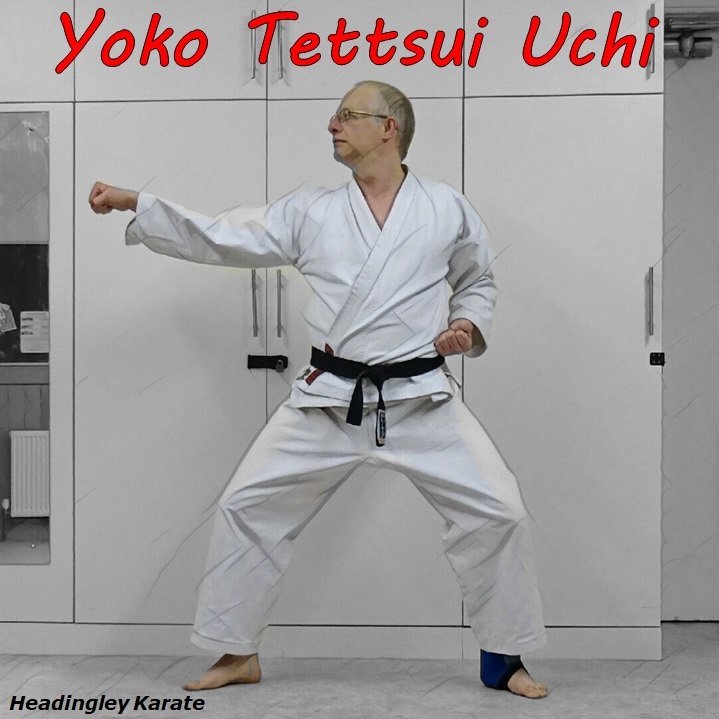
Now to examine the final section of our Pinan Daikou kata. The 1st move of this section isn't actually in the original Pinan kata. In fact it isn't in any of the Shorin Ryu kata that we practice, which I find interesting in its own right. We do however have the converse of this movement, which is tetsui (hammerfist).
In tetsui the primary method of power generation is to circle the arm outwards around the shoulder. This can be augmented by the action of the body/stance.
Circling the arm inwards works in a similar way, again augmented by the body/stance. The constantly changing direction of force (moving in a circle with the shoulder at its centre) is inherently difficult for an opponent to resist.
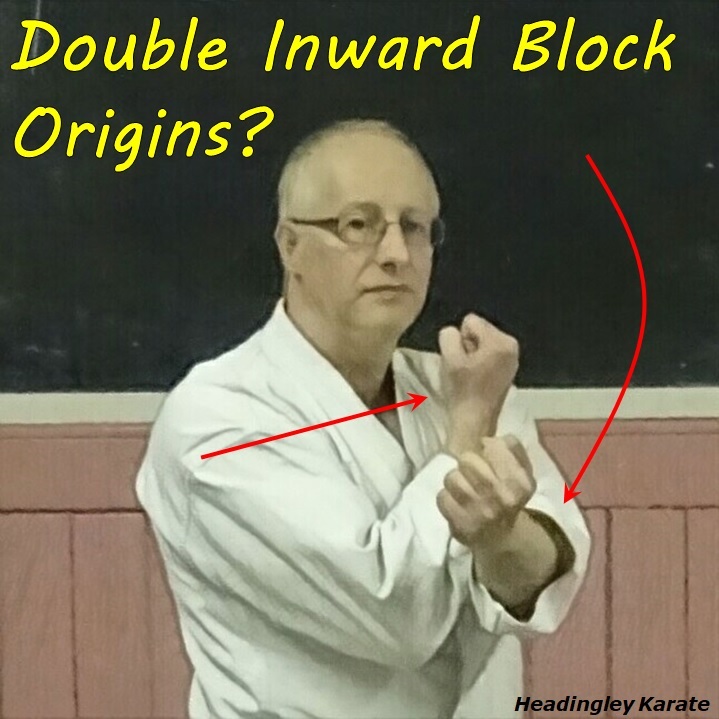
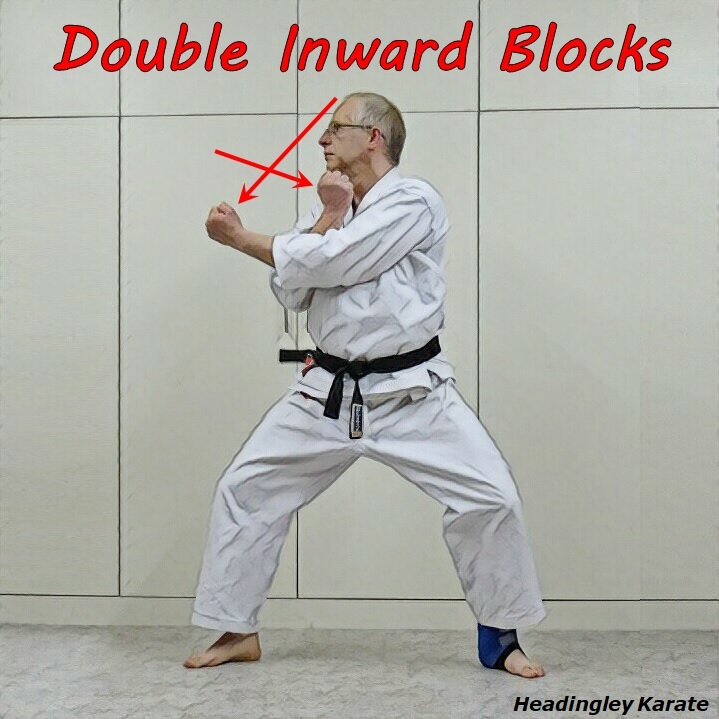
I've taken this move from my teacher's Shinsei kata, with a couple of modifications. The first modification is that we're circling with both arms at the same time - its possible to practice both at the same time, so why not! In application you might do it with just one arm or both, it just depends.
I've shown the move starting from the previous posture in the kata, with the hands on the hips. I raise my arms to the sides, pronating slightly in preparation for the final phase, in which they supinate. Having moved in a large circle the arms supinate as they drop into the end position, basically the same position as an inward block.
The other modification is the stance, or to be more specific, I'm not doing anything with my stance. I've left it the same as the previous movement, essentially the kata isn't telling us anything about the stance. The stance you actually use will vary and will be determined by the application.
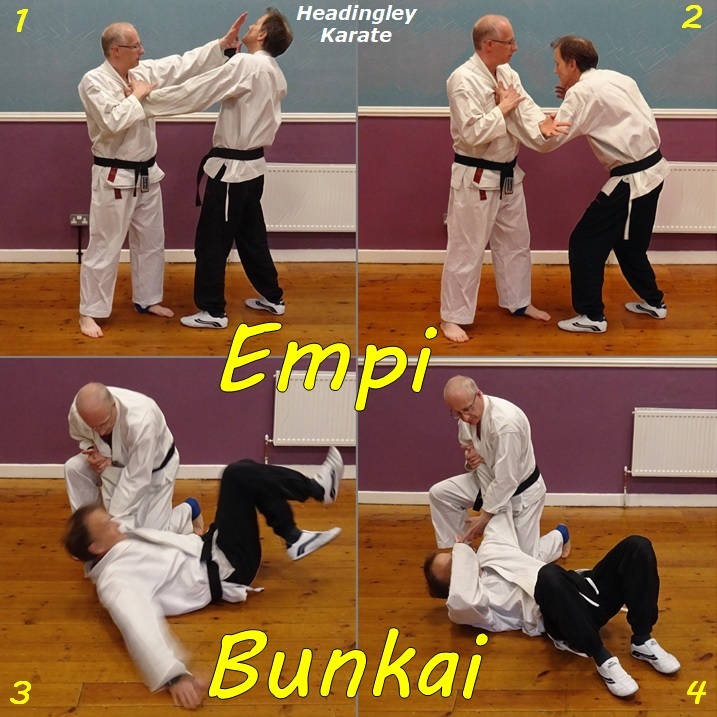
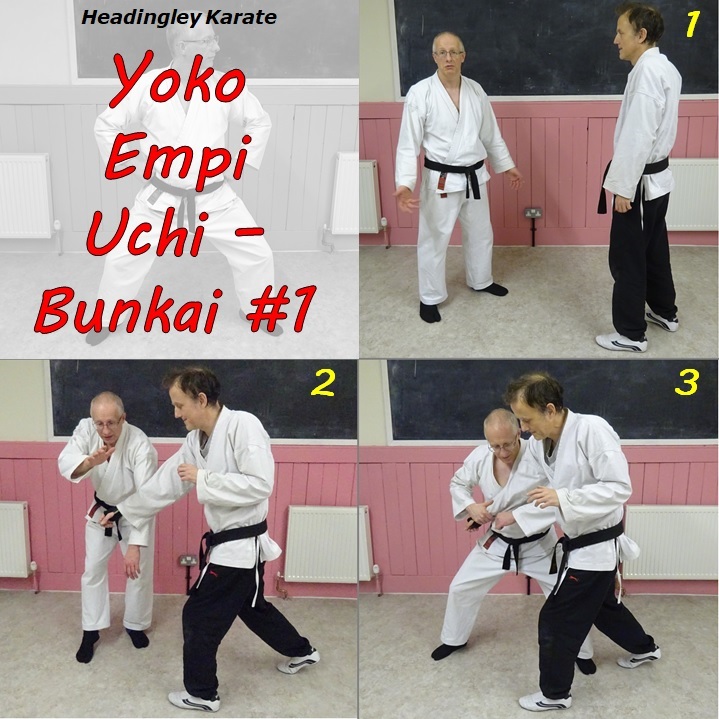
I was prompted to write this post following a discussion on a forum about application for the kata Empi (aka Enpi). This kata isn't in our syllabus, but I did learn applications for it from Vince Morris, over 20 years ago. This application is for the (nearly) kneeling down posture combined with a downward sweep (gedan barai) at the start of the kata. Any imperfections in its execution are mine alone. I've done the technique mirror image to the kata here but hey, deal with it.
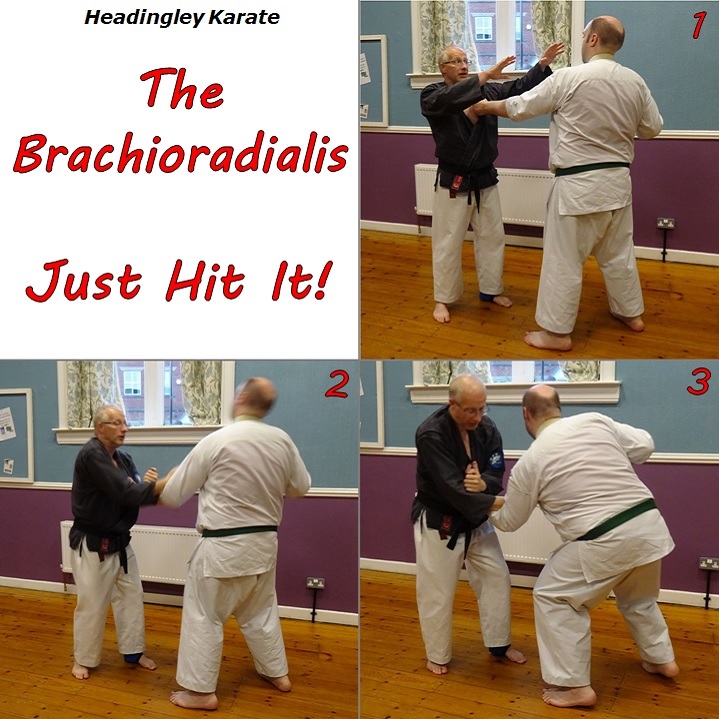
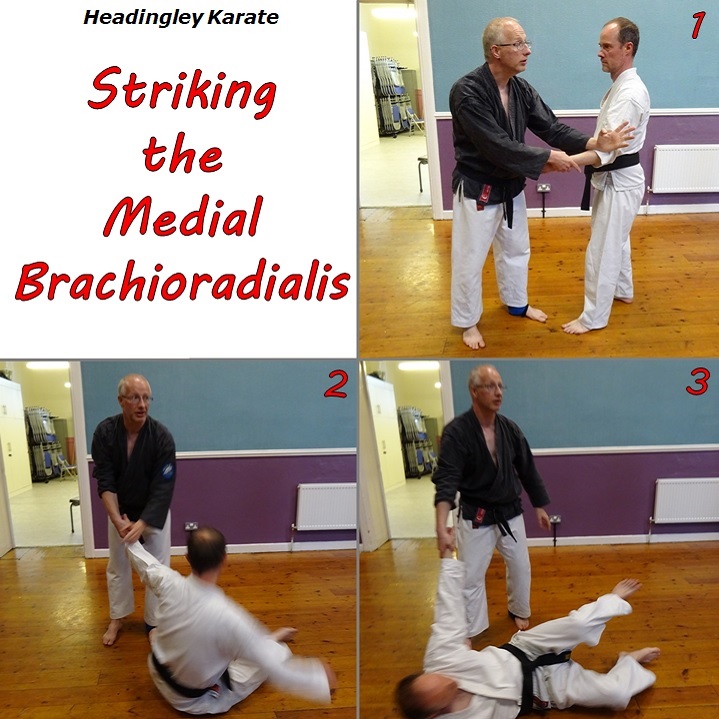
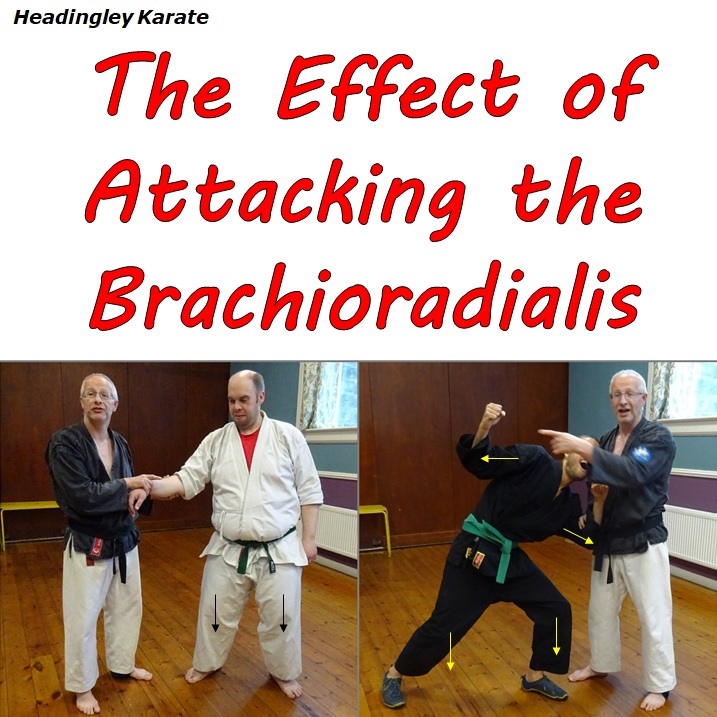
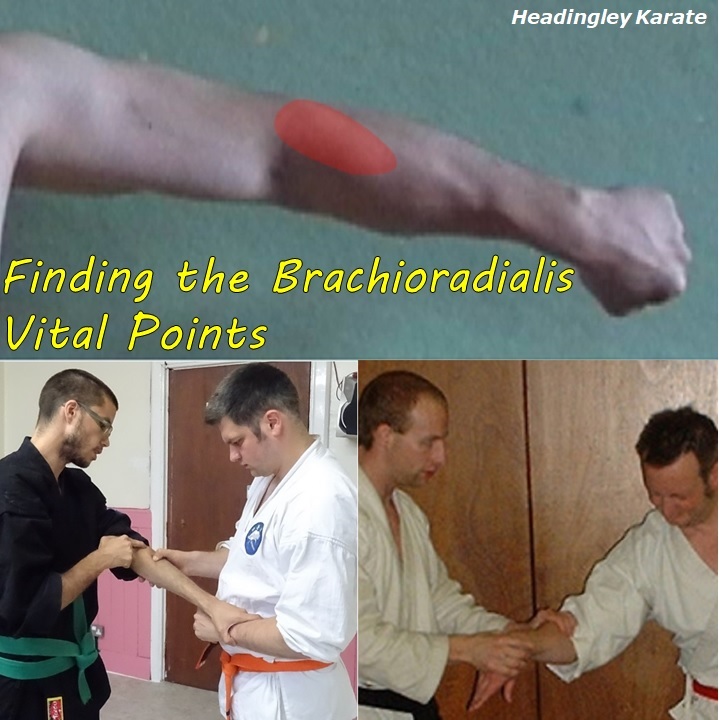
We start with a left single handed lapel grab. The attacker may push or pull or just hold. In order to stabilise my position and create a distraction I strike straight to their face with my left hand, at the same time as pinning their grabbing hand to my chest with my right. They may already be punching, in which case I block the punch instead. Or block and then strike. Or both at the same time.
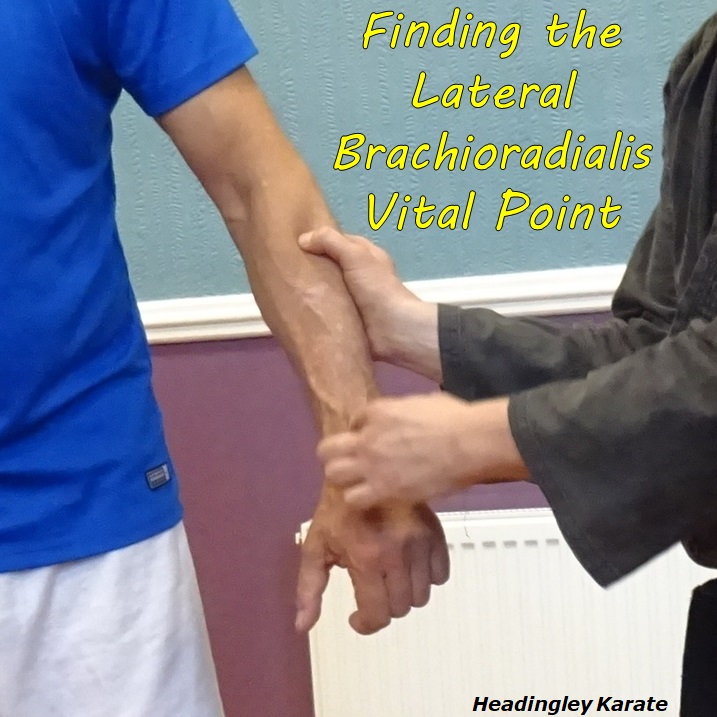
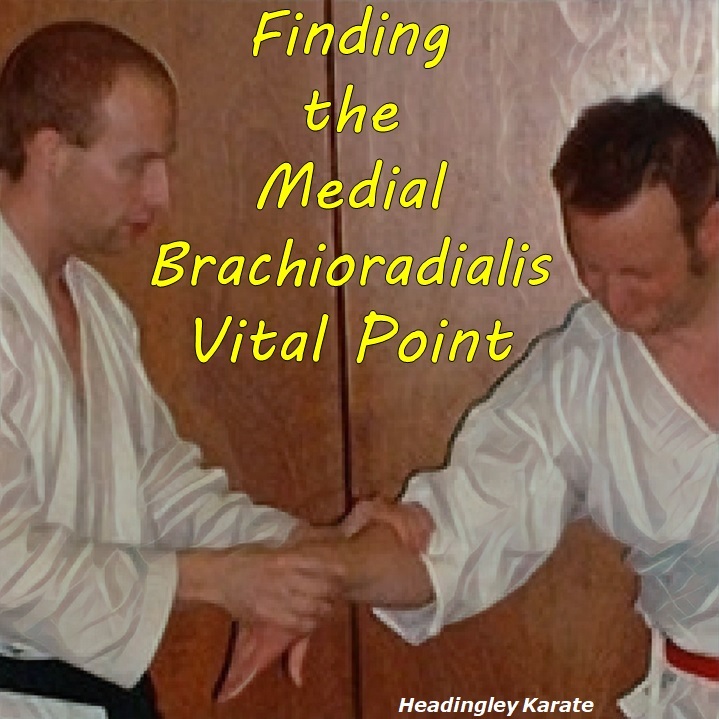
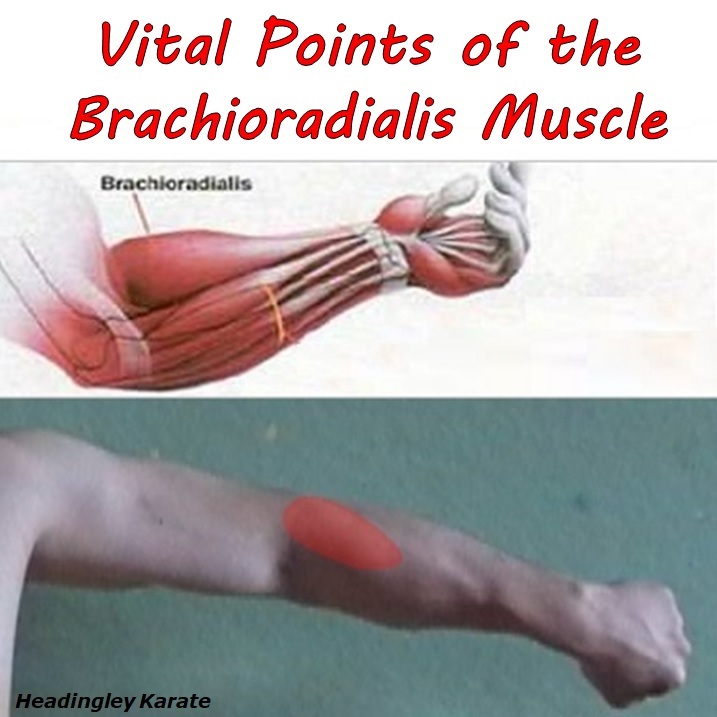
I immediately drop my left hand down through the vital point on the inner border of their brachioradialis muscle. This produces the reflex shown in picture 2, including a buckling of their knees. The strength of their response determines what I do next. If its only slight then I can move straight on to counter with a strike. At the other end of the scale it could drop them to the ground (or their knees). But what if its on the way to a takedown, though not really enough to achieve it as is?
That I think is where the move from Empi comes in. I continue to press down through their brachioradialis. At the same time I turn to my right and kneel down, completing the gedan barai movement. This is one smooth movement, ensuring that pressure is on their arm throughout. The point is to drop as much of your weight as possible down through their arm. That, in my view, is the chief reason for kneeling down like this.
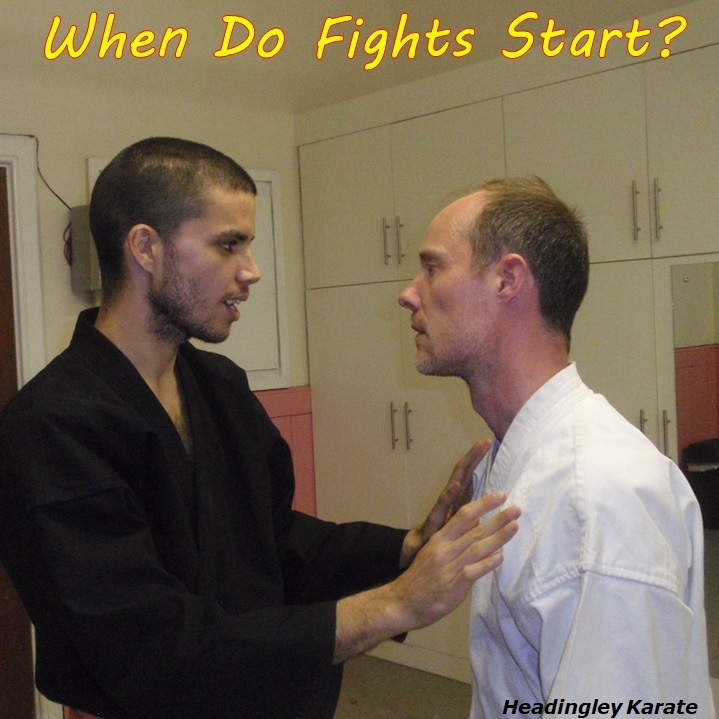
...is that it doesn't happen that much in real violence.
If you practice an art that specialises in kicking and punching you could be forgiven for thinking that the range you work at is the range at which violence usually occurs. That may be more a reflection of your competition/dojo rules than of the real world violence. Outside the dojo, violence doesn't start when the referee says 'hajime'. It comes out of the blue, or as a result of an argument - a verbal confrontation that ramps up then becomes physical.
If we take the arguments first, its my experience that many of these situations start at close range. They close to within arms' reach during the verbal phase. You're already up close before it becomes physical.
Sometimes violence starts at longer range, maybe in a sudden unprovoked attack. Typically kicking range is rapidly crossed and, once again, we're up close.
In either scenario once you've got to close range (close enough to grab) it's not that likely to increase again. Human instinct, whether through fear or anger matters not - is to grab hold (to stop the enemy from hurting you and to control them) and to hit with the other hand. Even highly trained martial artists often fall back on this basic instinctive response. So if you want to get back to long range the enemy is unlikely to allow it. They'll most likely keep pressing forward and grabbing, until one of you achieves a decisive advantage.
Yes, you may have an opportunity to throw a high kick during their initial approach. But it's usually a small window of opportunity! Or you might be one of those people who can kick at very close range. Great. But remember its a high risk manoeuvre. At that range its very easy to grab/push/pull you off balance in the early phase of the kick.
Picture the scene. The Karate lesson had started. The class had bowed in and the warm up was complete. Everyone was now practising kihon (fundamentals). But it was a scene of chaos, or at least it might have looked that way to some. Everyone was doing something different. There was no count, just each person individually working their way through their kihon combinations. The class wasn't lined up in grade order. People were even facing different directions, making best use of the available space, and working at different speeds. They were sometimes doing slightly different things, to accommodate for injuries they were carrying. The dan grades were the worst - sometimes practising the definitive combination, sometimes working on some variation or other - finding different ways to explore the principles embodied in the kihon.
The instructor walked up and down, not barking out a count, but pausing to watch each person and offer a few words of instruction. A few words of praise here or there, to acknowledge a well executed technique. Perhaps a few words to correct an error. Or maybe a few words of explanation or clarification. Occasionally a student might be given a slightly different exercise to do, to help them work on a particular aspect of a technique. Meanwhile the rest of the class carried on their practice.
This is how we generally practice kihon in our dojo. There's nothing wrong with the more regimented, military inspired mode of practice seen in many dojo. In fact, its probably the only way to effectively teach children or large classes. And it can have benefits in forging spirit and a group identity. But its not the only way of training. For small classes of adults, which ours usually are, we find a mixture of different approaches works very effectively.
How many times have I heard people say that! They recognise the importance of keeping kicks low for self-defence. I guess they feel the need to justify spending so much time doing something different.
This argument is a fallacy for 2 reasons. Firstly, there are technical differences between high and low kicks. Some kicks are essentially the same, low or high, but others aren't. Why would you expect that practising a technique one way would improve your ability to do it differently?
More importantly, it is demonstrably the case that how you train is how you will react, or at least how you will attempt to react. If you spend all of your time practising high kicks then, when put under pressure, that is what you will try to do.
Even when not under pressure you'll still almost certainly revert to your normal way of kicking unless you make a supreme effort to do otherwise. I've confirmed this over nearly 2 decades of teaching Karate. In that time I've had numerous students come along from high kicking arts, kyu grades and dan grades. Not a single one has been able to readily transition from using high kicks to low kicks. Not one! They consistently revert to high kicking - unless they're focussing on that to the exclusion of everything else. It takes months if not years to reprogram these habits. Trying to change habits in the middle of a violent encounter is really not what you want to be doing.
It can get worse, I've known at least 2 people who were good kickers but had an encounter in which they instinctively knew that a high kick was going to land them in trouble. They found themselves unable to kick at all, not high (too dangerous), not low (not enough practice). All that training poured straight down the drain!
I've previously discussed the issues around the relative speed of high kicks versus low kicks. Not surprisingly, the same logic applies to balance. The longer you have a foot off the ground the longer the period of time during which balance is compromised. And the higher it is, the more your whole posture must accommodate that, so the greater degree to which your balance is compromised.
So what? Well, one of the things that has become more and more clear to me over the years is the importance of balance in combat. Balance is critical in order to make many individual techniques work and it is equally critical to overall success. That's why we place it at the heart of all that we do, as one of our core principles, known as kuzushi. Kuzushi to us is equally about keeping our own balance and destroying the opponent's. And once their balance is broken, keeping it broken. Achieve kuzushi, then maintain it! I cannot emphasise enough the importance of this principle.
Typically I find that karateka have some appreciation of balance, but usually not enough. The rules of engagement for most Karate training, with its emphasis on long range striking, don't reinforce the importance of kuzushi to real-life violence. If however, you do recognise and accept its importance then you must by extension appreciate the importance of keeping your feet firmly on the ground. In other words, choose carefully when to kick, and keep it low!
The picture shows quite a nice of example of kuzushi in kicking. Tori has unbalanced uke before kicking, the kick to the leg unbalancing uke even further. Further, tori has increased her own balance by (carefully) using uke to support her bodyweight during the kick. Nice!
Is it because I kick so fast? No. Is it because my kicks come spinning at you in a totally unpredictable fashion, like a whirling dervish? Possibly, but no. Is it because they're so powerful they just knock your attempted block out of the way? Nice idea, but no it's not that.
Its because your arms aren't long enough. If I kick to your legs and you try to block it with your arms, 'karate style', then you won't be able to get low enough to block. Or if you do, you'll leave your head so unprotected you'll definitely be eating a knuckle sandwich.
Of course, you could always try to block with your legs, or evade. Either of those could work. But a nicely executed gedan-barai (downward sweep)? That will end in tears!
As an aside, I'm confident that this use of gedan-barai to block kicks is a modern phenomenon that began in the 1920's or 30's, born out of a need to address the newly created long range 'high' (chudan) kicks. It also conveniently created a sanitised use for gedan-barai.
Going back to the kicks themselves, kicking so low is especially useful if you do so whilst keeping the enemy's arms busy. Doing this makes it even more difficult to evade or block. Or you could alternate the height of your attacks, eg. high (punch) - low (kick) - high (punch). It's a surprisingly effective tactic – completely in keeping with Sun Tzu's advice to 'feint to the east before attacking to the west'.
Never mind the terrible play on words, what an arrogant claim to make! What makes me make such a claim?
Is it because we spend so much time training kicks in our dojo? No, I would imagine we work on most kicks rather less than in most Karate dojo.
Is it because of the superiority of our technique or the quality of the instruction? No! Its true that there are some technical differences in the way that we kick, but that’s not in itself the reason for our speed. As for the quality of the instruction, well I think I'm a long way from being the best kicker in town.
Perhaps the steepness of the hills in Headingley means that just walking around imbues us such great leg strength that kicking is that much easier? No, Leeds is hillier than some cities but I'm sure that isn't the reason.
The answer is simple, it boils down to physics, or even just common sense. Because we aim kicks low, typically no higher than the groin, our feet don't have as far to travel. There is variation depending on the type of kick of course, but generally a kick to the head is going to take somewhat longer to get there than the same kick to knee height.
My favourite kick is the knee strike, usually delivered to the thigh. I can do this pretty quick. If I'm in the right position I can even do it without taking my foot off the ground (the heel raises but the toes stay where they are). You'll struggle to beat that for speed.
Of course this isn't really about whether we can kick faster than you. Its about whether you can kick faster low than you can high. And the answer is that yes you can, as long as you devote some time to practicing it of course.
You can also get your foot back on the ground sooner and be ready to move on to something else.
Time to bring my series of blog posts on Karate history to a conclusion…
We've seen that Karate has a long history, over many hundreds of years. As well as indigenous Okinawan development it shares a common heritage (and periodic influence) with both Japanese and Chinese martial arts. It has been closely related over time with weapons practice. At least some Okinawan security forces studied both, presumably to aid in their official duties.
We can't say much about the centuries of Karate evolution, but we can dispel the myths about Karate being developed because of a weapons ban. Both of the supposed weapons bans that occurred were in fact nothing of the sort.
Karate has changed over time. However, by far the most important and dramatic change came about during the late 19th and early 20th centuries, as a direct result of the Meiji Restoration, when Japan was propelled out of the feudal age and into the modern era. Classical martial arts at that time were in danger of dying out and so were re-imaged for a new generation. Karate put aside its functional purpose and became a method of character development, a 'do' art rather than a jutsu. Most of the rituals and techniques we now think of as synonymous with Karate actually originated in this period. Karate then also developed as a sport.
What’s the take home message? If you want character development, you can't do much better than traditional Karate-do. If you want fun and exercise, sport Karate is definitely an exciting, dynamic pastime. But if you want self-defence, then neither of these is the sharpest tool for the job. Better to find something closer to the original source. Or at least a 'do' version that has subsequently been 'reverse-engineered'. But choose carefully, to ensure your chosen art matches your goals.
You may disagree with my conclusions, but if you read through my previous posts on Karate History (see my history blog page) you'll find a considerable body of evidence pointing in the same direction. Any alternative theories about the development of Karate would need to explain the historical facts as outlined there.
Click here to read the previous posts on this subject.
Ergonomics is defined as the study of people's efficiency in their working environment. Ergonomic Karate then would be Karate that enables the practitioner to apply their techniques in an efficient manner, for maximum effect. I'd like to think that my Karate is ergonomic. I'm sure you'd like to think the same about yours.
Now take a look at the picture (taken from the Manual of Karate by E J Harrison, one of the earliest English language books on Karate). Does this look ergonomic?
Clearly the man on the left (tori) is about to knee his training partner (uke) in the head. But I see a number of issues with this. I'm not concerned about tactics for the moment, just the mechanics of power generation.
See how stretched out tori is. His stance is long and his arms are held high, stretched out. This is a weak a position to be in, if you want to pull your hands and knee together. Muscles generally generate the most force close to the midpoint of their range of motion, but here multiple muscles are at or approaching the endpoints of their range.
Now that may not be so bad if tori didn't have to overcome initial resistance. But look at uke's posture. He's standing upright in a stable, balanced stance. He's clearly going to be able to give some resistance to the initial pull.
Does it really look like tori can pull uke's head down to knee it? I don't think so, unless tori is massively stronger than uke! Techniques that require you to be stronger than the opponent I think we'd need to put in the unergonomic pile.
So if you're interested in self-defence then I think you'd need to review how you do this technique, to make it more efficient - firstly the mechanics of how you do it, but also whether you can first do anything to the enemy to make easier to control.
No, of course you wouldn't. But why then is it OK to turn your back to use a Judo throw like this one when you do kata applications? Look at the picture, note how the guy in blue has his left hand free. If he was holding a knife that would be really bad news for the other guy. Even without the knife, if you tried to throw me that way I think you'd regret it. A quick punch to the kidneys, or just pushing on the pelvis, would thwart the throw. Alternatively, wrapping my arm around your face for a crank would give you problems.
As long as I don't limit myself to the rules of Judo its not too problematic to negate this kind of throw. Of course a good Judoka, executing good, fast technique and timing it well might well throw me. As long as their timing is good they're in with a chance. But then, as a hopefully half-decent Karateka, I too have a good chance of thwarting their attempt with a good punch. It could go either way.
What if you weren't turning your back? What if you were grabbed from behind and so threw the attacker over your shoulder? That would be OK. It wouldn't involve worsening your position in order to effect the throw.
Remember that self-defence is about minimising risk. Its not about increasing risk in order to do cool or fun techniques, even if they do seem to fit the kata. So if you are going to turn round in order to throw someone, do it in such a way that they can't hit you with their free hand. Either control both arms, or do the throw in such a way that they can't reach you with their free arm. To do otherwise is to invite defeat.
Just because something looks like your kata that doesn't make it a good thing to do.
The image used here is courtesy of https://commons.wikimedia.org
You wait for ages for one to come along. And then 3 come along all together.
Or to put it another way...
Real attackers don't step forwards and punch then stand waiting, hand on hip, for you to work your mojo, like you see in the photo. No. What they'll do, if you block their first punch is to immediately throw another. Actually they're probably going to throw that second one anyway, whatever you do. Then the third one and so on.
Real violence will definitely not look like this picture. Yet anyone who's done traditional Karate will recognise this scenario. Now if you use this type of exercise as a way of gaining some basic skills in say timing, distancing or the mechanic of a specific technique then I'm not going to argue with that. Its not really my thing, I think there are more effective ways of learning those lessons, but I concede that it can have some value. But it's clearly not realistic. Its not self-defence. Its not bunkai.
So, if you're interested in practical technique you need to move beyond that kind of drill, quite rapidly I'd say. You need to allow the attacker to move realistically and you need to consider what the attacker would do next. It doesn't have to be at full intensity but it does need to be more realistic than we see here.
Now if your initial reaction unbalanced the attacker, or blindsided them, or controlled them in some other way then that might prevent their second punch coming and give you time to counter. But if it didn't do any of those things then you'd need to work on the premise that their next punch would be on its way - and deal with that accordingly. In terms of combat effectiveness, anything else is pure fantasy. You might as well be playing dungeons and dragons. Or fortnite.
Its an often asked question and of course its completely the wrong question. It reflects the obsession with the idea of a black belt being something magical. Reaching black belt is simply an indication of a certain level of proficiency and commitment, not expertise. But as a measure of proficiency - and of whether a person has made martial arts a 'way' of life - it's as good a yardstick as we have.
I've heard different answers to the question, typically being that only 1 in 1,000 people who start training make it to black belt. Well, one advantage of having run a dojo for nearly 20 years is that I do have data to put some flesh on the bones of this discussion. What I've found is as follows...
Of those who start training a third drop out after the first session. The drop out rate stays high for the first few sessions, having increased to a half after the 3rd session. Things level off after that. However, only 1 in 6 people make it to their first grade (9th kyu in our system). Only 1 in 10 make it to their second grade. We're down to 1 in 20 by the intermediate kyu grades (6th kyu to 4th kyu). And so it goes through the higher kyu grades, whittling ever downwards.
And now for the headline. According to my figures, only 1 out of about every 150 people who begin martial art training make it as far as black belt. So not the 1 in 1,000 figure that's often quoted, but still only a small fraction of those who begin the journey. Of course, these figures are only for our dojo. I suspect it's a similar picture in your dojo too, but I'd be interested to compare with those who have collected the same data in their own clubs.
This is the 4th Tsukami Tegumi exercises.
As usual, the aim is to learn to transition smoothly and effectively from block to catch to strike to hold/lock to takedown to pin.
Again, we start from tegumi, not shown here. This drill involves another passive hold, intended for low level situations - we're not emphasising striking, but it could be resorted to at any point.
From the tegumi drill take control of your partner's arm and feed your other arm over it. If need be use it to slap the face or block a punch from the other hand en route.
Loop your free hand back towards yourself to come under your partner's arm.
Thread the arm through to latch on to your other wrist. Hug your elbow close in to your rib cage to draw in and control your partner.
Move your whole body away in arc to draw your partner off balance. Keep your elbow pulled tightly in to best control and unbalance. In a caring setting you may be able to hold the person in this position while you calm them down, especially if a colleague holds their other arm in the same way.
What if something more decisive is required? Keep moving to keep them off balance. Then suddenly change tack - step back with your left leg, draw your left arm back and extend your right. This creates both the opportunity and the necessary space for the next technique.
Strike or press their triceps tendon whilst pulling their wrist back to your hip - this is an application of downward sweep. This effects an armbar that can be used to take them down.
Walk forward to drive them face down to the ground.
Finish by pinning them, switching the pressure from your arms to your legs for greater power and endurance.
Recently my son and I have been playing fortnite, currently the most popular video game in the world. The idea is straightforward - you and 99 other souls land on an island replete with weapons and ammo, then shoot it out until there is 1 survivor.
It hasn't taken me long to work out how to place in even 2nd or 3rd place. This hasn't been through skill - my skills leave a lot to be desired. I have, however, spent a fair amount of time skulking in sheds and cowering under trees. This isn't cowardice, its strategy. I've simply applied the ideas from Sun Tzu's famous military treatise, the Art of War...
"Subdue the enemy without fighting" said Sun Tzu. Also no-one "benefits from prolonged warfare". Sun Tzu recognised that violence is inevitably risky; prolonged violence is costly. Better to achieve your strategic aims by avoiding violence - better still if you can do so while fooling your enemy into thinking they have achieved theirs. So, in the game, don't just automatically rush to engage enemies. If you can let them kill each other off all the better.
When you do fight "engage the enemy on your terms, not theirs". Also "wait to take the enemy unprepared". For example, let two enemies fight each other while you hide close by. When one achieves victory, attack!
On the other hand, "forage from the enemy". To win, you need to gather enough resources. Killing your enemies is a good way to achieve this (you can pick up whatever they've dropped).
"Sweat more during peace, bleed less during war". All that cowering is never going to win me a game. I can come close but to win I will have to polish my skills, I must acquire the right technical skills, even though I choose to use them sparingly.
OF COURSE, THESE PRINCIPLES APPLY EQUALLY TO SELF-DEFENCE!
This is the 3rd of our Tsukami Tegumi exercises. As before, the aim is for students to learn to transition smoothly and effectively from block to catch to strike to hold/lock to takedown to pin. Also as before, we start from tegumi, not shown here.
From the tegumi exercise take control of your partner's arm and slide in to apply a passive shoulder hold. The passive shoulder hold is not designed for serious self-defence, rather its intended for situations where you need to control (and pacify) a client/patient for their safety as well as yours.
Sometimes though the hold isn't enough (maybe they're too big and strong or too angry) so you need to up the intensity. Start by distracting and unbalancing them by sliding your hand across their face, aiming to apply pressure to the philtrum.
This is unlikely to take them down on its own, so we help by taking away their root - a knee strike to the thigh does nicely.
As they fall back go with them, dropping into a deep straddle stance. At the same time slide your hand that was on their arm down to the wrist - this requires good muchimi (sticking) skills. Also bring the other arm round to apply an 'outward block' to their triceps tendon - barring their arm to lift their shoulder and tip them onto their side (note how I supported my 'block' with my thigh in the picture).
Move your hands in opposite directions, so that their arm bends.
As they turn over keep your arms moving in a circle to press their bent arm behind their back.
Kneel (carefully) on their spine using the knee to push their arm further up their back (my partner is not flexible in the shoulder so I have applied this only loosely).
You can now take your hands off and swap them over. Grab again, this time applying a wrist lock in the process.
And now to continue summarising the introductory applications of the third section of Pinan Daikou. The next 4 movements are:
Knee lift and turn
Outward block on cat stance
Spearhand
Sideways elbow
The last 3 applications should be fairly obvious by comparing the kata move and the hands-on technique. The first one may not be so obvious - remember though, the throw is an application of the turn that follows the knee lift, not the knee lift itself. Typically however, the knee strike would be used to create the opportunity to execute the throw.
Now to summarise the introductory applications of the third section of Pinan Daikou. I've described these applications in their own individual posts, this is just a reminder - a quick visual aide memoire. The 4 kata moves shown here are:
Hi-Lo (simultaneous low and outward blocks)
Punch through hand
Low x 'block'
Wedging 'block'
There are 2 applications shown for the x-block, one for the 'chamber' phase and one for the 'block' itself. I'll cover the remaining moves in this section of the kata in my next post.
The photos show the sequence of section 3 of our Pinan Daikou kata. The first picture carries on immediately from the last move in section 2. As with the previous sections, this one is practiced on one side of the body (as shown) then the other. For clarity of the hand positions I haven't shown the stances for the first few photos, but they are straightforward. In the first 2 photos the feet are together, in the next 2 the stance is zenkutsudachi, forward stance. After that the stances are shown.
The techniques in this section are, with one exception, taken from Pinan Sandan and Pinan Yondan. There are as follows:
Outward block (soto-uke) in cat stance (neko-ashi-dachi)
Spearhand (nukite).
Sideways elbow (yoko-empi-uchi) in straddle stance (shiko-dachi).
I have of course already described the introductory applications that go with these moves, but over the next few posts I shall summarise these as a handy reference guide.
I teach people to put up a guard at the first sign of potential trouble. But sometimes you get caught out by the suddenness of the attack and/or your own lack of awareness. So you just have to deal with it. Photo 1 shows me not paying attention!
If the attack is high your response can be just the same as if you had your guard up - its just going to take longer to bring your arms into play, and you may pay a price for that. But if the attack is low a different approach is required. You can't raise your guard in order to then drop a block onto the incoming limb, this would take far too long and most likely result in failure. So what do you do instead? Simple, from where you are just sweep one arm or the other across in front of the abdomen.
Augment this by evading with your torso - rotate your hips and by move them back out of the way. This is a flinch response - it builds on the response you do naturally when surprised in this manner. See photo 2.
This arm position is that used in the kata as the 'chamber'. Note how the other hand is raised, we'll see why shortly. To be fair, this chamber position isn't used in the equivalent move in either Pinan Sandan or Chinto. I've added it to the move in our Pinan kata, but I haven't just plucked it out of the air. We see it in several kata, perhaps most obviously at the start of the 3 moves in the 2nd line of Seisan.
Having blocked with my left I can drop my right hand onto the enemy's wrist to capture it. At the same time I drop forwards into a straddle stance, pushing both elbows out to the sides. This pulls their arm at the same time that I drive my elbow into their torso. See photo 3. Its another example of the arms working in opposition but here the force is to the sides, not the usual forwards and back.
Yoko-empi means sideways elbow. It's the name I give to the odd looking 'hands-on-hip' posture seen in Pinan Sandan, others give it different names. In our Pinan Daikou kata it is the final move of section 3. When you compare the move in Pinan Sandan with the classical Shorin-Ryu kata its pretty obvious where it comes from. The only classical kata I know of that contains this hands on hip position is Chinto. In Chinto you place your fists on your hips, twist forwards to the right so that the right elbow dips forwards, then reverse that movement and do the same with your left. Without retracting, you continue that motion into a step with your left leg, turning the body through 180 degrees, before continuing with the next move.
Its easy to see that the move from Chinto has been modified and enlarged to produce the one in Pinan Sandan. In Chinto the stance is small and there is no sign of the downward sweep / hammerfist that follows each iteration in Pinan Sandan. There is definitely no sign of the large crescent kick that crept into the Shotokan Heian Sandan kata somewhere along the way.
Clearly I'm of the opinon that the Pinan/Heian version has developed away from the original. So I've happily modified it slightly further to make it more relevant to my purposes (without losing anything as I still practice the older Chinto version). In our Pinan kata this elbow technique comes just after nukite, as follows.
From a left nukite, start by pivoting to the right and simultaneously sweeping the left arm down while raising the right slightly. Slide the left foot forwards and in arc to land in a straddle stance with the feet in line to the front. At the same time extend the elbows out to the sides, into the final position.
What is the essence of nukite, Karate's 'spear hand' strike? Most Karate people will say that it's to strike with the fingertips. I think this is a red herring. Never mind the conditioning that would be required to strike a hard surface with power. In my view its about the mechanical principles involved, not the striking surface.
To understand why, let us first revisit tsuki, Karate's thrust or straight punch. When we punch we can use several different striking surfaces, beyond just a basic fist. There are single knuckle fists, foreknuckle fist, even palm-heel. The surface you strike with is the least important aspect of the tsuki principle. The essence of it is actually the straight thrust combined with the pull of the other hand (ie. hikite).
The clue to help us understand nukite is what the other hand is doing, ie. it draws back towards the punching hip, ending somewhere around about the punching elbow. Whereas in tsuki there is a rotational feel to the push-pull about both hips, in nukite the push-pull is centred around only one hip. The feeling is that of holding, or pressing down, or drawing back with one hand while the other pierces through. Perhaps 'piercing hand' would have been a better name.
There are many applications of this principle. The picture shows our introductory application. It doesn't look much like nukite, but that's just because the enemy's body is in the way, preventing your arms from reaching the final position. What's important is how it feels, not how it looks. The left hand, having struck the occiput, draws the enemy's head towards the right hip. At the same time the right hand presses onto a vital point on the face. The hands work in opposition to each other, one holding the target in place while the other 'pierces through'.
This is the next move in our version of the Pinan kata. Nukite literally means 'spear hand'. I'm showing it here as it follows on from the previous move - outward block on cat stance, as shown in photo 1.
Photo 2 - I first just need to adjust my stance from the previous position so I simply drop my right heel to the ground.
Photo 3 - I chop down with my leading right hand, opening the hand and bringing the forearm parallel with the ground.
Photo 4 - I step forwards and thrust with my open left hand. I keep my right arm stationary in relation to the rest of my body.
Nukite is part of a family of moves that occur in numerous Shorin Ryu kata. It seems fairly apparent to me though that the version found in Pinan (Sandan) is copied directly from Kusanku - based on both its shape and its position in the kata.
What's nukite for? The traditional Karate-do explanation is that you're thrusting with your finger tips. Good luck with that! Unless perhaps you're using it to strike specific soft vital points. But even then the chances of missing and pranging your fingers in the process seems quite high. There has to be a better rationale for this move, which I'll explore next week.
I've previously looked at application for Karate's outward block. And just last week I discussed some of the uses for cat stance. Let's put them together. We'll take the basic use of outward block as, well, a block. Not that it should look like the complete movement of the kata with the hikite etc. It's the switching principle it teaches that's important. And we'll put cat stance to its basic, introductory use. That is, as preparation for a kick.
Looking through my photo collection I found a number of instances of this technique. Here's one, where I've intercepted the punch with my left hand and passed it to my right. I've then followed with a right kick. Note that as usual my kick is low, aimed to the legs. In this instance I'm striking with the toe-tips.
Why bother with the cat stance? Why not just move back to control the incoming punch and then worry about the kick? Well you certainly can do that and there's nothing wrong with it. But if you have the presence of mind to see where things are going and drop into the cat stance as you're completing the block, then you can reduce the time taken to complete the whole technique. Instead of a) stepping/sliding back, b) then shifting weight to the rear leg, c) then kicking you can blend the 3 stages together. In kata, training the block as you drop into cat stance can help you to internalise this blending process.
It may or may not be a huge amount of time you can buy by blending your movements together in this manner. But even a small advantage can make the difference between success and failure. So its important to get these details right.
We were discussing the purpose of cat stance in the dojo the other night. Here's what we came up with…
The obvious use is as preparation for kicking off the front foot. Cat stance is a transitory stage between a) your weight being evenly distributed over both feet and b) the kick. But rather than a 3-step process of i) block, ii) transfer weight, iii) kick we can - by practicing cat stance & the block together - learn to blend i) & ii) together to get a slightly faster result.
We can shift into cat stance to generate power to support what the arms are doing. Lowering the hips add power to a downward technique. Weight shift from side to side can add power to some punches. Taking the weight off the front leg can free up the hip to rotate through a small arc without moving the feet.
We can get positional advantage. Rather than create power through the stance transition itself, it could put us in a better position to apply leverage with the arms. Dropping the hip can put you below a target that you want to push up. The weight shift backwards can put you behind something you want to push forwards. The difference in position is small but important, as seen in the application of turning into cat stance I showed last week.
We can use the stance to move to a position that exposes a particular target to our attack. The drop into cat stance can be useful here in certain specific contexts.
Pressure can be applied with other parts of the body too. Moving the centre back into cat stance can help you to bump someone directly behind with your hip. Pressure can be applied with the legs, eg. the bent front leg can press on the enemy or they can be levered over that leg.
Turning into cat stance adds further components, but I shall discuss that at a further juncture.
This technique is a little bit like Aikido's 'heaven and earth' throw, in that one arm goes up and the other down.
Following a successful entry with a wedge block or similar, I've ended up fairly close with my arms on the inside of the enemy's. I drive my knee into his groin or thigh and continue in with to step across in front of the enemy (pic 1).
I slip my lead arm underneath their arm so that I can start to push it up at the elbow. I also position my rear arm to press down on top of their other elbow (pic 2).
Now for the turn. I turn to face the rear, dropping back into cat stance as I do so. This brings the whole thing together. It helps to power my push up and to put my pushing arm in the best place to do that. It doesn't actively help my other arm to press down, but nor does it hinder it - a forward stance by comparison would move my arm away making it very difficult to press down on their elbow (pic 3).
Its not so much about pressing down, but holding their arm in place. At the same time their weight is shifted to the leading outside edge of their foot. Because of the pressure down on their arm they can't move the foot in order to keep their balance and so they are thrown forward, cantilevered over their own leg.
This is not the easiest throw in our curriculum, so why bother? 2 reasons - a) when I find myself in the right 'goldilocks zone' its actually quite easy, and b) it uses the same mechanics as some other rather more dangerous throws, so it's a good way of perfecting the right mechanic for those without the danger.
Unlike many of the Judo throws that people use as bunkai, this one doesn't leave either of the enemy's arms free and doesn't require you to compromise your own balance to make it work.
The first part of this technique is straightforward. The arms sweep down as the knee rises up - an example of limbs working in opposition. We've seen tsuki (thrust) as an example of this previously - one hand pushes as the other pulls. In this instance the arms are working in opposition to the leg.
It's the next bit that's of particular interest to me. There are 5 things happening at about the same time. As the kicking foot moves across and pivots the arms come into play. Assuming we're in contact with the enemy we are able to apply force to them by moving the foot across; and by moving the upper hand in the same direction; and by keeping the other hand in place, effectively pressing in the opposite direction to the upper hand.
The stance plays its part too. Dropping into cat stance can achieve 2 things - lowering the hips and moving them in the opposite direction (to that which you are now facing). Both help to provide power to the upper hand - you're trying to get both underneath and behind the upper hand, to help it push. The role of the lower hand, therefore, isn't so much to press in the opposite direction, but more to hold or check something in place while the upper hand presses on it. The overall effect should feel like trying to turn a ship's wheel (or a large valve).
The final position of the hands, ie. an outward block, isn't really part of the same move. In terms of the power generation, and therefore application, its all over by the time you get to the position shown in the picture. My decision to put an outward block on the end is simply a convenience, something which I wanted to include in the kata and its chamber position matched the end of this move. Which I think is just what the author of Pinan Yondan did.
Now for the next move in Pinan Daikou. From the previous posture (wedge block) strike with the left knee, sweeping both arms down to side in gedan-barai. The arms cross en route (pic 1).
Put your left foot down in front of and to the right of the other foot, turning it to face your right. Immediately move the right foot back and to the left, to facilitate the turn to follow. At the same time a) sweep the left arm round at shoulder height, palm down and b) hold the right hand back where it is (pic 2).
Turn to face the opposite direction, moving the right foot slightly further across to land in a cat stance. As you complete the transition execute a right outward 'block' (pic 3).
If you're familiar with the Pinan kata you'll see that I've taken this sequence from Pinan Yondan but changed the final posture. In Yondan this final position is more like shuto. The arm movements are more circular than in shuto and the rear hand presses palm down. The Shotokan version is simplified to just be a straightforward shuto. Wado Ryu kept the movement closer to the original - its quite obviously copied directly from the very end of Passai Dai (that is of course the classical Passai Dai, not the modern Bassai).
The first part of the sequence is also taken from Passai Dai, but earlier in the kata. Here we see the sequence of the preceding wedge block, kick with the rear foot, step forward and across, then turn. We see a very similar sequence at the end of the first line of Seisan. Each of these instances ends with a different posture. The author of Pinan Yondan clearly decided to change his version, by swapping the end posture with the very end of Passai. I too have changed the end of my version, for reasons for which will shortly become clear.
If you ask any karateka what Karate stances are for I think you would get a response that we can all agree on. That is, stances provide stability and support power delivery for our techniques. And different stances help us deliver power in different directions. Forward stance helps us deliver power forwards, for example, and straddle stance to the side. This should all be obvious.
As karateka we rightly obsess about keeping our hips level when we move. But sometimes we can take that too far. Some stances can help us deliver power vertically by helping us to drive up or to drop down. Cat stance and straddle stance, for example, are great for dropping your weight into a technique. Your hips would need to change height in order to generate power in this way.
None of this is rocket science. But there is another use for stances that is often overlooked in modern Karate. They can be used to generate power not just by supporting what the arms are doing, but by applying pressure themselves directly to the enemy. Anyone who follows our social media feed will have seen several examples of the scissoring takedown in which we use a straddle stance, so that we can lever the enemy over the thigh. The picture here shows a different example. I'm doing a left reverse punch, with every part of my body EXCEPT the punching arm. The hip twist bends and rotates my left leg so that my shin digs in to the back of the enemy's leg. This disrupts his posture helping me to off balance him and set up my next technique. Its easy enough to do, the trick is being in the right place at the right time - in particular, being close enough - to make it work.
Mechanically kakiwake repeats a familiar theme - supinating the forearm as the arm bends or retracts; pronating as the arm extends. Doing it with both arms simultaneously adds extra dimensions to this…
The bilateral movement provides a base for each arm to work against. The left back muscles pull on the spine to create a base for the left arm to extend against. If the right side is doing the same then this makes the spine a more stable and effective base, ie. each arm's movement is stronger because the other arm is doing the same. This all assumes that both arms meet resistance.
Further, the arms are working with or against each other. In the initial phase of the movement they can work together to pull or push upwards, or to trap and bend a joint (as we saw in application of the first phase of juji-uke). In the second phase the arms pull or push apart - imagine how this might work depending on where the arms/hands are in contact with an opponent.
Kakiwake is kind of the converse of yoi. In yoi the wrists cross and uncross low down, in kakiwake they cross and uncross as they raise up.
You're probably already familiar with the obvious application, but there's a right way and wrong to do it. On the left you see the wrong way - the enemy has grabbed my lapels and I'm attempting to break his grip. I'm unlikely to succeed! When your arms are out in front of you then its rather easier to adduct them (press them together) than to abduct them (pull them apart). So I'm not playing to my strengths! The picture on the right shows it correctly. The defender hasn't waited to be grabbed, but pressed the attacker's arms apart as they were reaching. He's then gone on to splay his hands apart in order to control the attacker's upper arms and shoulders.
The next move of our Pinan kata is kakiwake-uke or 'wedge block'. It's a straightforward enough movement.
The first photo shows the starting point, the juji-uke immediately beforehand. From here raise both hands, supinating the forearms as you do so. This brings you to the position in the second photo. Continue the upwards movement and separate the forearms, this time pronating. The final position, shown in the third picture, has both arms essentially in a shuto (knifehand) position, but with the fists closed. The shape of the arm though, exactly matches shuto, with the hands at shoulder height and the whole arm in a vertical plane directly in front of the shoulder and hip.
As you come up to the final position you can allow yourself a slight, well not leaning back, more of a standing erect after having been leaning forward. Think of having been leaning over so slightly forwards for the juji, then coming upright for the kakiwake. But just a tiny amount, nothing like the heady excess of some of the Japanese styles where this movement has morphed into a large back stance.
Where does kakiwake come from? It has a direct match in our version of Seisan. There is also an open-handed version in Chinto. Interestingly - to me anyway - Chinto also explores the related theme of 2 simultaneous outward blocks, ie. the same overall shape but going from pronated forearms to supinated, which is the opposite of what we see here.
Now to apply the 2nd part of Juji-uke - thrusting with both arms, crossed at the wrists.
Imagine that you've blindside the enemy. You're in a good position to punch, but they're heavier than you, balanced, stable and strong. It may be that punching them in the torso may bend your wrist, doing you more damage than them. I've certainly been in this position. Here's where juji can help.
Punch with one fist, in the standard Okinawan ¾ orientation. Use the other fist to brace it, by placing your hammerfist on top. The muscle on the little finger side of the hand of your hammerfist should press on to the metacarpals (the bones in the back of the hand) of the index and middle finger of your punching hand. This prevents the wrist from flexing (by far the most likely way that the wrist can buckle).
Don't punch from the hip, instead punch along your centreline. As you're using both hands turning the hip would be counterproductive. So how do you generate power? By driving the centre forwards and by a slight flexing of the spine (which curves back as you begin to drive forwards then curves forward at impact).
In this particular instance I've focussed on striking with the 2 main knuckles of the bottom hand, but I could equally well let the knuckles of the other hand join in too - more targets to hit but less pressure applied at each knuckle.
Why wait til I've blindsided the enemy before using this strike? Well as it uses both my hands working together I'm momentarily not a position to block or control either of their arms. So I want to have a free shot, to not worry for a moment about what their hands are doing. At those times this is just the tool for the job.
Low x-block is a brilliant example of a technique that can be so badly applied. I'm sure you know the classic 'application'. The attacker kicks to your groin, you drop into a deep forward stance and block down with both wrists crossed. There's no way you're going to get your hands back up in time to address the punch that's inevitably going to follow. What madness! This is what happens when instructors won't admit they don't have a clue. They make something up.
Lets inject some common sense. I'm only going to use the initial retraction for this application. It will work best when either a) the attacker has grabbed but not yet attempted to strike, or b) in a grappling situation where your free hand is momentarily low and doesn't have to travel very far to reach the grabbed wrist.
Photo 1 - In response to a same side wrist grab I slide my other wrist under the attacker's own wrist, so my radius is in contact with the back of their wrist.
Photo 2 - I draw both hands, in a curve, up towards my centre. This bends their wrist back and begins to lock their elbow out straight but not enough to crank it on tight.
Photo 3 - I need to move. Against a larger, heavier assailant I'll move forwards, as shown, making sure that I apply pressure up from below through their wrist and elbow. This forces their shoulder up towards their face (preventing them from being able to punch with the other hand) and creates an opportunity for me to switch to something else. Typically I'd grab and control their wrist so that I can strike freely from the outside. Against a smaller or lighter assailant its not so easy to get far enough beneath their shoulder for this to work - so instead of moving forwards I'd move back, to crank the wrist lock on more and so pull them off balance.
This is the next move in our version of the Pinan kata. It has a couple of differences with the way that many modern styles do it. Our version is inspired more by how it is presented in the different classical kata.
Phase 1: In photo 1 I step back from the previous posture ('Punch Thru Hand') with my left foot, into a right forward stance. At the same time I draw both fists back to my centre. I slide the left forearm over the right as I do so, until the wrists are crossed. The path my fists take is not linear. Instead they dip first down then up at the end of the movement to finish at my upper abdomen.
This is different to some modern styles where the hands come back on a more linear route and may come to the sides of the body (so they're not crossed at this stage). Our version is more reminiscent of the classical versions from Chinto and Kusanku. This 'pull back' is also shown more linearly in Seisan.
Phase 2: In photo 2a both fists thrust forwards, maintaining the cross at the wrist. Note the orientation of the fists at the end of the movement - the typical ¾ fist orientation as if punching. We see this phase of the movement in Chinto and - at head height - in Passai Dai. Photo 2b simply shows the final position again, this time from the front.
The mechanics of this move are quite straightforward - its simply about pushing and pulling along the centreline with both arms at the same time. Exactly where the arms cross each other should be determined by the particular application. Whether the pulling motion is linear or curved also depends on application.
Last week I showed an application of the 'punch through hand' posture that I took from Naihanchi kata, modified then injected into my own version of the Pinan kata. The previous week I showed an application of age-uke (or rising block) from the Pinan kata. The end points of both techniques are shown in the picture.
Note how I have joined the 2 techniques together here. I've gone from the end point of the Naihanchi technique (arm control and uppercut) straight into the 'rising block' - using it to drive my forearm through the attacker's head. I haven't done one technique then the other. Note how the uppercut is essentially the same posture as the 'chamber' for the rising block. I've actually completed the first technique then joined in with the second half-way through.
Isn't this cheating? Going from one kata move to a different one, out of sequence? In fact, jumping to a different kata (remember that I stole the uppercut from Naihanchi in the first place)?
No! There are no rules saying you can't do this. Any rules like this that anyone tries to impose on kata are rules of their own creation, they are not inherent in the kata. Remember that the only hard and fast rule is the one that states: you get to go home safely. Any tactic that helps with that is worth pursuing. So internalise the principles of the kata and apply them freely as required. Anything else is just you working to fit the kata, rather than making the kata work for you.
At the weekend I attended the FBMA Autumn camp at Skipsea on the East Yorkshire coast. FBMA stands for 'Friendly Bunch of Martial Artists', it's a Facebook group that does exactly what it says on the tin. The training was over 2 days (Saturday and Sunday) and the cost included 2 nights stay in a caravan. The caravans were very nice, the site good but most important was the training…
I got to have a taste of Tai Chi, Wing Chun Kung Fu, Silat, Kaze Arashi Ryu Aiki Ju-jutsu (there's a mouthful) and a couple of non-style-specific sessions with a highly experienced bouncer / security specialist. All of the instructors were excellent, all the sessions fun and informative. I taught a session on kata bunkai (shown in the picture), which wasn't terribly well attended but I hope was useful for those who did take part.
My son enjoyed the kickboxing and, especially, learning to use nunchaku.
While we were both training, my wife may even have had the opportunity to experience a few minutes peaceful solitude. So an excellent weekend all round.
This is an application of the uppercut in Naihanchi kata but, as this move is partly based on that uppercut, then its applicable here too (although the stance is closer to that used in Naihanchi).
Picture 1 - this application starts, as the last one (age-uke bunkai no. 5) did, with the enemy grabbing my lapel with their right hand. They're about to follow up with a left punch. Again as before, I seize the initiative by catching their hand with my left to pin it to my lapel and simultaneously flicking to the eyes with my right fingers. If their punch is already on the way then my right arm could block that rather than flick to the eyes.
Picture 2 - I slide to my left (ie. away from the threatened/incoming punch) and drop my right forearm through their medial brachioradialis muscle, jerking them off-balance. Dropping into the stance here will drop your bodyweight into the strike.
Picture 3 - I strike to the head with a left uppercut, without taking the pressure off the enemy's arm. If I were to strike the face like this there'd be a good risk of injury to my fingers, from one of the bony protrusions of the face. However, because of my body movement and the strike to the brachioradialis the enemy's face should be angled away from me. So I can strike to the side of the head/face which presents a much flatter surface to hit, and contains several useful targets. In this instance I'm striking to the temple.
This is a classic application of Age-Uke (rising block). I first learnt it in about 1996, under the guidance of Vince Morris, although there were a few other good instructors about then teaching similar versions of the technique. Vince's approach was particularly dynamic and effective in my opinion. There are numerous bunkai experts around today. I think many of this current wave would benefit from tapping into the experience and knowledge of the generation of teachers who blazed that particular trail before them - while those guys are still actively teaching.
This application starts in picture 1 with the enemy grabbing my lapel with their right hand. They're about to follow up with a left punch.
In picture 2 I seize the initiative by catching their hand with my left to pin it to my lapel and simultaneously flicking to the eyes with my right fingers. If their punch is already on the way then my right arm could block that rather than flick to the eyes.
In picture 3 I slide back and to the outside slightly while dropping my right ulna through their medial brachioradialis to jerk them off-balance and encourage them to reflexively drop their head towards my next strike.
In picture 4 I slide back in to strike with age-uke, driving my forearm up through their head. Aiming for the angle of the jaw generally ensures I'll hit a useful target.
Step 3 must flow into step 4 without pause. This produces a 'plyometric bounce' which adds power. It also means that your forearm strike hits the enemy as they're moving forwards, again adding power. Take care in practice, as you can't be certain how far forwards the enemy's head will come. Either pull your age-uke well short, or wait for the enemy to stop moving before you strike, to prevent injuring your training partner.
This isn't rocket science! I hope that the application of this move is obvious. You punch into your own hand. I've heard this described as 'proprioceptive marking', ie. it relies on your inbuilt knowledge of where the different parts of your own body are in relation to each other. If you hold the opponent's head with one hand and punch into that hand with your other fist, then their head has to be in the way of your fist. You can't miss, even with your eyes closed.
How do we use it? A typical starting position is shown in picture 1. You're in a relatively close range grappling situation with one hand on or close to the enemy's shoulder or neck.
In picture 2 you grab the back of the neck. Ideally, dig the tips of your fingers into the vertical groove between the trapezius & sternomastoid muscles, and jerk your hand back towards yourself. Hopefully digging your fingers in will magnify the jerking action as they move their head away from the stimulus (ie. towards you). Immediately punch towards your own hand selecting a suitable target along the way. In this picture I've chosen the jaw, an obvious and fairly safe target. Of course, the enemy doesn't just want to let you do this. I'm glossing over this here but you have to find or create the right opportunity so that his (right) hand doesn't just stifle your (left) punch. Don't just think of punching your hand, but as if you're punching right through it, penetrating deeply into the target.
So far I've just looked at a situation where you strike straight towards your hand. But what if you offset the hands? What if you punch above your own hand? That would create a bending or twisting action between the 2 target areas (ie. the grab and the strike), which could itself be useful. This is shown in picture 3.
The next move in our Pinan Daikou kata I call 'Punch Through Hand'. Its actually an alien - ie. its not found in the original Pinan kata at all. Its not even copied direct from another kata. I've actually coddled this move together myself, taking inspiration from 2 different kata moves.
The first move is the classic 'Sun & Moon' salutation posture from the start of various kata. I know a number of people who practise punching into their own hand as an application of this posture. Punching your own hand may not make sense at first, but it makes a lot more if you're holding part of the enemy's body at the time - more on that later. It's a good technique in my view, but I don't see it as an application of Sun & Moon. I've never seen a version of Sun & Moon in which the fist thrusts and that is after all an essential component of the technique. So I decided to include a kata move that is truly representative of the actual technique.
The second move is a variation of the uppercut from Naihanchi. We put them together as follows.
Picture 1 - start from 'Separate Hi-Lo', the previous technique in the kata, with the left hand in gedan-barai and the right in soto-uke. The feet are together and won't move during this technique.
Picture 2 - open the right hand and bring it to the centreline, rotating the forearm so that the hand is palm down. At the same time thrust upwards with the left fist, punching into the open right hand. The hands meet on the centreline.
Picture 3 - Continue the same motion with both hands, allowing the right hand to slip past the left fist. The right hand forms a fist (as if grabbing) and comes to rest at the left elbow, at the same time as the left fist comes to rest at face height. The left has slightly crossed the centreline by this time. Job done!
We've seen the basic version of Hi-Lo, but there are a number of variations on the same theme. They all start the same, in terms of what the arms do. One arm performs a downward sweep, passing on the inside of the other arm as that one sweeps up. We find the basic version in the kata Naihanchi, with the arms to the front, no further than shoulder width apart. The hands are held in fists, with the raised arm performing soto-uke (outward 'block'). The stance, it being Naihanchi kata, is of course naihanchi-dachi. Note also the different fist orientations in the 2 Naihanchi photos.
In other variations the arms can sweep further to the sides (I think of hi-lo narrow and hi-lo wide). The height of the high arm can also vary, as can the shape of the arm movement itself. Sometimes its soto-uke (outward 'block'), sometimes its age-uke (rising 'block'), but either way the movement starts the same way with the arms crossing. The hands can be open or in fists, but frankly I think that's not really important - it really just depends on the particular application and situation.
The stance can vary too. It can be feet together (as in the Pinan kata). We've already seen naihanchi stance. It could also be a back stance or straddle stance, or even a crane stance, with one foot lifted and held at the supporting knee (as in Rohai and Chinto). Choice of stance is of course dependent on application.
We see all these variations in different kata. To some extent they're interchangeable in that there are core mechanics shared by all the variations, that are used in particular applications (bunkai). But there are other applications that use the specific end points of different variations and are therefore specific to those variations.
Imagine the enemy is relatively close and he throws a straight right punch. Perform mawashi-uke (aka roundhouse block). First (in pic 1) intercept inwards with your left hand. Then (pic 2) pass it to your right. This block utilitises the crossing motion at the heart of all of the basic 'uke' techniques. You intercept with one hand and pass the other hand underneath, to switch contact with the enemy from one hand to the other. This is the same block as practiced in the tegumi drill.
There are numerous ways to progress from this point, depending on distance, angle, intent, etc. In this case we're not going to try to catch the enemy's arm, rather we're going to emphasise immediate countering, whilst their punch is still in motion.
From picture 2 draw the left hand back no further than necessary to create a path, under the enemy's arm, to their torso. Strike to their lower ribs (pic 3). This can be either a thrust (tsuki) striking with the main punching knuckles, or sweep (harai) striking with the little finger knuckle. At the same time complete the blocking motion with the right hand, to keep turning the enemy's arm away to the right. This puts your right hand in a good position to grab the enemy's arm, or intercept a strike from their other hand, or attack their head - whichever is appropriate in the circumstances. Whilst all this goes on turn the hips slightly to the left, powering both arm movements and angling slightly away from the enemy's strike.
The pictures give the impression that this is a linear 'ichi ni san' sequence but that's a simplification to aid the learning process. In reality each step blurs into the next smoothly and seamlessly to just become 'ICHI'!
This application doesn't use the foot movement from the kata, we'll come back to that later.
Back to looking at the techniques from our kata, Pinan Daikou. This 1st posture of Section 3 consists of 2 movements we've already seen - soto-uke (outward block) and gedan-barai (downward sweep). Previously the 'active' arm of each move was combined with hikite (pulling hand) action by the other arm. But now we're dispensing with the hikite and putting the 2 'blocks' together. At the same time the feet come together, the rear foot drawing up to the lead foot.
This is of course the same move as found in the first section of Pinan Sandan. There it occurs after an outward block in cat stance. In our kata it comes after a straddle stance, but the method of moving into the posture is just the same.
Its very limiting to think of this movement as consisting of 2 blocks. They are of course simply powerful arm movements (I've described these in detail previously). Combining them together, however, offers new possibilities. Instead of each working in opposition to hikite, each 'block' is working in opposition to the other. It is akin to the 'yoi' ready position in which the arms cross and uncross to generate power. But here we start with one arm low and one high, crossing them to change which is high and which low. The crossing is important but the name I give to this move is based on what happens next. That is the feeling of separating or pulling apart as you finish the move. Just as you pull apart in yoi, you pull apart here too, hence the name: Separating Hi-Lo.
Where does this move come from? Obviously its in Pinan Sandan but (focussing on the hands not the feet) it was used in at least 2 classical kata before that - Naihanchi & Passai. And then there are variations on the same theme found in several other kata. Not to mention the different Kung Fu systems and even Qi Gong.
I've looked at vital points & acupuncture points, and shown that actually there isn't as much correspondence between them as people often think. But what about Traditional Chinese Medicine (TCM) generally? Are the principles of TCM relevant to vital point striking? Some people think so.
The most popular use of TCM principles is in selecting combinations of points that together produce a much greater 'energetic' effect than single points alone, or other combinations. Attacking the right combination of points might adversely affect the victim's qi, to give you 'more bang for your buck'. Its nearly 20 years since I teamed up with Zoltan Dienes, an experimental psychologist at Sussex University to test this idea. To my knowledge our experiments were the only properly conducted scientific research that has ever been carried on this aspect of martial arts.
Specifically, we tested what is called the 5 Elements Destructive Cycle against the 5 Elements Creative Cycle. According to followers of the TCM approach the Destructive Cycle should have been demonstrably better at causing pain than the Creative Cycle. However, we found no evidence to support this at all (full details in the Articles section of my website).
The problem was that the whole approach was fundamentally flawed. Thinking that qi was something you could reliably manipulate to produce immediate harmful effects represented a complete misunderstanding of TCM. TCM isn't science. It's a holistic approach to wellbeing, more akin to art than science.
The misunderstanding was so great that the advocates of the idea even got the name of the Destructive Cycle wrong. TCM therapists refer to it as the Control Cycle - but that name doesn't sound as cool and doesn't sell as many books, DVDs or seminar tickets.
This is the 2nd of our Tsukami Tegumi exercises. Its a variation on the first exercise, but assumes the armbar isn't working and so transitions to a different joint-lock and hence different takedown and pin. The pictures take up the story where the 2 exercises diverge:
As the armbar is not succeeding, start to rotate to your right to unbalance the attacker and stretch out their arm as best you can.
Continue to turn, digging your knee into the back of their leg and applying pressure with your hip/torso to their arm. The feeling is that you're doing a left reverse punch, in term of what your hips and body are doing (not the arm). This will unbalance the attacker to enable you to carry out the next technique. At the same time let go of the wrist with your left hand and switch it to gripping the hand - thumb on the back of the hand, fingers wrapped around the meat of the thumb.
Pivot and turn to face the other way. As you do so, dig into the attacker's bicep with your elbow to help bend their arm. Turning in this manner, while holding their hand with your left (without changing the grip) will apply a kote-gaeshi wrist-lock. At the same time let go with your right and use it reinforce the action of your left.
As the wrist-lock takes the attacker down follow them by bringing both feet together immediately behind their shoulder. At the same time pull up on their hand with both of yours, to stretch out their arm and roll them onto their side.
Apply the finishing lock. This is like doing a kote-gaeshi at the same time as a shiho-nage (4 corner throw), but with the attacker on the ground they have nowhere to fall to.
This shows a close up of the final lock, from a clearer angle. More on this lock later.
Last week I described the first of our Tsukami Tegumi Waza. In this there's an application of 'Yoi' (the ready position) hiding in plain sight.
The starting position is shown in photo 1. Having grabbed the opponent's wrist (with your right hand) and struck him (with your left) you've brought your left hand down to also grab the attacker's arm and help to roll it over. This helps to apply an armpit armbar. Now for Yoi.
Let's recap on the mechanical principles of Yoi. The first stage involves simultaneous forearm rotation (supination), elbow flexion and crossing of the forearms. This is what we see in photo 2. Let go with the right hand. Use the left hand to keep the opponent's forearm rolling over. Also supinate the right forearm, keeping the hand it in contact with the opponent's hand, so that it grabs their hand from underneath. The arrows indicate the direction of the forearm rotation, ie. supination.
The second stage of Yoi movement is shown in photo 3. This involves uncrossing the forearms whilst pronating them and extending the elbows slightly. Doing this with the right hand applies a wrist-lock. You can't really see much rotation with the right hand, that's because the opponent's hand is in the way. It's the attempt to pronate that's important in applying the lock, not how far you actually rotate. Again, the arrows indicate the direction of forearm rotation. The left hand isn't too important here. Releasing the grip and pronating makes it available for other uses, such as applying an armbar as shown here. You could interpret that as part of the Yoi, but then you could equally do other things with it that couldn't be classed as Yoi. Remember, the kata move is a tool for you to make use of as appropriate, not something that must be slavishly adhered to.
They're the same thing, right? Well, no they're not! Or rather, its not that simple.
First, let me qualify my experience. Unlike most martial artists, I have actually formally studied and practiced oriental medicine. I studied for 3 years and practiced professionally for a further 7. That's not to say that you should just accept all that I say on the subject, it merely demonstrates that my opinion is based on both practical experience and formal education. I invite you to independently verify anything and everything I say for yourself.
In reality, some vital points are in the same location as acupuncture points and some aren't. Some vital points are better described as zones or lines, which may or may not contain one or more acupuncture points.
Lets look at some important examples that I've already described in detail - the brachioradialis points. The line of the lateral brachioradialis incorporates the acupuncture point 'Large Intestine 10' (aka LI10). But that's only 1 point on a line that is several centimetres in length - and its not necessarily the most sensitive point on that line. Similarly the line of the medial brachioradialis contains the acupuncture point known as 'Lung 5' (L5). BUT THIS ISN'T THE REAL L5. The real L5 is in the elbow crease and is rather less martially useful than the point that martial artists use (you can just about see the real L5 in the picture). The vital point, several centimetres away, isn't an acupuncture point at all. Its just a convenient fiction to pretend that it is.
There are other examples we could look at, but the message is clear. The overlap between vital points and acupuncture points isn't that large, certainly not as large as some would have you believe. So why think of them as one and the same? Really, what's the point?
I've previously outlined our Tsukami Tegumi Waza - a set of exercises that combines together the tegumi flow drill and our tsukami waza joint locking flow drill. The idea is to break out from the tegumi drill, using strikes to create the opportunity to flow into a joint lock, then use the joint-lock to take the attacker to the ground and pin them there. This sort of practice helps you to flow seamlessly between these different types of technique.
The pictures give an overview of the first of our Tsukami Tegumi Waza. Starting in the top left corner and working clockwise:
Intercept the incoming punch.
Blend with the punch, using a mawashi-uke block to switch to the outside, stepping back to the left to draw the attacker forwards.
Drive in with a palm-heel, knee, elbow combination. The picture just shows the elbow.
Don't stop at the elbow strike, instead sweep it through the target bringing the hand round to grab the attacker's forearm. Drop into a straddle stance and bend forwards at the same time in order to apply an armpit armbar.
Keep rotating the attacker's forearm and switch the grip with your right hand, to apply a reverse wrist lock.
With the wrist lock on, take your left hand off and place it on the attacker's elbow to keep the armbar on. Drive forwards with your left foot, using the armbar to force the attacker towards the floor.
Keep going, taking them to the floor and bringing your left shin onto their triceps tendon.
Bring the right leg forwards, using it to support the attacker's forearm. You can now bar the arm with your legs, to free up your hands. Even so, keep the wrist lock on. You can now safely take your left hand away and, for example, use it pull out your phone and call the police.
There are 2 typical approaches to defining vital points: a) the western medical approach, thinking in terms of anatomy & physiology, or b) the oriental approach, thinking in terms of ki (or qi or chi), meridians and acupuncture points.
I prefer a simple, robust definition of what vital points are, which doesn't get stuck in technical detail…
A vital point is any point on the human body which produces a disproportionately large effect for the amount of force used to attack it.
For example, a gentle poke to the eye will produce a much greater effect than the same force against the forehead. It will cause pain, an instinctive flinch away from the stimulus and produce tears (making it difficult to see).
This is an obvious vital point, but there are many less obvious ones that can produce an effect disproportionately large when compared to just bashing the human body at random.
At this stage we don't need to concern ourselves so much with how the vital points work, but rather what effect we're looking to produce. These are:
Pain - not something we can rely, but not a bad place to start.
Reflexive action - an instinctive response, which we can exploit.
Dysfunction - ie. loss of ability to function properly, such as unconsciousness, or a broken bone.
Leverage - some points are very effective places to apply leverage, regardless of any other properties they possess.
All vital points should produce one or more of the above, when attacked correctly. As to why these effects occur, it's clear to me that the mechanisms concerned are different for different points. What are the underlying principles? Well that's a subject for another post.
The picture, from longer ago than I care to remember, shows a single-knuckle strike to a vital point behind the jaw.
Yesterday I was on the receiving end of a road rage incident, perhaps not quite as dramatic as the one in the picture but dramatic enough.
It doesn't really matter how it started. Suffice to say that the other driver perceived some insult on my part that wasn't there. We ended up pulled over on a minor road and he leapt out of his car. He shouted, not making a lot of sense. I tried to reason with him but he wasn't listening. I just fell back on the usual tactics - calm tone of voice, hands up in a guard. He didn't attempt to hit me but came close enough that my guard instinctively touched his arm. He moved back but then, incensed, grabbed my forearm with both his hands and tried to twist it. He still wasn't trying to strike so I opted to just twist out of his grip. He backed off a bit, his urge to lash out just being kept in check either by fear or common sense.
He ranted some more, insisting I drive on (ahead of him) or he was going to ram my car with his. I politely but firmly declined, saying that I had now reached my destination. Eventually he gave up, got in his car and drove off. I waited for a minute then turned round and went another way, just in case he was waiting to cause further aggro.
What lesson can we take from this? I think its the importance of the usual tactics in dealing with confrontation: a) staying calm; b) speaking in clear, calm but assertive tones; c) keeping a guard up; d) physical contact with your guard, if the distance closes. From years of practice of muchimi (sticking) it was clear to me that he was not feeling bold enough to try to hit me, at least not while I had a guard up. I certainly think the day could have ended very badly for one or both of us had I not applied those simple tactics.
…to be effective. In fact, I think the opposite may be true. But looking at social media you could get the impression that Karate should involve people doing the splits, or flying through the air, or perhaps both at the same time! Of course there's nothing wrong with being dynamic, but I wonder if sometimes practicality is being sacrificed in the pursuit of excitement and athleticism.
I took this photo recently and I thought it was a really nice example of some of the core principles that I'm always looking for. What I think it shows well are:
Muchimi - sticking to the opponent, to help control their movements.
Kuzushi - breaking their balance, whilst keeping your own. Notice that the orange belt is leaning slightly to his left. Also the toes of his left foot are raised and his weight is pushed to the outside edge of his foot. Its relatively subtle but his balance is definitely broken.
Tai-sabaki - moving to a position of advantage. In this case the defender is twisting the attacker to his left, making it momentarily very difficult to continue his attack.
Ki - using bodyweight and correct structural positioning to produce the power to effect the technique, in preference to upper body strength.
These are not the only important principles, but they are central to effective self-defence. I think this picture shows well how they all work together in a mutually supportive manner - in one simple movement, one contact with the opponent.
Of course, I've said all this before. But then I bang on about these principles ALL of the time in the dojo, so its only right that I should repeat myself online. In conclusion, I actually think this picture is very cool, if you know what to look for.
I've looked at the brachioradialis muscle across a number of posts now. First we looked at the anatomy and how to target it very accurately with a grab. This required considerable precision. Then we hit one border or other of the muscle. As we were striking we could get away with being less precise. Now, having got a good feel for the anatomy and a good feel for the required technique, we can go the whole hog. We can move from using fine motor skills to gross motor skills and still get the effect.
The technique shown is a good example of this. The assailant has grabbed my lapel with his left hand - a precursor to hitting with his right. He might also push or pull to make life more difficult for me. I start by jabbing the fingers of both hands towards his eyes. This serves as a distraction and, if he's pushing forwards, should help to halt his motion. Instead of him physically unbalancing me, I'm mentally unbalancing him.
From this position I can easily drop both my forearms down onto his grabbing forearm. One arm drops through the brachioradialis, the other through the forearm closer to the hand. It doesn't matter which hits the brachioradialis, the right or left, from the inside or outside. Don't think about specific points, just drop through their arm with the right feeling.
Feeling is everything here - how you hit is more important than where you hit. And that feeling is one of cutting through, rather than striking then stopping with the modern concept of 'kime'. Once contact is made I keep the pressure on, back towards myself, throughout the 'cut'. Note how I drop into a cat stance so that my bodyweight augments the pressure from my arms.
This should produce a strong reflexive movement which I can capitalise on for my counter-attack.
As with the medial brachioradialis, we need to move from being able to find the point, to seizing it, to striking it.
Its generally easiest to strike the lateral border of the muscle from the outside. The photo shows an effective way to do this. Imagine the assailant has grabbed your left forearm with their left hand, as a precursor to striking with their right hand. Rather than wait for their punch to come, take the initiative.
Simultaneously a) move your body to the right (away from their anticipated punch); b) draw your left forearm towards your right shoulder, supinating it along the way; c) strike down onto their brachioradialis with your right forearm. Your combined arm movements will have the effect of presenting the lateral border of their brachioradialis in the right place at the right angle for your strike.
This should release their grip and, to some degree, buckle their knees (thus dropping their head) making it easy for you to follow up with a counterstrike. Its difficult for them to complete a punch with the other hand while this is happening. Depending on the exact angle at which you catch their arm it may be appropriate for you to follow through the strike to their arm by pressing straight down or back towards yourself slightly. Back towards you is good, if you have the angle right, as it will draw them in towards your counterstrike. Also note the position of their arm - the combined action of your arms has forced them into a wrist lock (nikyo). This will make them let go rather than having the wrist fully locked.
Finally, the counterstrike. The position in the photo I hope is obvious - it is the chamber position for shuto!
So we've practiced finding the medial brachioradialis point, we've practiced applying pressure with the fingertips, we've even augmented that pressure with the other hand. Now time to hit it. The pictures show an effective way to achieve this.
Imagine you've caught hold of the attacker's left wrist with your right hand, ideally holding it from above with their thumb uppermost. From here also imagine that they've thrown a round punch with their right hand and you've blocked it with your left. Or that you've slapped the left side of the face. Or both. Either way, you're going to swing the left arm across and down on to their left forearm, at the medial border of the brachioradialis. Once you strike, keep cutting 'through' their arm with yours, pivoting to your right as you do so. Keep the pulling motion going with your right hand. This looks like gedanbarai but it feels more like you're cutting with a sword down and back to your right.
Get it right and you see the result - they hit the deck, as their nervous system attempts to move their body away from the stimulus. Pulling with your right hand as you strike, it becomes easy to draw them off balance.
Actually in these photos I didn't strike as such. Or rather I 'struck' when already in contact with the target, from the position shown in photo 1 - you could call it a 'no inch punch'. This is a good way to practice for several reasons: it allows you to feel and learn the technique with your arm starting on the correct target; it allows you to use less overall force so that you don't damage your partner; it gives you the opportunity to practice the rapid acceleration (without prior retraction) required to make the technique work at such close range.
Still on the subject of the brachioradialis… We've learnt how to find the vital points and how to grab them, but for serious self-defence we're going to have to hit them. One challenge with using vital points is that you have to get know them like old friends, if you ever want to stand a chance of effectively hitting them during combat that is. You need to be able to hit the right place at the right angle, and to follow through correctly as the target reflexively moves away from the stimulus. It certainly helps to have the arm you're striking secured at the wrist. In the case of the medial brachioradialis point there's an extra challenge in that part of the reflexive flinch involves rotating the forearm, so you have to change your angle of attack on the fly.
The technique shown in the pictures is a halfway house. It allows you to still use your fingertips to dig into the medial brachioradialis point, but provides extra force by augmenting the action with the other hand. Its an application of the sun and moon posture in which you place your left fist inside your open right hand (or vice versa) then draw both hands down your centreline.
As the attacker grabs high on your lapel or puts their hand on your shoulder then grab their medial brachioradialis point from the outside with your fingers. Reinforce your fingertips with the palm of your other hand. Pull back towards yourself and down with both hands to invoke the reflex. From here there are various ways you could continue, depending on how strong their reaction was. A slight variation would be, instead of thinking of drawing down the centreline, to think of stacking the hands on one hip as seen in Naihanchi amongst other kata. This would draw their elbow to your hip rather than down your centreline.
I've already described the locations of the vital points on the brachioradialis muscle. Now to consider what we can gain by attacking them. If you've tried finding them you've probably found that most people experience pain when they're pressed. Pain's great but it can't be relied on to end a fight. Even if it did, not everyone will experience pain to the same degree, if at all.
No, the pain is just a clue. Accompanying the pain is a reflexive flinch, which is what we're looking to produce. The human body is awash with reflexes, which we can exploit to useful effect in combat. Firstly, if we knowingly invoke a reflex in our opponent then for a moment we have a very good idea of how they're going to move. That's got to make things easier. Secondly, some reflexes cause a momentary loss of balance - something we always want to produce in our opponent. Thirdly, whilst a reflex is occurring its difficult for a person to do something else at the same time - its hard to override the reflex with a conscious action.
In the case of the brachioradialis both sides of the muscle produce a reflex, though the reflexes are slightly different. In each case the reflex moves the elbow away from the stimulus. For the lateral point this means that the elbow will bend and, if the stimulus is strong enough, the knees will buckle. The picture on the left shows this - note that my partner is rather taller than me but his knees have buckled enough to bring his head down to the same height as mine.
The medial brachioradialis reflex is more complicated. As before the elbow will bend and the knees buckle. Also the forearm will supinate. The upper body will rotate and lean in towards the stimulus, the face will turn away, possibly the other arm will move away too, as shown in the photo on the right.
The lateral brachioradialis point is perhaps a little harder to find than the medial point but is easier to stimulate.
To find the point first find the brachioradialis muscle at the top of the forearm. Find the lateral border (on the little finger side of the forearm) of the muscle. You'll find a groove that runs along that border back up to the bone on the outside of the elbow (the lateral epicondyle of the humerus).
Now, file that knowledge away for a moment and find the centreline for the back of the arm. To do this draw a straight line from the middle finger knuckle up the middle of the arm to the elbow.
The 'point' starts where the line and the groove intersect, and runs along the groove to the elbow. The distal end (ie. the intersection) is probably the most sensitive bit but you'll likely find other locations going up the groove that are sensitive to pressure.
Its probably easiest to find the point on a partner (or yourself) by pressing with the tip of the thumb. Press straight in at a right angle to the line of the forearm. Note that in the picture my distal thumb knuckle is bent to ensure that all the pressure is applied through the tip of the thumb only. Also note that my fingers are wrapped round the underside of the arm, to act as a base opposing the action of the thumb.
You should find that most people will report pain when you press these points, as long as you have enough grip strength to provide sufficient force
The next question, of course, will be 'what is the point' (pun intended) of attacking these points…
Last week I described the locations of the brachioradialis vital points. Lets look at the medial point in more detail and how to train finding it. To recap, this point lies on the medial border of the muscle, high up on the inner aspect of the forearm. Think of it as a line about 3 cm long pointing straight down the arm.
The easiest way to find the point is to put the palm of your (right) hand on the outside of your partner's (left) forearm. Wrap your thumb round the underside of the arm. Gently slide your fingertips over the top. You should feel the brachioradialis move in the same direction as your fingers then gently flip back in the opposite direction. If you press too hard you won't feel this. Your fingertips should then be just past the border of the muscle. Dig your fingertips in, pulling them back towards the palm of your hand as if forming a fist. This feels like moving the muscle out of the way to get to the point beneath.
Most people will feel pain and reflexively move away from it - more on that later. Don't worry if this doesn't happen, unless you can't get it on anyone - in which case you're doing it wrong.
If you have difficulty, try wiggling the first 3 fingers as if playing a trumpet. This will vary the pressure between the fingers - it may be that only 1 finger is in the right place. Also varying pressure is more likely to get a response than if it is constant.
You may have missed the point by sliding too far over it. Be sure to get the tension right so that you feel the muscle slide past under your fingers.
Finally, when you dig in with the fingertips make sure your distal (furthest away) finger joint is bent. Otherwise you'll be pressing with the pads of the fingers rather than the tips, reducing the pressure in the process.
Last week I discussed the brachioradialis muscle and the rough location of its vital points. Now to locate them more rigorously. Rather than trying to hit the points straight off, its much more effective to learn to locate them by grabbing them with your fingers or thumbs. This will help you get a feel for the correct location, correct angle of attack, the underlying musculature and the reflex produced. Finding them can be difficult at first, because its not really the surface location that you're interested in, its the underlying muscle structures.
I use the term 'points', but its better to aim at 2 lines. Imagine a straight line passing more or less along the top of the red area show in the picture. This is the lateral border of the brachioradialis. Apply pressure directly through the forearm - so if the forearm was placed palm down on a table you would press vertically down through the arm. See the bottom left picture.
Another line along the bottom of the same red area shows the medial border. This is attacked a little differently. Imagine you're peeling the brachioradialis out of the way slightly to dig into the (radial) nerve hiding beneath it. The pressure is back towards the ulna, more or less at 90 degrees to that required for the lateral border. See the bottom right picture.
Along each border there are points that are a bit more or less effective than others but its easier and more effective to just aim at the lines. More on that later. Note that in both pictures the victim's wrist or hand has been stabilised in some way. With most people, you'll know you've got the right point if you illicit a pain response and reflexive moving away from the stimulus.
The brachioradialis muscle in the forearm is a very useful and important target to attack in Karate-jutsu. So I want to look at this in a bit of detail. Today lets look at the anatomy.
The main belly of the brachioradialis lies at the upper (proximal) end of the forearm, overlying the radius bone. It connects the lower (distal) end of the humerus (upper arm bone) to the lower (distal) end of the radius (thumb side forearm bone). Like the biceps and brachialis it flexes the elbow (bends the arm) although it is not as large or powerful as either of those two muscles. It also plays a minor role in both supination and pronation (the two different ways of rotating) of the forearm. The radial nerve passes deep to (ie. underneath) the brachioradialis muscle. If you hold your forearm so that the thumb is uppermost this muscle is also uppermost just below (distal to) the elbow crease.
The first picture shows the musculature, the second the surface anatomy indicating the main belly of the muscle - so you can see where it lays on your own forearm.
The primary targets to attack on the brachioradialis are the anterior and posterior borders of the main muscle body, ie. along the edges (of the muscle, not its tendons). Attacking the borders gives us easier access to the underlying tissues (so its really those that we're attacking). The anterior border (on the inner aspect of the forearm) gives us access to the underlying radial nerve. This is a big nerve so pressure on it can produce a considerable effect, more on that in a later post. The posterior border gives us access to several underlying muscles close to the common extensor origin, ie. where they attach to the elbow.
Next week I'll show how to find the vital points associated with this muscle.
Now for the final bunkai from Section 2 of Pinan Daikou. I've already described these applications, this is just to recap the content of our 5th kyu grading syllabus.
This segment consists of just one move, which is the spinning hammerfist taken from Pinan Sandan. There are however, 2 applications. Both deal with someone trying to twist your arm behind your back. In the first you simply thwart their attempt, using the 'unbendable arm' principle often seen in Aikido. In the 2nd application (assuming the 1st wasn't successful) you go with their attempt, spinning faster than they apply the hold, to strike them and force a release.
And that completes the introductory applications for this section of the kata.
Here is the next set of movements from Pinan Daikou Section2. They are of course the same as the first 3 moves from Pinan Shodan. The corresponding bunkai for our 5th kyu syllabus is also shown. As before, I've only shown each technique as far as the kata goes. The last strike of each sequence might finish the fight, or it might not. So you need to be able to continue on from the end point as necessary.
Over the years of teaching Karate I've been asked some interesting questions by students. Here's a few…
Student: "Sensei, I can't get this technique right. What should I do?"
Me: "More practice."
Student: "Sensei, press-ups on my knuckles hurt. What should I do?"
Me: "More press-ups."
Student: "Sensei, can I keep my grade from my old style?"
Me: "Yes, of course you can. When you practice your old style. But not here."
Student: "Sensei, is it OK if I just put some electrician's tape on my belt, rather than sew on this new stripe you've given me?"
Me: "That's absolutely fine. Assuming you never want to grade again, that is."
Student: "Sensei, what would you recommend as first aid for bruises?"
Me: "Erm, I don't know. Not whining about them?"
As I often say to my students: "Remember, I'm your Sensei, not your Mam!" There are things I can help you with. And other things you have to do for yourself, or get your mam to.
N.B. The above is of course written in jest. In particular, I don't think martial arts teachers should demand to be called 'sensei'. It is, in my view, a term of respect rather than an official title. It should be up to the student whether to use it or not. Personally I generally prefer to just be referred to by my name - it helps me to avoid delusions of grandeur.
I've examined several applications from Pinan Daikou recently, most of which correspond to movements from Pinan Shodan. Now I just want to go through how we organise some of these for grading purposes. Currently these are examined as part of our 5th kyu syllabus (green belt with 1 stripe). This particular sequence consists of 4 moves:
gyaku-soto-uke (outward block with the rear hand)
aegeri (front kick with the rear foot)
gyakuzuki (reverse punch)
gyaku-soto-uke (the same 'block' as at the start of the sequence)
The first 3 moves can be put together as numerous different variations on the same theme of: block, kick, punch. Several variations are shown here (ie. different variations of the kick, followed by different variations of the punch, it just depends on your relative positions, distance and orientation).
After that there are different ways to follow up. If I've grabbed the wrist an armbar would probably be my preference. Here however, we're going to use gyaku-soto-uke to apply a partial (transitory) armbar followed up by dropping the elbow onto the back. Switching back to an armbar should be straightforward from here.
I've looked at both these applications separately already. Now I just want to highlight how well they can work together.
First the gyaku-zuki, aka reverse punch. Fairly often, when we've seized the attacker's wrist with our lead hand we have an opportunity to use this move to apply an armbar. We punch through the attacker's triceps tendon, just above the elbow. Not with the fist but with the (distal ulna) forearm bone (but it still feels like a punch). This can jar the elbow badly and drop the attacker to their knees, alternatively their knees may just buckle and their body bend forward. Either way it's a great opportunity to carry on with an armbar, drawing them out into a prone position on the ground. Sometimes though, you may feel you just haven't destroyed their posture enough to do this, or their just too big.
Time to switch tack. Instead of pushing forwards with your forearm, draw it back towards your opposite hip, still with a feeling of cutting through their arm. So both your arms are drawing back towards the same hip. Use this to pull their body in towards you, or you towards them. It matters not, either way. This is the chamber position for the gyaku-soto-uke (rear hand 'outward block').
Now for the 'block'. Circle the arm round and drop the elbow on to the attacker's back -described in more detail in a previous post. This should drop the attacker further down, making it easy to go back and succeed with the armbar. In this position I would typically change to applying pressure on the triceps tendon with my hand, but it just depends on the angle. Alternatively you may wish or need to carry on with further strikes. A knee to the ribs at this point is usually quite effective.
Over recent weeks I've described the individual techniques in Section 2 of our kata, Pinan Daikou. Now to put it all together.
The individual techniques are as follows:
Outward block (rear hand)
Front kick
Reverse punch
Outward block
Simultaneous uppercut and rising block
Simultaneous inward blocks
High sweep
Spin and high sweep
Of course, these terms are just labels. I don't think of any of the 'uke' or blocking movements specifically as blocks, but the labels are convenient all the same. Similarly, the punch doesn't have to be a punch in application, this is just a label.
The pictures show the first half of this section of the kata. It then repeats on the other side. If you only know as far as Section 2 then you close the kata with the Sun & Moon followed by 'yame' (ie. coming back to the 'yoi' position).
If you're familiar with the Pinan kata then you'll recognise these techniques. Steps 1 to 4 are lifted as a sequence straight from Pinan Shodan (aka Heian Nidan). As are steps 5 to 7. The last move comes, with a little modification, from Pinan Sandan.
There are actually two applications in one here, both address the same attack - that is the policeman's 'come-along', ie. twisting the arm behind the back.
The first application utilises the first part of the move, ie. pushing the hand down behind the buttock, before bringing the hand forwards to the standard hikite position. The idea is to simply to keep the arm in front of you so it can't be twisted behind your back. If the assailant does manage to get it behind you, press your hand down behind your buttock, unbending the arm in the process. Then bring your arm to the front. If necessary you can move your body rather than your arm, to get one in front of the other. This is not really a test of strength, its actually an application of the Aikido 'unbendable arm' principle, but more on that at a later date. I haven't shown a photo of this as it is isn't really very photogenic - just a picture of one person holding another's arm, to no obvious effect.
What if the above doesn't work? And they're managing to twist your arm behind your back? Instead of continuing to resist, suddenly change tack and go with it. But don't just let them lock your arm. Keep spinning so they don't get a chance to hold the lock in place and sweep your arm through their head/neck. Note the use of the word 'through'. Don't stop when you've hit them, just keep your arm swinging round and then bring it in a circle under their arm so that you can wrap it round one or both of their arms. Having momentarily trapped their arms you can pull your (grabbed) arm out of their grip. From here various options to follow up can be explored.
The next move in our kata Pinan Daikou is a spinning hammerfist. That's not like the spinning backfist you see in some competition formats. It actually comes directly from the spin/hammerfist in Pinan Sandan, with some slight modification.
In Pinan Sandan it's the move directly following the nukite (spear-hand). There are some styles that do it differently but I'm thinking of the variation in which you turn 180 degrees and place your open right hand on your buttock/thigh, palm facing backwards. You then step and spin a further 180 degrees and finish with a left hammerfist.
Our version is slightly different. The starting position isn't nukite but is itself a sideways hammerfist in a straddle stance. Lets assume we start with the right arm extended.
Picture 1 - Slide the left hand down behind the left buttock, so that the back of the hand rests on the buttock. Open the hand at the same time. This is a deviation from the way that most styles do this move in Pinan Sandan - in which they pull the hand back into that position, turning the body away at the same time. It is a rare instance in which I've specifically modified the kata to incorporate a particular application.
Picture 2 - Pivot the left foot to the left then draw back the right foot in order to spin round to the left. At the same time begin to chamber the right arm ready for the hammerfist to follow.
Picture 3 - Complete the spin, dropping into a straddle stance and completing the hammerfist.
I realise that to be correct in my anglicisation of Japanese words I should probably have said 'harai' rather than 'barai'. But I used 'barai' deliberately as that how is most karateka would think of it, eg. gedan-barai or 'downward sweep'. So 'barai' means 'sweep'.
Tsuki, on the other hand, means 'thrust' (not specifically 'punch' which is how we normally think of it).
Japanese Karate is like a bento box. That is, various moves are defined and pigeonholed into fairly rigid categories. Sweeps sit in one compartment while thrusts sit in another, just as your tempura vegetables and your sticky rice would sit in their own separate compartments.
Classical Okinawan Karate, in my experience, isn't like that. Take the double 'punch' at the end of Naihanchi as an example. For now, lets ignore the rear hand and just look at the main (lead) arm. Is it a thrust or a sweep? I think most karateka would think of it as a thrust but some styles/practitioners might choose sweep. But I think in the older Okinawan systems it can be a bit ambiguous. It can be a mix of tsuki (thrust) and barai (sweep). That's certainly how I do this particular move, somewhere between the two. Other techniques may veer more one way than the other, but in tsuki there's always a hint of barai, and vice versa. The emphasis can change, dependent entirely on application - something to think about in your own kata and bunkai practice.
This is similar to the last Pinan Shodan application but is done on the outside instead of the inside. It can be used against several different attacks but let's go with the easiest - an overhead, downward blow. As with the last application it exemplifies 'Intercept (block and counter in one move), swallow, spit'. On to the pictures.
Picture 1 - top right. The attacker comes in with a downward blow to your head. Slip to the outside, dropping into a straddle stance. At the same time block and counter with an uppercut to the ribs under the armpit. The stance helps you to drop under the attack then drive up into the uppercut.
Picture 2 - bottom left. Seize the wrist with the rear hand. Slide the lead forearm across their triceps tendon. Pull both arms back towards your rear hip to effect a partial or transitory armbar, drawing the attacker in and maintaining the unbalancing effect (kuzushi).
Picture 3 - bottom right. Spit! By which of course I mean: sweep the lead arm through the attacker's head while pulling their wrist strongly back to your hip. As last time, there are or course different option for how to follow up.
Finally, remember that although this combination follows the sequence of the kata that is only one possibility. There would be nothing wrong with applying the kata principles in a different order, particularly if circumstances change.
I've looked at bunkai for the opening move of Pinan Shodan, ie. haiwan-uke. I've also looked at the next 2 moves and described them as 'swallow then spit'. We can tie these together so that the whole thing could be described as 'Intercept (block and counter in one move), swallow, spit'. This is what we see in the pictures.
Picture 1 (top right). The assailant throws a big round punch. I slide in dropping into a straddle stance, evading on the inside, blocking and striking in one move. The inset shows this from the other side.
Picture 2 (bottom left). Following on from the block I seize the wrist with one hand and strike down into the brachioradialis muscle on the forearm with the other. This should unbalance the attacker to that side, dropping them down slightly and momentarily preventing a punch with the other hand. This is 'swallow'. To me the best description is that it feels like 'gathering in' the attacker's arm.
Picture 3 (bottom right). Spit! By which of course I mean - sweep the lead forearm through the attacker's head/neck. At the same time pull their wrist to your hip, adding considerably to the power of the strike. You'd hope this should finish the job but there are of course a variety of follow-up options that you can and should continue on with.
This is a phrase you sometimes hear in Karate, particularly in Goju schools. Its also used (or variations in the same theme) in different Kung Fu schools. However, it applies equally to Shorin Ryu.
Often when people talk about these 4 concepts they're thinking of what they're doing to the opponent (especially for float & sink). But I think it better describes the mechanics that I'm utilising in my own body. I'll discuss these concepts in relation to the combination of 2 consecutives moves that we can do from Pinan Shodan, as shown in the photos.
In the bottom left picture I'm applying sink & swallow together, using the double inward block move near the start of the kata. In response to a single lapel grab I've dropped both my forearms down through the assailant's forearm, making sure that one of them strikes his brachioradialis muscle. In addition to sliding back slightly I've used a cat stance to 'sink' my bodyweight into the strike.
This move is also 'swallow'. The feeling of swallowing is embodied in 2 ways. After I've made contact with their arm both of my arms draw back towards my body. Also my hips move back slightly so that my upper body leans slightly forwards. These combine to draw the attacker in, 'swallowing' the attack.
The next move is clearly 'spit'. I extend & drive forwards into the attack, driving my forearm through the attacker's head/neck. No mystery there.
Its also 'float'. Note how my whole body has moved forwards. I haven't left my rear leg behind as an anchor. Instead I started by driving off the rear leg but then switched to letting my whole body move forward as one unit, adding all of my mass to the strike.
There are other ways to combine these principles, spit and sink for example. But that's a story for another day.
There are of course various ways to apply this movement. We can put emphasis on different components of the movement, eg. the arms working in opposition, the lead arm and leg working in opposition, both of these ideas together, or driving forwards with the lead arm. Here are a few examples.
In the top right hand photo only one arm is in contact with the assailant. My lead arm sweeps through the assailant's head/neck. The feeling is of driving my bodyweight into the strike.
In the bottom right hand photo Mike Sanderson is putting emphasis on the arms moving in opposition, one arm striking/pushing through the assailant's head/neck while the other draws the assailant's arm out. The body turns side on, accentuating the separating of the arms. Note the position of Mike's left knee. I don't think, in this instance, that its in contact with the assailant, but if needed it wouldn't take much to dig it into their leg to unbalance them.
In the bottom left hand picture I'm doing the same move, but now as a choke. After striking, I've slid my left thumb high up inside the assailants' collar, before grabbing the collar itself. Note the muchimi (sticking), the assailant's arm is controlled even though I'm not actually grabbing it. As its stands, this is only a partial choke. Its not going to choke the person out by itself but, combined with the other stimuli I'm providing (unbalancing by pushing with my left arm, unbalancing with my left thigh, pulling/controlling their right arm) it gives the assailant too many different things to cope with at the same time. To complete the choke I'd need to, for example, grab and pull their right collar with my right hand.
It doesn't matter whether you think of this move as yoko tettsui uchi (sideways hammerfist strike) or jodan barai (high sweep). The move is the same either way. It's the next move of our Pinan kata, coming immediately after the double inward blocks. This is how it appears in Pinan Shodan. In our version the stance used is shikodachi (straddle stance), which is simply the stance used for the previous move and the one before that.
In terms of its mechanics, they are a mix of gedan shuto uke (in terms of the stance) and gedan barai (in terms of the arm movements). In other words:
The arms work against each other in pushing and pulling (combined of course with the correct pronation and supination).
The arms work against each in terms of 'abduction', ie. both moving outwards from the centreline.
The lead arm and leg work against each other in that the arm presses out while the knee although not actively pressing in would certainly prevent the opponent's lower body moving in the same directon as the arm. This is similar to gedan shuto but due to the height difference doesn't perform quite as strong a scissoring action.
In terms of its origin, there are plenty of examples to choose from. We see this same theme presented in slightly different ways (ie. stepping or turning) in various classical kata. We can therefore move straight on to looking at bunkai in the next post.
This application utilises the mechanical principle that I mentioned last week - generating more power by swinging both arms inwards, each pectoralis major muscle acting as a base for the opposite muscle to work against. But it also uses the same bilateral principle on another muscle, the latissimus dorsi (aka 'lat'). The lats are used here to pull both arms down strongly, an important feature of this application.
Imagine an assailant grabs your lapel with their left hand. It doesn't matter too much which foot you've got forwards. Slide back slightly and drop both arms down through their forearm. I say 'through' because the feeling should be one not of hitting their forearm, but of cutting through it.
Your left wrist should strike the brachioradialis muscle just down from the elbow. I'll come back and discuss that in more detail in another post.
Your right wrist strikes the distal forearm on the outside. The specific location is less important, though it can intensify the effect of the other blow if you can strike the tendons that run alongside the radius.
Striking through the forearm in this way should bend the arm and buckle the knees, as shown in picture. As soon as you feel this start to happen angle both your arms back towards yourself. Keep the pressure on. This will draw their forearm back towards you, keep their arm bending and knees buckling.
Why the cat stance? In the kata we use a straddle stance, but the stance used can vary depending on application and situation. Here I've used a cat stance in order to sink my weight into the strike. The photo shows how effective this can be in augmenting the action of the arms.
This could even drop them to their knees, but its not likely to be the end of the encounter, for that we'll need to use another move from the kata.
This technique, the 2nd move of Pinan Shodan (Heian Nidan), immediately after the haiwan-uke, doesn't appear in any of the classical kata that I know of. Or at least not in an obvious form. But I think perhaps we can find it if we look hard enough.
The clue is in part in the preceding move, the haiwan-uke. Try just doing one side of the haiwan-uke, the rising block followed by the inward block. Does it remind you of anything? If you practice the kata Passai dai (aka Bassai Dai) then it should. Think of the move where you raise both arms, lift the knee, then drive forwards with inward blocks (or punches) with both arms. Is this not the same arm movement, just done on both sides of the body instead of one?
What about the other arm? The fist comes to the opposite shoulder, the forearm supinating as it does so. Its an inward block. But its also simply the same chambering movement that you see in gedan-barai (downward sweep) and shuto (knifehand).
So did the creator of Pinan Shodan simply take a bilateral arm movement from Passai Dai, do it with one arm only and add a standard chamber with the other arm? I don't know, but it's the best theory I've got.
This is the move immediately after the haiwan-uke in Pinan Shodan (Heian Nidan). In our version of the Pinan kata it also follows haiwan-uke. I first learnt it as '2 inward blocks at the same time'. The arm raised above the head extends as it 'blocks', the other arm retracts towards the opposite shoulder. Both arms supinate as they move. I've heard it described as 2 blocks, 2 hammerfists or just the chamber for the high level sweeping move that follows it.
The typical Karate-do application is: having blocked a right punch with your left haiwan-uke, then block the next (left) punch with 2 simultaneous inwards blocks, with the aim of breaking the arm as you do so. Good luck with that! Not only is it highly unlikely to break the arm (I've never heard of anyone ever achieving this), if you fail to make the break then the fist is still hitting (or grabbing, or stabbing) you in the chest. So I think we can throw that application out and start again.
Mechanically '2 inward blocks', or 2 hammerfists, describes the move quite well. They work a bit differently to one another, one extending an arm, the other flexing an arm. In addition to the usual power generation for an inward block there is a synergy or gestalt effect at work. Each 'block' utilises the large pectoralis major muscle. As these attach to the sternum, each pec is effectively using the other as a base to work against. This increases the overall power. So 2 simultaneous inwards blocks will be more than twice as powerful as one on its own. That's certainly something worth pondering.
I've talked about the origins of haiwan uke. I've talked about its mechanical principles. And I've talked about its tactical principles. Surely its time to look at the bunkai.
Our first application for haiwan uke should come as no surprise. Remember that in our version of the Pinan kata we get into this posture in a slightly different way to other versions. That's a clue as to our introductory application. We move into haiwan uke from a forward stance, sliding the rear foot back and inwards so that it is in line with the front foot as we drop into a straddle stance (shikodachi).
Imagine you have your right foot forward and the attacker throws a big round swing with his right hand. The natural thing to do is to check it with a left rising block. At the same time move the left foot across to the right and turn your hips to the left. This will turn your body side on. Drop into a straddle stance as you do so. The block combined with the stance shift allows you to ride the incoming punch - this can help some of the sting out of a powerful blow. Dropping into the stance also creates the possibility of ducking under the punch and guiding it over your head.
To counter, raise your right fist to uppercut the attacker under the jaw. There are alternatives. If you're very close the uppercut could become a rising elbow to the jaw instead. If your hand is in a different starting position you could give them a hammerfist to the face. This would feel more like the movement as performed in the major Japanese styles.
All of this MUST happen at the same time. When you're on the inside you haven't got time to block then counter. The attacker's other fist will hit you before you can do that. You must block and counter simultaneously in order to take the initiative away from the attacker.
I often bang on about mechanical principles in kata, but we can find tactical principles expressed in kata too.
Last week I showed 3 different kata moves as possible candidates for the precursor to haiwan uke (as seen in the Pinan/Heian kata). All 3 had something in common, mechanically speaking. The first, from Passai Dai, is very similar to haiwan uke. The next, from Kusanku, a bit less so. And the last one, the double punch from Naihanchi somewhat less so again.
One thing they all have in common is the simple act of raising both arms. There is a clue here to a tactical principle, and it comes in two parts:
"Raise both arms to protect your head; if you can, attack at the same time"
The pictures show 3 applications that employ this principle, for the moves discussed last week. First, from Passai Dai, we see a simultaneous uppercut and rising block. Second, from Kusanku (and also Passai) we see a simultaneous palm-heel and (variation on) rising block. Third, from Naihanchi, we see a simultaneous hammerfist to the head and a further variation of the block. This one is particularly interesting because the attacking arm is also blocking at the same time. Raising the arms and ducking the head slightly creates an excellent cover that is particularly useful against a 'windmilling in' kind of attack.
So while they do have mechanical similarities what really binds them together as a 'family of techniques' is the tactical principle that they share. Let's not forget though that, while practising the kata can reinforce the mechanical principles, it won't do anything in and of itself to help you internalise the tactical principles. For that you will need to practice bunkai and/or some other partner drills specific to that purpose.
Haiwan-uke is immediately recognisable as the opening move of Pinan Shodan (Heian Nidan), but where does it come from? There are several possible candidates from the classical kata.
First off is Passai Dai, specifically the series of double 'punches' just before you turn round at the end. In many styles these are just punches, often one high and one low. In Shotokan this is a highly exaggerated 'C' shaped double punch. In the classical Matsumura version however, these moves are typically performed much more like haiwan-uke. The rear arm does a rising block, the lead arm movement could be seen as an uppercut or an outward block. Its just haiwan-uke in a forward stance. I think this is the most likely origin of the posture we see in the Pinan kata, but there are other possibilities.
The next candidate is the 'mountain block', both arms raised high, as seen at the opening of Kusanku (Kanku Dai) or part way through Passai Dai. Imagine lifting the arms into this symmetrical position then moving them both to one side. You'll come to a point that looks just like haiwan-uke. Not only does it look like the same technique, it feels like it too, ie. its mechanically similar.
Then we have the double punch at the end of Naihanchi Shodan (Tekki). It doesn't feel much like haiwan-uke but imagine being in the Naihanchi position then lifting and rotating both arms so the palms face forwards. This has a lot in common with haiwan-uke, though it does feel a bit different. Most notably, I think, is the fact that the rear hand comes in from the side - this is akin to how some styles do the rear arm motion in haiwan-uke.
These moves are all mechanically different to some extent but they do embody similar tactical principles, which I shall explore next week.
The following relates specifically to the way that we perform haiwan-uke in our version of the Pinan kata. There will be common mechanical principles with other versions of haiwan-uke but also some differences too.
The individual arm movements are straightforward enough. The rising block is actually quite a sophisticated movement but, as I've previously looked at this in detail, I won't discuss it further here. The uppercut is a simple enough mechanic, if we consider the arm movement in isolation.
The stance shift, in our version, involves moving from a face on position to side on, dropping into a straddle stance as you do so. This is the key to power generation for the whole technique. Shifting stance and rotating the hips as shown in the photo generates power for the rising block. It also moves the blocking arm away from the incoming limb slightly, thus mediating the impact, even potentially slipping the strike. The same rotation provides power for the uppercut. Dropping into straddle stance can also help to a) duck below the incoming strike slightly and/or b) line the uppercut up for better targeting to the underside of the jaw. Depending on your relative heights this may or not be necessary.
Of course, from the above description, you now have a fairly specific application in mind. Yet the point here is to describe more general principles. But that's OK, while the example is specific the principles it embodies are fairly general and can actually be applied in a number of ways.
Anyone who has practiced the Pinan/Heian kata will recognise this posture. The name translates as 'square side block' - taking into account the usual caveats around the meaning of 'uke'. What does 'square side' mean? I assume (and I could be wrong) that it comes from the shape of the arms as practiced in the major Japanese styles of Shotokan and Wado Ryu. The 'lead' arm has a vertical forearm and the 'rear' forearm is horizontal.
In these Japanese versions the rear arm sweeps in from the side to reach its final position. I think this is a red herring. If you look at the majority of Okinawan Shorin Ryu styles (and Japanese Shito Ryu) you'll see it done differently. Here its just a rising block movement, pure and simple. So the arm does not sweep in from the side and the forearm does not finish in a horizontal position.
Similarly the lead arm does not observe the clean lines of the major Japanese versions. Different styles use different end positions, but don't generally adhere to the Japanese liking for the vertical forearm. Some styles hold the fist side on, but some turn it palm-up so the end result is basically just soto-uke (outward block). Other styles do this as an uppercut movement, rather than a block. This is how I like to do it.
No surprise then that the stance can vary too. The major Japanese styles use a back stance. Okinawan styles tend to use a cat stance or straddle stance. In the Pinan kata I use the straddle stance as it works well with the uppercut. But really, in application the stance can vary according to the needs of the situation. In the context of its position in our version of the kata the feeling is of slipping to the side and dropping down below an attack. This movement powers both the block and the uppercut at the same time.
Sometimes I worry when I see people practising what they call 'Karatejutsu'. Sometimes it just looks like they've taken some Judo throws and added them to Karatedo. That's not Karatejutsu! I'm all for borrowing from other arts, but you should take the right techniques, from the right art, for the right reason.
Most 'do' arts have one or both of 2 primary aims: a) character development through austere training, and/or b) sport. Contrast this to the aims of older 'jutsu' traditions - first and foremost they were about combat effectiveness, by the most reliable, effective and ergonomic means available. These are very different aims. The throws of Judo, for example, were selected/modified to be as safe as possible. They deliberately allow the receiver to breakfall - that way participants can engage in a free exchange of technique with little risk of serious injury. Contrast that idea with the image I've used as a background to today's picture - this throw is designed to prevent a breakfall and instead drop the receiver on their head. This is very much a jutsu throw.
If you combine techniques from 2 'do' arts you don't get a 'justu'. What you get is 2 'do' arts mashed together. The result might (or might not) be better for self-defence than either of the original 'do' arts, but its still suboptimal for self-defence. If you're trying to put the 'jutsu' back into your Karate this might be a place to start. But its not the best place to start and it certainly isn't the end of the journey. At best its only the very beginning.
You may or may not be familiar with the symbol ?. It's the opposite of 'equals', it mean 'is not equal to'. We can conclude then that:
Gyakuzuki (reverse thrust) is just a punch right? Well mostly yes, although we mustn't forget what the hikite hand is doing. But even when it is 'just' a punch there can still be variation in what part of the arm you use as the impact area. That's not just about what fist formation you use, you could even strike with the arm rather than the fist.
Here we see an armbar, nothing unusual there. Typically however, I would apply pressure to the triceps tendon with my leading arm, generating power primarily by shifting or switching stance. It feels like gedan-barai (downward sweep). In this case though, I haven't switched stance, instead I've just thrust with my rear arm (supported by the hip of course). It feels just like gyakuzuki, in other words mechanically it IS gyakuzuki. The only real difference is that instead of striking with the fist I've actually struck with the distal ulna, ie. the end portion of one of the forearm bones.
The impact of this technique works well to snap the attacker's arm straight. It works particularly well if their arm is bent with their elbow raised a little. And of course, the hikite (pulling hand) is a vital component. Once the 'punch' has extended pressure should then be applied downwards.
From this point I could step forwards and turn it into gedan-barai, using the armbar to drive them to the ground. Or I could pull both hands back towards my right hip to execute gyaku-soto-uke as an elbow drop as shown earlier this week.
Imagine that you've grabbed the attacker's right wrist with your right hand and managed to blindside them, so that you're stood to their right. You've got your right foot forward and your left hand extended. Typically this might be the case if you've just hit them with a left reverse punch, but that's not the only way to get there.
From this position bring your left hand back and across to your right to meets their tricep tendon. You may need to rotate their arm with your right hand in order to get the correct angle. This is the position show in picture 1.
From this point you could use gedan-barai as an armbar but, on this occasion let's do things slightly differently. Cut back through their arm with your left ulna, towards your right hip, scraping down their tricep tendon towards the elbow as you do so. Your right arm augments the movement of the left by pulling back on the wrist, to the right hip. This is shown in picture 2. As you can see, done correctly it should force the attacker to bend forwards. This is essentially the chamber position for the gyaku-soto-uke.
In picture 3 we finish off the 'block'. Slide forwards towards the attacker. Raise the arm and drop the elbow onto the attacker's back. Keep pulling on their wrist as you do so. The final position of the left arm is exactly the shape of soto-uke, but the path it took to get there is slightly different. There should a hint of tettsui (hammerfist) to the movement, ie. the arm should rotate up and down around the shoulder. Not too much! Just enough, to help you drop your bodyweight into the attacker's back.
I want to make several further points about this technique but I shall leave those to a further post.
I've looked at variations in bunkai for the block-kick sequence in Pinan Shodan. Now for the next piece of the jigsaw, the following punch - gyakuzuki. Specifically we'll look at the kick-punch combination.
As we've seen, there are variations in terms of the kick you can use to follow the block. As a result the attacker can end up in different positions and orientations, at different distances from you. On top of that there is natural variation that you can't fully control, even though you are holding on to their arm. And of course, how successful your kick is matters a great deal. Ideally you want to knock the attacker down with the kick, perhaps even break their leg. But lets assume that your kick was not wholly successful. It should be no surprise that you may have to pick some different targets to strike as a follow-up. There are a number of variations, here are some of the most commons ones. Note that in each case you still keep hold of their arm, in order to constrain their movements. This is the essence of hikite.
In the top right picture the attacker has stayed upright. So the side of the face (temple, jaw) is an obvious target. As its relatively flat its much safer (for my hand) than striking to the front of the face. In the photo I've actually punched to the rear of the jaw, underneath the ear.
In the bottom left picture the attacker has bent forwards. This has exposed the back of his head to attack. I've avoided striking the back of his neck, that would be very dangerous. Instead I've struck the occiput off to one side, between trapezius and sternomastoid muscles.
Finally, at a similar angle but closer in, I've used my elbow to the same point- it may not be gyakuzuki, but the overall body dynamic is the same.
The pictures show applications of the rear hand outward block (gyaku-soto-uke) and kick (mae-geri) from Pinan Shodan.
In blocking I've slipped past the punch and moved forwards slightly to the outside of the attacker. In doing so my right arm applies pressure inwards and upwards to the punching arm. This is a relatively subtle but important point. It makes it somewhat harder for the attacker to immediately continue with a punch from the other hand, and creates a window of opportunity for me to follow through with a kick.
The kicks shown demonstrate the Karate-jutsu principles of avoiding athletically demanding techniques and of attacking vulnerable areas. These are not kicks for the purpose of sport or character development. Which kick I choose to follow up with depends primarily on our relative positions and distance. Which foot the attacker has forwards also has an impact on my choice of kick. In the example(s) shown we're assuming that the attacker is punching with their right hand but their left foot forwards.
The top right picture shows a knee strike to the nearest thigh. The bottom left show a toe-tip front snap kick. This can be aimed to the groin or, as shown in the picture, the opposite inner thigh. Bottom right is a front stamp kick to the inner thigh. With this kick in particular take care if you practice it with a partner. It is intended to break the thigh or dislocate the knee - only practice it under controlled circumstances - not free sparring!
With all these kicks the main intention is to break the attacker's balance so that we maintain the initiative. The knee or the stamp can easily knock them down. Secondarily to that aim of course, the dysfunction caused by stamping on the leg or, less likely, the pain of the kick to the groin could be a fight finisher in itself.
I've been ruminating over this sequence in Pinan Daikou (outward block, kick, punch, outward block) for a couple of weeks now. I've copied the whole thing from Pinan Shodan to my amalgamated Pinan Daikou. But where did it come from before Pinan Shodan?
Kick-punch seems a pretty standard combination in Karate, but actually its practiced here quite differently to how we see it in the classical (pre-Pinan) kata. Here we kick with the rear foot, put it down in front, then follow with gyakuzuki (reverse punch). That's different to the classical kata. In those we often see kick-punch with the kicking foot placed back down at the rear, so the gyakuzuki is done on the same side as the kick (eg. Seisan or Gojushiho/Useishi). Or the stance is neutral before and after the kick (which itself is nami-gaeshi - returning wave kick, as in Passai). Nowhere does it appear quite as in Pinan Shodan.
Perhaps there's a clue in the following technique, the outward block with the rear hand. In the first line of Seisan we have 'block, step, punch, block' rather than 'block, kick, punch, block', but otherwise it's the same thing. Generally speaking, practitioners of Matsumura Shorin Ryu consider a step in kata to be interchangeable with a kick, ie. 'every step can be a kick'. From this perspective the two sequences are just the same. So, for my money, I think this is where the sequence originated.
When I reworked the 5 Pinan kata into one new version, known as Pinan Daikou, I had several aims in mind. One was that every technique should be done on both sides of the body but, other than that, there should be no repetition. It may at first appear that I've broken my own rule here, but that's not quite true.
This is the next movement of the kata, after the kick-punch combination. It is in fact slightly different to the previous gyaku-soto-uke, in 2 ways. The first is trivial - in the only already shown you turn in to the technique. The other difference is more important. The first version utilises both arms in the standard manner for Karate 'blocks'. The arms cross then one goes back to the hip in hikite while the other completes the 'block'. The second version is different in that the supporting arm is already chambered at the hip and doesn't move anywhere. Only the 'active' arm moves. At the same time the hips turn a little more into the technique.
If you're familiar with Pinan Shodan (Heian Nidan) you will already have noticed that this and the previous 3 movements (outward block, kick and punch) are copied as is (ie. in sequence) from that kata. And why not? If it ain't broke, don't fix it. My main issue with the layout of the Pinan's is that it's ritualistic rather than practical in nature, but I don't see that issue with this sequence of 4 movements. So I've incorporated the sequence as is. You might fairly ask the question: where does the sequence, or the individual moves, come from in the first place? I will examine that question tomorrow.
Recently I've discussed the use of the guard, when talking to aggressors or potential assailants. That's really useful in itself but you need to do more than just hold your hands in a static position. Remember that, at the verbal stage, you're still in a social situation - not a fight. Humans generally don't hold their hands stationary in front of themselves while talking to each other. To do so, for more than a few seconds, would look very odd. Its going to draw attention and potentially inflame the situation - not as much as standing in a 'fighting stance' but moving in that direction.
So what do we do instead? We talk with our hands. We put our hands in a guard but then use them to gesture with, to accentuate what we're saying. The movements should be relatively small for two reasons. For one thing, if we move the hands too far away from the basic guard position it begins to lose its defensive capability. Equally importantly, we don't want to gesticulate wildly - that would serve to inflame the situation, not calm it down. Using the hands in this way can be an immensely powerful tool. There are so many nuances we can communicate simply by the angle we hold our hands at and how we coordinate the movements with our speech.
The process should feel natural however. Its very, very difficult to deliberately control your own gestures consciously without it looking artificial. Trying to do so can make look like a politician - the body language jars on the psyche of the viewer, the discord between what you're saying and what your body language is saying does nothing to help the situation. So try to stay calm and confident, and just let your natural body language communicate that, without too much conscious control.
This is not rocket science but, even so, you need to practice it in order to get good at it.
The next move in Pinan Daikou is the mae-geri, gyaku-zuki combination from Pinan Shodan. For many Karate styles this is also a regular feature of kihon practice.
The way I execute this combination has two main influences. The first is the way I learned it in Wado Ryu as a kid. This forms the overall shape for the technique. However, the kick is performed in the standard manner of Matsumura Shorin Ryu, as follows…
Photo 1 - Following the previous technique (gyaku-soto-uke) simply pivot the front foot, from pointing in to pointing out. This is in preparation for the kick.
Photo 2 - The kick itself, as noted above, is not a standard Karate-do front kick. It is a snap kick, with no hint of thrusting the hip at all. It is aimed low about knee height or just a little above. The toes are not curled back to expose the ball of the foot. Instead they are held straight in order strike with the toe-tips. Finally the ankle is held at a right angle, to present the toe-tips in the correct orientation.
Photo 3 - The act of putting the foot down is pure Wado Ryu. It is put down in front, in order to step forwards, with the toes turned in and no weight commitment.
Photo 4 - Only once we feel our footing is secure is the punch executed. The hip turns and the rear leg (nearly) straightens so that we get a combined power generation effect of hip twist and moving the centre of gravity forwards. The front foot being turned in acts as a brake, preventing excessive hip rotation, and the loss of power and stability that would accompany that.
This is really our 'go to' application for soto-uke. It doesn't matter too much which foot you've got forwards. We've seen this technique before, both when I've described tegumi and the switching principle. So here goes…
Photo 1 - the attacker throws a left straight(ish) punch. I intercept from the outside with my right hand.
Photo 2 - I start to press the incoming limb across to my left. At the same time I raise my left hand up underneath my right and start to push the attacker's arm up and across with my supinated (palm-up) forearm. This is the essence of soto-uke, the switch as the arms cross over. It enables me both to control the attacker's arm and to switch completely to their outside.
Photo 3 - Soto-uke has been and gone. Now I've moved on to maintain control in order to counterattack.
Wait a minute I hear you say! Photo 3 doesn't look like soto-uke! Well like I said, the soto-uke had served its purpose the moment I successfully switched to my left arm controlling (between photos 2 & 3). This is where the 'magic' happened. There was no need to hang around at the end of the movement with my arm supinated waiting for a photographer to pass by. I've moved straight on to pronating my arm (rolling the forearm palm-down) in order to keep control and press home my advantage.
You may also complain that my right hand hasn't ended up in hikite at my hip. Well in this application there's no need to. Between photos 2 & 3 my right hand has retracted but, as its not holding anything, it's only gone as far as it needed to, ie. into a guard position. Moving further than that would be tactically unsound. Of course, there are other applications that require a full hikite. We'll look at some of those in the coming weeks.
I subscribe to the idea that the Pinan kata were put together from different kata that already existed in the Shorin Ryu / Shuri-te tradition. Given that, you should be able find each technique in earlier kata. How about the Gyaku Soto Uke I described on Tuesday, where you turn from right to left before executing the 'block'.
If you're familiar with Bassai Dai you might be tempted to think of the 3 outward blocks that occur early in the kata. But I think that's a red herring, as I believe those blocks to be a relatively modern alteration. If you look at the Matsumura version of the kata you don't see these blocks. And if you look at Ankoh Itosu's version (as preserved by Chosin Chibana) you don't see them there either. In these older versions what you tend to see is open handed sweeping movements of the arm, often with the other hand held in some sort of guard (as opposed to at the hip). So I think that Gichin Funakoshi introduced the standard inward and outward blocks at this point in the kata, as part of his self-confessed process of simplification.
That said, I do think that Bassai Dai is the right place to look. Think of the end part of the kata, where you do 3 double punches then turn round into a wide stance with a low outward block. This is, I think, where the Pinan version comes from. You've got the turn (in Bassai its 180 degrees and in Pinan just 45). But this is a low block I hear you say, not the same thing at all. However, if you go back to the earlier Matsumura version its not low at all. I think the Matsumura Passai is the original in this case, a more generic version of a particular principle. And the corresponding movements in both Pinan Shodan and Bassai Dai are both derivative of that earlier version. Which may give you food for thought when thinking about application.
Last year I described the techniques in section 1 of our Pinan Daikou kata. Now on to section 2. This section consists mostly of techniques from Pinan Shodan (Heian Nidan) but also 1 move from Pinan Sandan. Section 2 carries straight on from the end of Section 1.
The first move, Gyaku Soto Uke, is really just an 'outward block' (soto-uke). So I won't review the mechanics of the arm movements. 'Gyaku' indicates that its done in reverse, ie. it's the rear hand that executes the 'blocking' motion while the lead hand executes hikite (pulling hand). The other point of note is that the technique starts by sliding the lead leg, followed by the body, across to the leading side. So if you're left leg forward then you'll slide to the left. In our version we follow the Wado Ryu approach that I learned as a child, in that the stance is a little shorter and wider than zenkutsudachi (forward stance) with the front foot turned In slightly.
In Pinan Shodan you change direction from South-West to South (relative to the embusen of the kata). In our version there's no change in direction as such. But as you start in a straddle stance and change to a (shortened) forward stance then you still have to slide the front foot across and turn the stance and hips through 90 degrees.
The picture shows the standard Shinseido kamae, or guard position. It's not a fighting stance. Our aim is to dissuade an aggressor from attacking in the first place, but to be ready in case they do. The guard achieves all this while being socially acceptable. It is the perfect combination of de-escalation and readiness.
If you have read anything by the author, martial artist and ex-bouncer Geoff Thompson you'll recognise the guard as Geoff's 'fence'. This is absolutely true, although I didn't learn it from Geoff. I worked it out for myself, through my own experiences as a bouncer. When I began training in Shinseido Shorin Ryu I also learned the same thing from my sensei, Roger Sheldon. He too had worked the same thing out for himself, largely through his work teaching aggression management skills to National Health Service and Social Services staff.
I think this provides useful validation, when 3 different martial artists with different experiences come to basically the same conclusion - that you to have to have your hands up and posture ready BEFORE the violence starts, or you'll get caught out. I'm sure none of us were the first to discover it, and that others will discover it for themselves in the future.
There are some differences between Geoff's fence and our guard. These are about mindset rather than the posture itself. If I remember correctly, Geoff 'put a fence around his factory', if someone touched his fence 3 times then he'd feel free to hit them. In Shinseido we take a more tactile approach. We're happy to get hands on, we can use muchimi (sticking) to control the aggressor, we may even be able to use tactile body language to calm them down. And that has to be a worthy goal - to prevent violence happening in the first place.
Last week I talked about the difficulties martial artists experience when faced with confrontation. Principally, when does the fight start? As tension mounts, the martial artist wants to drop into their fighting stance in order to be ready. But they intuitively understand that to do so would probably be the trigger that instigates the violence. So they stand frozen in action, then quite likely end up on the receiving end of the first blow.
Take a look at the fighting stances in the picture. There's Karate, Kung Fu and Taekwondo. They all share common features. They all have both hands raised in a guard. They all have one foot forward and knees bent. These are important features - the stance gives you a degree of manoeuvrability and stability, the raised guard makes it easier to attack or defend. Now look at these stances from the point of view of body language. The postures (what the body and legs are doing) and the gestures (what the arms and head are doing) all say "Fight Me!" No wonder it doesn't feel right dropping into fighting stance whenever we feel a potential threat.
What's needed here is a combination of posture & gesture that doesn't say "Fight Me", but still gives the same benefits in terms of its defensive and offensive potential. The answer is quite simple, and you see it in the 4th picture. The Shinseido 'guard' or 'ready' position has the same basic benefits as the others shown, but it gives a very different body language message. It says "Calm down". Unlike the others, this is a stance you could use in conversation at the bus stop, the library, the pub or wherever, without feeling that you were antagonising the situation. And that is its simple beauty.
Yesterday I described the content & rationale of our set of Tsukami Tegumi exercises, today I want to explore that a little further.
The point of these exercises isn't to be clever, to show how well you can string a whole series of techniques together. I've seen plenty of flow drills, for example, that do exactly that. The point here is to give you options.
Firstly, having delivered your 'finishing' blow you may find that you haven't finished it all. Or the finishing throw may have been less than 'final'. You want to be able to carry on, continuing to erode the enemy's ability to attack or defend. You don't want to get stuck, thinking "where do I go from here". These exercises give you those options, avoiding not knowing what to do next.
Secondly, they help you to progressively weaken the enemy's position. First they're standing, then unbalanced, then on the ground, then pinned. At each stage things get more difficult for them and easier for you.
Thirdly, they give you options for different levels of severity. You may not want to strike as hard as you can, but prefer to execute a takedown instead. Or you may not want to break their wrist with a joint-lock, but instead use it to take them down to the ground.
Finally, you want the choice of how to exit from an encounter. You might just want to strike hard and exit the scene as quickly as possible. Or you may want to restrain the attacker with a joint-lock. Or use it to take them down before exiting. Or you may want to pin them to await the arrival of the police. Those choices should be yours, not driven by whichever technique it was that you pulled out of the hat. These exercises help you to develop the skills to make all those choices, as appropriate to the situation.
When I started Karate it was a striking art. There was the odd takedown but no joint-locks or pins. Later I learned about more realistic bunkai and the older Okinawan methods. This introduced me to joint-locks & more work on takedowns. Dabbling in Ju-jutsu & Aiki arts added more joint-locks & throws & even pins to my portfolio.
That was great. But I wasn't so great at joining all these things together. Through lots of tegumi I'd learnt not just to block a punch but to catch it as well. But the joint-locks I'd learned often worked best from a grab, or perhaps a ritualised unrealistic strike. I could do takedowns from some joint-locks but not others. I could turn some takedowns into pins, but not others. It was all disjointed. I needed to learn how to flow from one thing to another, effectively & without hesitation.
Then it occurred to me. I would create a series of exercises which involved each of the above types of technique in appropriate sequences. First the block and catch; then strikes, a joint-lock, a takedown & finally a pin. Each technique would set up the next appropriately.
But which joint-locks to use? The choice was easy, I would start with the 10 joint-locks & holds from the Shinseido Tsukami Waza (Holding Exercise). I'd practice each of these within the context of tegumi, so it seemed logical to call the end result 'Tsukami Tegumi Waza'. Of course then I had to find the right combinations of takedowns & pins to follow on with.
Let's be pragmatic, not dogmatic. Sometimes the sequence can vary, a joint-lock after a takedown perhaps. Strikes can be sprinkled liberally throughout. Remember that the point is to defeat the attacker asap. You want the strikes to finish it, but if not you can carry on to the joint-lock, and so on and so on.
I don't mean what time of day do they start. I mean at what point in a confrontation does it change from verbal altercation to physical violence?
I've observed that many martial artists, at least those who do stand-up striking arts, have great difficulty in working out when a fight actually starts. Is it when the first punch is thrown? Is it when the aggressor shoves, prods or grabs you? Is it when they raise their hand threateningly or when simply when they come into striking range? Is it when the call your mother a '*&£%$^'?
The problem is that in most training fights start at a mutually agreed distance, when the referee says "Hajime!". No matter how well that may prepare you in terms of fighting skills it doesn't teach you how to handle the transition from verbal confrontation to violence. During the confrontation stage the martial artist may feel the urge to go into their fighting stance, possibly even moving back to get to their preferred range. But they correctly intuit that this would likely be very provocative, probably precipitating the violence that they're seeking to avoid. Instead they become frozen into inaction, not knowing what to do or when to do it. Then suddenly a fist is flying towards their face, their guard is down and its too close to block. The fight has started and their invitation has arrived late.
This is not a great place to be. Martial artists have lost fights simply because they were backfooted at the very start of the affair. How do we prevent this situation? By recognising that fights happen in the context of a social interaction and learning to better handle that interaction. By better managing that transition from posturing to actual violence. And that of course is a subject of another post.
Over the last couple of months I've gone through a number of joint-locks and holds. These form our Tsukami-waza, or 'holding exercise'. Most, but not all, of the techniques are joint-locks. A couple are simply holds, designed to restrain a person who isn't trying to hurt you but poses a risk to you, themselves, or others.
The idea in this exercise is to go through the locks and holds in sequence, smoothly from one to the next. This achieves two goals: a) to remember and practice the individual techniques themselves, and b) to practice the skill of moving from one lock/hold to another. Its important to be able to move from one position to another both smoothly and maintaining control throughout. Practising this will both test and refine your core skills of muchimi (sticking) and kuzushi (unbalancing).
Having said the above, we don't envisage that in reality you will necessarily transition through the techniques in the sequence shown by the exercise, its just a matter of learning the general principles involved. The transitions themselves can be initiated by uke (receiver) or tori (giver), they can also be helped along by atemi (striking) or some other unbalancing/distracting manoeuvre. It just depends on each transition, there are many possibilities beyond those that are incorporated into the exercise.
Finally, for completeness, here is a list of the individual techniques in sequence:
I've had Bob (the anatomically correct punch bag) for years, but suddenly he's grown an arm. Well I say 'grown', I confess I helped a bit.
As you can see from the picture, with the arm he's useful for practising basic principles like pull/push (punch/hikite). But it's actually useful for practising all manner of variations of muchimi (sticking), a critical skill in Karate. It's also useful for practising joint locks. To be fair, the more you understand the anatomy of the arm the more I suspect you'll get out of working joint locks with Bob and his arm, on the basis that you'll be better able to imagine manipulating the arm's anatomy. I find it very useful that the arm 'flares out' at the wrist and the elbow just as occurs in a real human arm, courtesy of the knots that form those 'joints'.
Clearly then I'm finding Bob's new arm a useful training tool, but perhaps the best bit is the price. It cost me £2 to make, that was the price of the plumbing tube. The only other 'ingredients' were a couple of old Karate belts I had lying around. Just cut the tube in half, tie the belts together (that knot forms the elbow), add a couple more strategically placed knots, and Bob's your uncle - or rather your one-armed training partner.
Following on from my discussion about the negative effect of kime on force generation…what would happen if we removed the kime? If we do so during impact then more force will be absorbed by the target, which would decelerate our fist til it came to rest. Great! But what if we missed? A linear punch would inevitably come to an end at the moment when the elbow reaches maximum extension, stretching the tendons, ligaments & fascia that connect to the elbow. Not so great! Done repeatedly this will cause a hyperextension injury.
So we must impose some deceleration in order to avoid injury (on those occasions when the punch doesn't connect). I suggest that the amount is a lot less than is required for an 'aesthetically pleasing' kime.
How would a punch with reduced kime feel? More relaxed for a start. Some muscles will tense just as much, others less so, some perhaps not at all. It should feel as if you're cutting through the target rather than hitting it. It should also have a distinctive feeling at the end of the motion, as of a weight continuing to press on to the target. For this reason this way of striking is sometimes called 'Heavy Hands' in Chinese arts.
Ankoh Azata told Funakoshi to "think of your arms and legs as swords". Shigeru Egami echoed the same sentiment: "Practice as if your blow will pierce through your opponent…". So think of cutting or piercing, rather than striking.
In martial arts sometimes we overcomplicate things. A non-martial artist friend read my earlier post on this subject and said something like "Oh, it's like when you hit a tennis ball and follow through". Yes, I thought, that's exactly what it's like!
This is the 10th and final technique in our grappling flow drill. It is a common hold used in many cultures, not just oriental martial arts. Here in the UK it is often called the 'arm behind back' or policeman's hold.
The hold itself is straightforward enough. The arm is bent and pressed behind the back - the elbow is pressed across towards the other side of the back and hand is pushed up the spine. In our variation we're adding a kote-gaeshi style wrist lock, which makes it more difficult for the person to push their hand back down again.
There are of course numerous variations on how to get into this position. One alternative I like is not to hold with both arms but instead to use one arm as a lever, going under the forearm and over the upper, acting as lever on both parts of the arm at the same time. A number of Japanese arts would call this ude-garame, literally meaning 'arm entanglement' - this can be a bit confusing though as there are other arm entanglements going by the same name that work in completely different ways.
Last week I wrote about the negative effect that kime has on generation of force in karate techniques. I argued that kime involves a deliberate and rapid deceleration that occurs during the impact phase of, say, a punch. Newton's 2nd Law tells us that this will reduce the overall force applied by the punch.
It shouldn't matter what authority I have to make such a radical statement - the argument should stand or fall on its own merits. However, I can understand many karateka might think "well, what does he know". So let's re-examine what someone with a bit more gravitas than myself said on the subject - that is Shigeru Egami, arguably Gichin Funakoshi's top student.
In the 1950s Egami came to believe that the way he'd previously learnt to punch was ineffective. He felt that "concentrating power", ie. lots of muscular tension (kime), was actually counter-productive. To test this he allowed numerous other karateka to punch him full force in the abdomen. In his words:
"…I thought that this way of striking was not really effective. And this was true, even with karateka who had been practising on the striking post (makiwara) for 6 or 8 years. Because of putting too much power in the wrist, elbow and shoulder, the blows … were already weakened considerably, and I felt no pain whatsoever. Moreover, the greater the concentration and the faster the blow, the greater was the impact on the wrist, which could result in a broken wrist."
Egami developed a much more relaxed way of punching, which he contrasted with the "stiff, Pinocchio-like movements" that he'd previously learned. He felt "the movement must not be impeded due to tenseness or rigidity".
So how do we strike in a relaxed way yet generate more force? Some people call this striking with 'heavy hands', which I will look at next week.
This is the 9th technique in our grappling flow drill. Its quite a simple wrist lock. The arm is rolled over so that the tip of the elbow is uppermost then the hand is pressed back towards the elbow - this is hyperflexion on the inverted wrist. Ideally the arm should be fully extended at this point.
This is the position shown in the photo. From here you could do a couple of different things. Continuing to draw your own body back should keep the arm extended. You might be able to take the person to the ground with this, it just depends on their wrist flexibility. Alternatively, pressing forwards while rotating their hand outwards may take them down in the opposite direction. To do this press their forefinger knuckle on a line that passes their head. But this could result in their arm bending at the elbow and you losing control of the lock. Personally I often like to transition to a combination wrist-lock / armbar, which gives me an improved level of control.
I learned the other day that my first Sensei, Walter Seaton, had passed away. It was actually old news, he died over a year ago but I've only just heard about it. I shouldn't feel sad, he did after all lead a long and - as far as I'm aware - healthy life. Still, I did feel a little sad and the news made me reminisce about my early training days.
I started training with Water Seaton in Wado Ryu Karate in 1977 or 1978. My brother wanted to start, being inspired by 'Kung Fu' starring David Carradine. I knew in my heart that if my brother, 4 years older than me, was doing Karate then I'd best have a go too - that or become his daily practice punchbag! At that time Walter didn't take students under the age of 14. I was the first, just because my mam knew his mam and had a word with him. She convinced him to take us both on. As it turned out my brother stopped quite quickly, but I kept going, for a while anyway.
In truth I was an indifferent student. I remember the training being quite hard, it wasn't 'kiddi-karate'. I remember warming up by running barefoot round the grit football pitch outside. I remember many, many knuckle press-ups. I especially remember being the only child in the class on a regular basis. Most of all I remember being amazed by Sensei's precision and dynamism.
The Karate I do now is a long way from Wado Ryu, but those early experiences left a lasting impression. There's still a kernel of Wado buried deep within me - in particular some of the inner circular stances and the Wado emphasis on powering simultaneous evasion, block & counter all from the same hip movement. More than anything though, I never get phased by the size of an opponent - thanks to all those sessions in which I was the only kid.
Last month I wrote about the physics of impact. I discussed how the force a projectile imparts to a target is equal to the force that the target imparts to the projectile. Further, the force has 2 components: a) the force required to overcome the momentum of the projectile (at the moment of impact), and b) the force required to overcome the acceleration of the projectile (during the impact phase). Let's call these forces A and B.
I gave some simple examples: a) a cannonball (has momentum but no acceleration at the moment of impact) and b) a push (has acceleration during the impact phase but starts with zero momentum). Typically a punch is composed of some combination of these forces, the proportions varying depending on the type of punch. If we call the total force generated F, then:
F = A + B
Now for the heresy. Lets think about a feature of typical Karate punches - kime. Kime is a deliberate contraction of a range of muscles throughout the body, coordinated with the breath and designed to produce a sharp snap at the end of the punch. This contraction brings the punch to a rapid and definite stop, in other words it decelerates the punch. Wait a minute! Isn't deceleration the opposite of what we want to achieve? Yes, we've already seen that the more we accelerate during impact, the more force produced. Anything that reduces the acceleration inevitably reduces the force. If we call the force produced by this deceleration C then we can rewrite the above formula as
F = A + B - C
So introducing kime actually reduces the force produced! Punches with kime look and feel powerful but would actually have more effect if it were removed. I realise that some will not find this a palatable conclusion, so I shall explore it in more detail next week.
This is the 8th technique in our grappling flow drill, although it is actually the first joint lock that students in our dojo learn. In my opinion, this is a fundamental technique in classical Karate.
Armbars are popular in a number of different arts and always, by definition, involve hyperextending the elbow joint. Looking at the photo though, this version is obviously quite different to the armbar as seen in arts such as Judo or BJJ. In these arts the armbar is generally applied on the ground, with the opponent's movements constrained. As a result a lot of force can be brought to bear (possibly with all 4 limbs) while the opponent is unable to move away from the danger. This gets the result: a submission, or failing that, an elbow dislocation.
Our armbar is quite different in that its initiated in a standing position. With the opponent free(ish) to move around its unlikely to cause a dislocation, but that's not the aim. As the pressure at the elbow rapidly builds the opponent will try to move away from the stimulus. As their hand is restrained they must move their shoulder - and hence the rest of their body. This is the result we want - they are forced to bend over or even to go face first to the ground. Once there we can use the legs to put more power into the armbar and so use it as a pin or, if necessary, dislocate the elbow. If all the opponent does is bend over that's still great - they're in a rather more vulnerable position and we can easily follow up with strikes.
I've just been looking back at my post from this time last year. With the Headingley Karate club growing I was feeling very positive about 2017. I'm happy to say that my positive vibes were justified. 2017 has been a great year. We've had two 'home grown' students pass their black belt tests. That's in addition to the new members who have joined over the year. And of course, the continued efforts of our existing members.
Our group is growing and goes from strength to strength. But Karate, for us, isn't really a numbers game. It's about quality. It's about sharing the principles of classical Okinawan Karate. Not as a sport, but as a life-skill - as relevant now to good health and self-defence as it ever was in the past.
So now I'm looking forward to 2018. Training restarts on the 2nd. And I'm raring to go!
Addendum: You may notice a gap of some months between this post and the previous one. I'm currently backfilling the missing posts from my Facebook/Instagram feeds, but I thought I should start 2018 as I mean to go on, ie. keeping this blog completely up to date.
Over the last 2 weeks I've devoted several posts to exploring throws in Karate and other arts. To summarise, we've found that:
Throws can be categorised as either dynamic or mechanical.
Judo primarily uses dynamic throws.
Karate, according to available historical literature, is the opposite - it primarily uses mechanical throws/takedowns.
Although modern bunkai often calls upon Judo throws, this is usually flawed - the mechanics of the kata do not match those required by the Judo throw.
What's going on?
Karate is a martial art obsessed with balance, with keeping one or ideally both feet firmly on the ground. With good reason in my view. As a jutsu, Karate is focussed on self-defence. Judo is focussed on success in sporting competition, without compromising the opponent's safety. In Judo its OK, better even, to go to the ground with the opponent so that you can apply a pin. The Judoka knows the opponent isn't going to hit them, they're not going to pull out a knife & their mates are not going to join in. So throws that involve turning away from the opponent or have a high risk of going to the ground yourself are absolutely OK. In self-defence we can't make those assumptions. We would be wise to avoid turning our back on the enemy or going to the ground with them.
Seek inspiration wherever you like, but do think critically and apply some common-sense. Remember that the throws/takedowns in Karate-jutsu should be consistent with the art's aims and principles. They should emphasise keeping your balance & keeping on your feet, above all else. They could, but are not obliged to be inherently dangerous to the enemy. It would be nice if there was an option to control & possibly pin the enemy to the ground, as long it doesn't involve us going to the ground too, or having our arms tied up.
For the main part, I've got to say…NO! Let me explain.
I've previously discussed what qualifies a technique as bunkai (application) for a particular kata move. To qualify, the kata move must embody the principles that make the technique work. Otherwise practising the kata won't improve or maintain your ability to do the technique. It would be like playing air guitar to improve your trumpet playing. Utterly pointless!
Last week I discussed how Judo throws work and we saw that most Judo throws are dynamic in nature - you have to compromise your own balance in order to break the opponent's. If Karate kata were littered with Judo throws we should expect to see these dynamic movements in kata. Yet, with a few possible exceptions, we don't.
That said, lots of people do Judo throws as bunkai for kata. Lets look at an example.
Photo 1 shows the 'hands on hips' posture in Heian/Pinan Sandan. You draw your left foot to your right, turning 180 degrees as you do, and put your hands on your hips.
Photo 2 shows the Judo throw, o-goshi. Many karateka do this as bunkai for the move in photo 1. They do share some common characteristics. You spin round. You put your feet together. Even the hands on the hips is a bit like what you do with your arms in o-goshi. But that's where the similarity ends.
Photo 3 shows o-goshi without the opponent in the way. You can clearly see the critical dynamics of the throw. You bend your knees then straighten them, projecting your hips up and across, and bending the upper body forwards. Typically your heels leave the floor as you push up. This whole dynamic is the essence of o-goshi. Without it, its not o-goshi and it probably won't work.
The proof of the pudding is in the eating. You can practice Pinan Sandan for decades and it won't help your o-goshi one jot. I certainly have. And my o-goshi sucks!
The objectives of a martial have a big impact on the choice of technique. This should be obvious but is often overlooked. Let's compare, for example, Judo and the Koryu Ju-jutsu from which it was derived. By Koryu Ju- jutsu I just mean those historical Ju- jutsu systems that were around before the end of the feudal era in Japan.
The purpose of Koyru Ju-jitsu was straightforward. It was to kill, maim or subdue an enemy in the shortest time possible with the minimum of risk. The purpose of Judo is very different. It is a 'do' art, a method of character development. It is also a sport.
When Jigoro Kano, the founder of Judo, was putting it together he put a great deal of thought into selecting/modifying the right techniques for his new art. First and foremost they needed to be safe, to allow a free exchange of technique (limited by rules) in a live situation with full resistance. This was quite a challenge, certainly as far as selecting the right throws. Many of the throws he came up with were significantly different to their predecessors. The opponent needed to be allowed to breakfall from the throw. And if they could breakfall, chances are they'd land on their back. This is, I believe, where osaekomi came into the picture - that is, to pin the opponent's shoulders and hips to the ground in order to score a point.
Safe throws followed by pinning the opponent's shoulders to the ground - its great for sport but not the best tool for the job of self-defence. That's not a criticism, simply an acknowledgement of Judo's fitness for the specific task for which it was designed. Judo has other advantages, which I'll discuss another time.
The photo shows a Koryu Ju-jutsu throw. The intent is quite clear - to drop the opponent on to the top of their head. It would be devastating if properly executed.
The following describes what you should expect if you turn up to train at our club, if you've never practiced a martial art before. If you do have some previous experience we may structure things a little differently, depending on what your experience is.
First off, you won't be asked for any money - we don't charge for your first lesson. Before the lesson starts you'll have a quick chat with an instructor, so that we can get an idea of what you hope to get out of it, to assess/discuss any injuries or health issues you may have, and to answer any questions you have.
The lesson will start with a warm-up, to gradually increase blood flow throughout the body, preparing you for the physical activity to come. After that you'll learn our basic defensive posture from which you can defend, attack or - even better - calm an aggressor down. Then footwork - looking at how to move around in the same posture, to better position yourself relative to an assailant.
Next, practice of basic strikes - these are not complicated or acrobatic movements that take years to master. Instead, they're simple techniques that can be very effective with relatively little practice. These are then put together in a combination and practiced as part of one or more self-defence techniques with a partner.
The same strikes are also practiced against a striking pad, held by a partner. Ultimately this develops striking power, but initially you shouldn't try to hit hard. Its more about developing correct technique, distance and targeting.
Finally, you'll learn how to attack one vital point. Vital points are simply areas of the body that can be attacked with relatively little force to produce considerable effect. They're not magic but can be a great leveller when dealing with a bigger, stronger assailant.
The picture shows new students practising elbow strikes against a pad.
Yesterday I looked at categorising throws as either mechanical or dynamic. Today I want to look at how different arts may favour one category over the other. Let's start with Judo.
Judo formally includes 67 throws. Of these I would class 58 as dynamic and only 9 as mechanical. Clearly Judo favours dynamic throws.
What about Karate? For the moment, I'm not going to consider developments in the modern bunkai tradition that started in the 1980's. Rather, lets look at historic documentary evidence. What better place to look on that score than the throws taught by Gichin Funakoshi. Funakoshi published several books which demonstrated throwing techniques, in particular 6 throws in 1925 and 9 in 1935 (with some repetition) - a total of 10 different throws.
All of these (with the possible exception of Byobu Daoshi - 'topple a folding screen') are clearly mechanical. Funakoshi's Byobu Daoshi is a bit ambiguous, looking at pictures of it from the different publications. I think it could be performed either mechanically or dynamically with minor modification.
This accords with my experience of learning Karate-do in the late 1970's and early 1980's. With the exception of foot-sweeps, all of the takedowns I learnt were mechanical in nature.
I see Karate and Judo as being at two ends of a spectrum of mechanical versus dynamic throws. Other arts sit somewhere between those two points. Aikido sits pretty close to Karate in my opinion. As for Ju-jutsu, well that depends on the particular ryu - there are so many to choose from. Most sit somewhere between Aikido and Judo.
Why do different arts emphasise one category over the other? Why such a dramatic difference between Karate and Judo? That subject I'll come back to in the next week or so.
The picture shows one of Funakoshi's throws - Yari Tama, ie. 'Spearing a ball'.
There are lots of different throws used in martial arts and they can be categorised in different ways. There's one categorisation that I see few people making - to distinguish between mechanical and dynamic throws. The difference is actually quite straightforward.
In mechanical throws you apply leverage in such a way that you retain your balance throughout the whole movement. To test if this is the case try executing the throw in slow motion. If it can be done slowly throughout then it must be mechanical.
In dynamic throws you also apply leverage but compromise your own balance in order to do so. This isn't necessarily a criticism. Rather than thinking of being unbalanced you could define it as controlling your balance dynamically. You create imbalance in yourself in order to generate momentum which is transferred to the opponent. Hopefully your own balance will be recovered in the process. If a throw is inherently dynamic you'll find it very difficult to apply slowly and smoothly. At some point you'll have to 'throw' bodyweight into it.
Let's look at a couple of examples, both from Judo. First, o-goshi, a basic hip throw. In order to apply o-goshi you must put your feet close together, get your hips below the opponent's and project up. At the same time you must lean forward. Typically your heels will leave the ground briefly. Try to do this technique slowly and you'll really struggle to throw the opponent, unless they're quite a bit lighter than you. This is clearly a dynamic throw.
In uki-goshi, on the other hand, the feet are firmly planted, somewhat further apart, and the opponent levered over the hip. This can be practiced slowly and smoothly without difficulty, and is clearly therefore a mechanical throw.
Recently I've described the Kihon Kata that we practice in our club, as well as its associated bunkai. There's nothing special about the kata itself. It simply runs through a number of basic Karate techniques, more or less on the spot, then repeats them all on the other side. The student can focus more on what the arms are doing, without getting wrapped in complex stepping and turning movements.
As for the bunkai (application of the kata), please note that this is not THE bunkai. Each kata movement encapsulates various mechanical principles. The bunkai, by definition, incorporates some or all of those principles. There are therefore, numerous bunkai for each movement. Bunkai has been selected here because it is:
Relatively simple, and
Clearly representative of the principles embodied in the corresponding kata movement.
The picture is not intended to describe the bunkai. It merely serves as an aide memoire to both the kata and the bunkai. For further information on these applications just look back over my previous posts.
You may notice that there is no bunkai shown for gyaku-tsuki. This is because several of the other bunkai lead very nicely into the obvious gyaku-tsuki application - holding & pulling with one hand, while striking with the other.
Human beings, like most animals, are awash with a variety of reflexes. A reflex is an action that is performed without conscious thought in response to a stimulus. One reflex of particular interest to martial artists is the startle reflex. This is triggered by sudden loud noise or something moving rapidly towards your head. It sets off a cascade of responses that are expressed to varying degrees: eyes blink, shoulders hunch, arms raise, legs bend, the body leans. All this to protect the head and face, or to move them away from danger.
Everybody experiences this reflex when startled. The effect of a loud noise or rapidly incoming fist can be over-ridden, but only if you know its going to happen beforehand. If you're startled you will exhibit the startle reflex. Even if you're a black belt. Even if you've practised formal karate blocks for years. You'll only pull out the formalised response if you see the attack coming, ie. if you're not startled.
But there is another approach. What about if you build formalised responses on top of your startle reflex? So that they recruit more or less the same muscles in more or less the same sequence. Lets take haiwan-uke, the opening move of Pinan/Heian Yondan as an example. If I'm surprised by seeing a fist suddenly and unexpectedly flying towards my face then I'm going to flinch. Amongst other things my hands will come up towards my face (to cover it) and my knees will bend (to move my head away from danger). I may also lean or move backwards. The result is something surprisingly similar to haiwan-uke. Once the movement is underway its now actually quite easy to build on it and turn it into haiwan-uke.
We might expect then that there are movements in kata that deal with situations when you're not startled, and others for when you are startled. As you can see from the picture, clearly this is true.
This is a simple introductory application for inward block. It addresses a common attack - the one handed lapel grab, which will typically be rapidly followed by repeated punches with the other hand. I find this a difficult attack to address for beginners. There are plenty of things you could do, but they're usually dependent on the situation - arm orientation, arm straight or bent, size of attacker, whether they're pulling or pushing. This creates a dilemna for beginners - too many different responses to consider and choose from. This response isn't perfect, it would certainly be better if it blindsided the attacker. But its not bad as first stab at a 'one size fits all' solution.
Attacker grabs lapel. They may pull or push with the grabbing arm.
Prod the suprasternal fossa with your 'inside' arm to take the attacker's attention away from the grabbing arm. It will also halt their push if they're doing that. At the same time cover their grabbing hand with your other hand.
Now for the inward block. Draw the extended arm back into an inward block, cutting into the attacker's elbow crease (we could target a vital point but we're keeping it nice and simple for beginners). It may be helpful to slide or step back as you do this, it just depends on the distance and which foot you've got forward. Make sure you end up with same leg forward as you blocked with.
This isn't part of the inward block, just a nice easy 'one size fits all' follow up. Slide forwards, lifting the elbow into the attacker's face. Done correctly, their face is still travelling forwards at the same time - take care in practice. This of course isn't the end, but now you've turned the assault into an opportunity to follow up. So follow up with vigour!
Yesterday I saw the most amazing thing on Instagram. Pre-aged 'vintage' black belts for sale. You can get your name embroidered on it (in kanji of course), then select how 'vintage' you want it to be. You can have anything from 10% vintage (bedded in but not tatty) to 100% vintage (faded to white and completely threadbare). Of course, one bit that doesn't fade is the bit that's got your name on it.
You'll forgive me, I hope, for feeling a bit cynical and jaded about this. Practitioners of 'do' arts keep telling me how martial arts are about subjugation of the ego. Mmmh? I'm not feeling there's much subjugation of ego going on here. But still, what would a soul-less follower of a 'jutsu' tradition like me know about it?
Here's a picture of my belt. I've had it for 17 years. My sensei, in his wisdom, awarded it to me - just a plain black belt. No gold writing. No gold stripes. No silk. Its covered in cotton, which is reassuringly hard wearing. I only wear it in the dojo, not if I'm training at home, so I imagine it'll last me a lifetime. Its certainly durable enough, the only obvious wear is where the knot is tied.
Of course, whenever anyone is awarded their first black belt they can't help prancing about in it as soon as they've got home after the grading. That's only natural, it's a goal they (should) have worked long and hard for, and everyone has an ego. The trick is to acknowledge and accept that you have an ego, then move on and just get on with training again.
My belt is a symbol. A symbol of trust and respect between teacher and student. As such it only really has meaning for my sensei and myself. So the gold writing isn't wrong in itself, but its not really necessary. But pre-aging it? How much trust and respect would my sensei feel if I did that?
The kihon (fundamentals) of Karate are taken straight out of the kata, right? Yes, of course. You've got lunge punch, reverse punch, rising block, downward sweep, knife hand block, outward block. But what about inward block, where is that in kata? Look at the Pinan/Heian kata for example. When these kata were created they were the most basic kata. Odd then that they include all the other standard kihon but not inward block. There are similar movements, for example the 2nd move of Pinan Shodan (Heian Nidan) is essentially both hands doing an inward block at the same time. But what we don't see is the standard way of doing inward block (first swinging the 'blocking' arm right out to the side, then sweeping it inwards at the same as the other fist pulls back to the hip in a standard hikite).
What about Bassai Dai, I hear you say. There's a couple of inward blocks in that. But actually if you look at older versions of that kata you'll see these movements done quite differently. Generally the blocking arm wouldn't sweep out anything as wide. More critically, the other hand never retracts to the hip. Like many kata Bassai was modified and homogenised in the early 20th century. I think this is when the standard uchi-uke was incorporated.
Going through the classical Shorin Ryu kata I can't find a standard inward block anywhere. There are similar movements, but all have the other hand doing something else, never a standard hikite. I can only assume that inward block was made up during the development of the modern Karate-do kihon, sometime after the Pinan/Heian kata were created. Otherwise we should expect to see it in these kata.
That doesn't mean that the technique is completely without value. But I'd recommend not starting with the wide sweep outwards and not really worrying about what the other hand's doing - in application its unlikely to be pulling to the hip.
I've mentioned this drill before, but not described what it is. Now's the time. First I'll describe how, then why.
2 people face each other with their forearms in contact, one on the inside & one on the outside so you're both in the same position. The idea is simply to push the other person on their head or body. The push could be with an open hand, a fist or even a forearm. Of course, they're trying to do the same to you so there's going to be a struggle. The whole thing happens in relatively slow motion. You don't have to keep your arms at the same point of contact, the idea is to maintain contact, create andadvantage then capitalize on it. Whenever you lose contact completely just come together at the starting position and start again. Its as simple as that.
And now, why? Firstly - muchimi, the skill of sticking to the opponent. This is a fundamental skill in Okinawan Karate-jutsu. To best control the opponent's movements and their balance we want to remain in contact (I've discussed muchimi in detail in a previous post). Secondly - control of the centreline. This is very important in close range combat. You will find by experience that its much easier to control your opponent and to prevent them from hitting you if you control the centreline.
Why practice slowly? Principally this is so that you can engage your conscious mind in the process. The emphasis is on learning rather than winning. Another benefit is that - once you've gained some experience and learned to let go of your ego - you can start to add in what would be illegal and dangerous techniques in standard karate sparring - elbows, takedowns, shoulder barges, headbutts, kicks to the groin or knees. You name it, any technique is fair game as long as you can do it slowly and controlled so you can be certain its safe.
Yesterday I listed the 3 common theories regarding the origin of the Pinan/Heian kata. Each theory involves Ankoh Itosu, the great moderniser of Shorin Ryu Karate.
Theory 3 - Itosu derived them from the Channan kata, imported from China or Taiwan.
I don't buy this. The earliest references to Channan all suggest that Channan could simply have been an early name for the Pinan kata. Plus, I've never seen any form - Chinese or Taiwanese - that looked like a source kata for the Pinan's.
Theory 2 - Sokon Matsumura developed 1 & 2, Itosu the rest.
I don't think that Matsumura developed any of the Pinan's, even though this is a view held by my fellow followers of the Matsumura tradition. I find these kata lean too much in the direction of 'do' rather than 'jutsu', as I'll describe shortly. From what I've learnt of Matsumura's character I don't think he would have developed a series of kata to embrace 'do'.
Theory 1 - Itosu developed the Pinans from existing Shorin Ryu kata.
This is the one for me. Almost all of the techniques in the Pinan's can be considered direct copies or derivations from techniques in earlier Okinawan kata. Itosu didn't need to look elsewhere for inspiration. I think the least practical aspect of the Pinan's are the turns. They're basically the same throughout all 5 kata, a strong clue that the overall floor pattern was as important to Itosu as the practicality of the movements. And what's so special about that pattern? Look at the attached photo. It shows the kanji for 'pin' as in 'pinan'. Turn it upside down and what have you got? A good representation of the floor pattern of the Pinan's. This is just the sort of 'word game' I think we might reasonably expect from a follower of the 'way' rather than a hard-nosed pragmatist.
So there it is, but I hasten to add that this is just my opinion.
The Pinan (aka Heian) kata must be the most common kata taught in Karate and related systems in the world. I think you'd struggle to find many Karate styles which use kata (other than in the Goju systems) but don't teach the Pinan kata. In most systems they're the first kata taught, although sometimes they're preceded by the Taikyoku (aka Kihon) kata. Personally I've learnt one or more of them in several different styles, even in Ju-jutsu.
Despite being so widespread they're actually some of the youngest kata around - as long as you ignore the whole modern cacophony of musical forms. There's no evidence of them existing before the end of the 19th century. So where did they come from?
There are 3 prevailing theories on the origin of these kata and they all involve Ankoh Itosu, a teacher of Gichin Funakoshi, Kenwa Mabuni, Choki Motobu and other notables of the Shorin Ryu tradition.
Theory 1 - Itosu derived these kata from the other pre-existing Shorin Ryu kata, for use in his new Karate-do which was introduced to the Okinawan school system in 1908.
Theory 2 - Sokon Matsumura (chief of security to the last Okinawan king and one of Itosu's teachers) created the first 2 kata and Itosu added a further 3, based on the same mold.
Theory 3 - Itosu derived them from the Channan kata, imported from China or Taiwan.
It is difficult to decide between the 3 theories, there is no evidence to definitively prove or disprove any of them. Tomorrow I'll present my opinion on which is correct.
The photo shows Gichin Funakoshi demonstrating Pinan Shodan in the mid 1920's.
Now to continue looking at some of the techniques described by Shigeru Egami in his book 'The Way of Karate - Beyond Technique'. This time, early variations of front kicks.
The first kick I've shown here uses the first joint of the big toe. Egami describes it thus:
"The form of the foot in the front kick when I began practice was with the toes folded down. The part of the foot that struck the opponent was the first joint of the big toe. Since the toes had to be strong - otherwise they might be broken - we were made to practice standing, and even walking, with our toes folded."
Photo 1 shows the foot formation for this kick, photo 2 shows practice of standing on the folded toes. I don't recall seeing this variation anywhere other than in this book.
Next comes the tip of the big toe, in photo 3. Over to Egami:
"Another way to make contact is with the tip of the big toe, although this is not practiced much today. This is not feasible unless power is concentrated in the big toe. To strengthen the big toes for this purpose one should practice standing and walking on them, in the manner of a toe dance…"
Although the photo shows a round kick the text is talking about front kicks. I'm no stranger to toe-tip kicks but I don't really fancy training it by walking on my toe-tips as Egami recommends. I prefer to either a) rely on my shoes to protect my toes or b) to moderate the power appropriately.
Finally the heel, in photo 4:
"The heel may also be used in kicking. Although this is a style not practiced much today, I would advise practising it, as it will be helpful when extending your feet backwards and forwards in the warming up exercises."
Again a front kick with the heel is not something I've seen in modern styles of Karate-do, though its not uncommon in various Kung Fu styles.
One does not simply change the kata to fit one's bunkai. Or some similar statement. I'm sure most of us have seen such variations on the 'Boromir meme' by now. Broadly speaking, I agree.
But what if…? What if the kata has already been changed, messed about with even, by every Tom Sensei, Dick Sensei and Harry Sensei who's had hold of it before you? That, I think, is the situation we have with modern kata.
We often consider kata to be immutable. Yet every style does them differently. What's going on? Clearly lots of people have been changing them along the way. Whether that's a good thing depends on what their reasons are for making changes.
I contend that at one point kata had completely practical purpose, that being to practice the principles required for the bunkai. We know that Gichin Funakoshi (and probably others of his generation) deliberately simplified the kata he taught & modified their purpose. He emphasised kata as exercise rather than a handbook for practical self-defence. Its quite clear when looking at the bunkai taught by his students from the 1930's to 1950's that they understood little if anything of the practical application of kata.
Many of Funakoshi's students changed their kata. But if they didn't learn the bunkai it seems unlikely that their changes would bring the kata back closer to their original intent. And so on to the next generation. Each successive change is likely to take a kata further away from its original intent. Sometimes change might be beneficial but I suspect that mostly it's just to make the kata more dynamic, more impressive to watch or even just to be different.
So if you're tempted to change a kata I'd caution you to think very carefully about it. Only do so with good reason. If its an old kata, well its survived this long, I say leave it alone. Otherwise, give it a whirl. After all, everyone else has!
I had the good fortune to come across the book 'The Way of Karate - Beyond Technique' by Shigeru Egami. I find it very insightful, partly into the development of Shotokai and partly into early training under Gichin Funakoshi. Numerous times Egami contrasts training 'now' with how it was 'in the old days'.
Gichin Funakoshi arrived in Japan and started teaching in 1922. The Karate he taught underwent rapid and dramatic transition between that time and the early 1950s, when Shotokan as we recognise it now was well established.
Egami began training under Gichin Funakoshi when he was 18, in about 1930. So he wasn't in the very first crop of Funakoshi's students. Funakoshi's own book from 1926 gives us some insight into the Karate of the 1920's. Egami's recollections presumably provide insight into the training of the early 1930s. I find these very interesting. For now I'll just look at one: zenkutsudachi (forward stance). Over to Egami to describe it in his own words:
"In the old front stance the rear leg was kept straight and the navel was pointed squarely at the opponent. The stance was very cramped; eventually it was abolished as a result of discussions between Master Funakoshi and his son Gigo. However many karateka still adhere to and practice this old form. And while it is not practical it will enable one to strengthen his ankles. From this point of view it may be a good idea to practice it. Later the form changed from one in which both feet turned inward to one in which the front foot pointed straight ahead…"
Obviously the stance is smaller than the modern Shotokan or Shotokai stances. No surprise there. But what interests me is the shape. First, the forward facing hips. Second, the front foot turned in. To me this seems more reminiscent of Wado Ryu (as I learned it in the 1970's) than of either of the modern 'Shoto' traditions.
I've seen some amount of discussion recently on martial artists' responses to the threat of terrorism. At the bottom of this post I've linked to a well written piece by Gavin Mulholland recommending various precautions we could/should take. I've also attached an infographic showing causes of death in the UK. I saw this a few days ago, with terrorism inserted as a tiny, barely visible spec. I can't find that version but you can use your imagination and consider how small that spec would be compared to 'war', the smallest category on the attached chart.
Every action we take as individuals has a potential reward. It also has a level of risk (of going wrong) and a penalty associated with that. We continually assess reward, risk and penalty against each other in our day to day lives. And we're often not very good at that assessment, I think especially when it comes to risk. Who in their right mind, for example, would smoke if they rationally weighed up the rewards against the penalties and their risk of occurring.
Clearly the risk of being involved in a terrorist incident is extremely small although the penalty could be catastrophic. But given the far higher chance of falling prey to any of the more mundane causes of death you would, statistically speaking, be much better off concerning yourself with those. Just exercising, eating healthily and taking care when you cross the road are all much, much better ways of increasing your expected life span than taking preventative measures against terrorist attack. Indeed, getting paranoid or even just worried about possible terrorist attack is going to cause you stress which is counterproductive and is just going to make you slightly more susceptible to a whole range of health issues.
So perhaps we should just lighten up and let go of worrying about the whole subject? I think so, but with a caveat. As martial artists with an interest in self-defence shouldn't we exercising alertness and vigilance anyway? Doing so has certainly saved my skin more than once. To my mind such behaviours are one cornerstone of self-defence. So I think that many of the precautions on Gavin's list are things that we should be doing as a matter of course. I'm not going to tell you which I think are appropriate and which are overkill, that's for you decide. But I do think you should be exercising some level of alertness and vigilance. Not with a heavy heart, stressing yourself worrying about the possibility of terrorism, but just as a part of who you are - no stress, just something which is ingrained in you to the point that you barely even think about it.
Quite often I see people struggling to make a technique work because they're unable to apply enough power to it. The hand movement may be correct. The stance may be correct. The whole sequence may be correct. But if they're not in the right position, at the right distance, relative to the opponent then all their effort may be in vain.
To make any sequence of techniques work, you need to be able to make continual positional adjustments on the fly. And of course, ultimately you need to be able to do so without even thinking about it.
Some years ago one of my students had a moment of realisation. He turned to me and said "In Karate, you're allowed to move your feet". Euraka!
Over the years I've seen many people struggle with this. In free sparring they move around, they bob, they weave, they bounce. But in practising bunkai or self-defence their feet become like lead. Some even stand fixed, unable to even think about moving to a better position - and I'm not necessarily just talking about beginners.
The recent bunkai I've been demonstrating for mawashi-uke is as a good example of this. Photo 1 shows me attempting to use mawashi-uke to deal with both wrists being grabbed. Sometimes this can be a struggle at this point in the technique.
Photo 2 shows the same situation from the other side, so you can see what's going on with the hands. I've got stuck at this point, unable to apply enough power to get the release. It also shows what I need to do with my feet to improve my position - pivot the left foot and move the right foot across, so that I move in a circle with my hands at its centre.
Photo 3 shows the result of moving my feet. I've done nothing different with my hands but I've easily broken the grip and moved to a counter-technique - in this case an armbar.
So the moral of the story is: if you're struggling to apply enough power to a technique, try moving your feet.
Last week I showed 2 applications of mawashi-uke (roundhouse block), the first dealing with a cross-arm wrist/forearm grab, the second with a same side grab. What if both wrists/forearms are grabbed? We can just do the same thing, as follows.
Picture 1 - my wrists/forearms are grabbed.
Picture 2 - I could move either left or right, it doesn't really matter. But I'm going to move back to my right, simply to be consistent with the previous applications shown. As I move back I swing my right arm up so that my palm faces the attacker's face. At the same I start to sweep my left arm across my body, underneath my right arm.
Picture 3 - I continue the movement of my left arm, supinating my forearm and sweeping up so that my wrist ends up just in front of my right hand.
Picture 4 - I finish the mawashi-uke movement, pronating my left forearm and sweeping it across to my left. Both of the attacker's hands are stripped off, leaving me holding their left wrist. Having blindsided them with this 'block' I'm now in an excellent position to counter-attack.
Imagine the scene. I'm teaching a group of karateka and we're doing some padwork. I've asked everyone to work on close range strikes. Between each strike each person is getting further and further away from their target. What's going on?
Most karateka practise hitting pads from the range that they're used to in karate sparring. If asked to strike from closer range they can't produce the same level of power as they usually would. Whether consciously or not, they begin to increase the range. Usually this is done by moving back a little further after each strike, or even by 'winding up' at the start of the strike.
This is not a fictitious scenario. I've seen traditional karateka do it, and sport karate people, and self-professed badass karate-jutsu people.
I understand the desire to move to a position from which you can maximise your power, but I think its the wrong approach. In self-defence you often find yourself at very close range. So you need to be able to generate power from that range. You won't always have the option of moving to your preferred range.
Now if you want to be able to hit hard from close range, what's the best way to develop that skill? Well it obviously needs to involve actually practising hitting from that range. The vast majority of martial artists would accept that, so why don't they do it - even when given specific instructions (and reminders) to do so? Some simply can't do it, no matter how hard they try, they cannot stop themselves moving to longer range.
The reason is simple, they haven't learnt to INVEST in LOSS - to practice something which doesn't feel optimal, until it becomes natural. Its not rocket science, you just have to make yourself do it.
Remember, self-defence is about dealing with the situation you're presented with, not the situation you'd like to be presented with. Learn to strike from where you are, not from where you'd like to be.
On Tuesday I showed an application of mawashi-uke, using it to take control of a cross-arm wrist grab. Now we'll use the same movement to deal with a same-side wrist grab.
Picture 1 shows the starting position - the attacker grabs my right wrist with his left, with a view to bashing me with his other hand.
Picture 2 - I respond by swinging my right arm up and around so that my palm faces the attacker's face. At the same I step or slide (whichever is appropriate) back at 45 degrees to end up left foot forwards.
Picture 3 - I swing my left arm up under my right, supinating the forearm in the process.
In reality I do these 2 steps in one movement, the first blending into the second. They're shown separately here for clarity.
Picture 4 - from this point I complete the mawashi-uke movement, pronating my left forearm to strip off the grip and grasp their wrist. My right hand comes back to guard, which helps to strip off their grip.
It may be that its quite hard work to swing my right arm up in the first place, in which case I can employ a diversionary tactic to take the attacker's focus somewhere else. Spitting in their face or a straight left punch to the abdomen are both good options which can lead easily into the mawashi-uke.
I've previously demonstrated application for mawashi-uke (roundhouse block) but I want to revisit this technique now and look at some applications that use it to deal with wrist/arm grabs. Today's application is against a cross-arm wrist or forearm grab.
The attacker grabs my left wrist with his left hand, as a precursor to hitting with his right hand. Why would he do this? To hold me in place and prevent me blocking with my left hand while he punches. Rather than wait for the punch I'm immediately going to go on the offensive. So I swipe my free (right) hand across his face, aiming to rake my fingers across his eyes. If I were closer this might instead be a slap across the ear. Either way the intention is to distract the attacker's intention away from the grab and simultaneously disrupt their ability to punch with the other hand. This is position we see in picture 1.
Picture 2 looks very similar. If you compare the 2 pictures you'll notice that the attacker has moved his head back slightly. This is a natural response to my hand sweeping across the face, whether it contacts or not. Also, my left forearm has begun to rotate around the elbow, supinating as it does so.
In picture 3 the mawashi-uke movement has completed. My left forearm has completed its supination, followed immediately by pronation. This action enables me to turn the attacker's wrist over, so that I've blindsided them and captured their wrist in one moment. From this point there are a variety of responses open to me.
Kata are immutable, handed down from the masters of old, not to be meddled with by lesser mortals like us. Apart from, of course, when they're not. In reality people have been creating, modifying and abandoning kata for at least 150 years, if not a lot longer.
I have created kata myself before now, and I think that's OK, as long as its been done for a specific reason. There are bad reasons to create kata, eg. you have to do so to fulfil a grading requirement. But there are good reasons too. I created a new kata last year, to suit a specific need, as follows.
Our kihon (basics) don't look like standard karate-do basics. They're less formal, without the same emphasis on hikite, plus a number of other differences. So there's a big jump when students go from the kihon to learning the Pinan kata. I decided therefore to put in an intermediate step, the point being to give students an opportunity to practice the arm movements of basic Karate techniques without having to worry about the complexities of stepping & turning. A secondary goal was to allow practice of some basic stances, but again without having to worry too much about stepping. And of course, it should be bilateral, ie. everything done on one side of the body should also be done on the other.
The pictures show the first half of the kata, from the end of that section you simply come back to 'ready' with the feet parallel and repeat on the other side. Here is the sequence:
1. Ready
2. Downward Sweep in forward stance
3. Reverse punch
4. Outward block
5. Reverse punch
6. Rising block
7. Inward block
8. Reverse punch
9. Lead hand punch
10. Reverse punch
11. Roundhouse block in cat stance
12. Low knife hand in straddle stance
From this point simply come back to step 1 and repeat on the other side of the body.
Gichin Funakoshi, the 'father' of Karate-do is often quoted as saying:
"To win one hundred victories in one hundred battles is not the highest skill. To subdue the enemy without fighting is the highest skill."
In doing so, he was actually quoting the famous Chinese military strategist Sun Tsu (who I quoted myself yesterday) in 'The Art of War'. But another of Funakoshi's sayings is often quoted in the same breath:
"The ultimate aim of the art of Karate lies not in victory or defeat, but in the perfection of the characters of the participants."
I'm not certain that Funakoshi was deliberately conflating these two principles together, but I think he probably was. That's certainly how I read it when I first encountered it as a teenager, and I think how many others have read it too.
Why is subduing without fighting the highest skill? From Funakoshi's words we could get the impression that there is a moral imperative, that we do not wish to unnecessarily cause harm to the aggressor. I'm certain that's not how Sun Tsu saw it. Its clear from reading The Art of War that he had no moral considerations, his rationale was purely practical. Throughout the book there is a recurring theme about minimising the risks associated with engaging in battle. What better way is there than to avoid battle entirely? To achieve your strategic goals without actually engaging in battle at all has got to be the best way.
So when I avoid or walk away from violence is not because I'm a nice person (although I am quite lovely). No, its because my primary strategic goal is to ensure no harm comes to me or my loved ones and, at that moment, that's the most effective way to achieve that goal.
The picture shows part of the application of soto-uke (outward block) that I described last week. Specifically it's the preparatory movement where the 'non-blocking hand' extends across in front of the body. In this case the movement is used to punch the attacker's wrist (at the same time that the 'blocking hand' begins chambering in the opposite direction).
This is a good example of one of the maxims espoused by Sun Tsu in the Art of War - 'Attack the enemy where he is unprepared, appear where you are not expected'. One of my instructors, Rick Clark, put his own slant on this - very astutely in my opinion: 'Attack where the enemy cannot defend'.
Whenever the enemy attacks, they create opportunity. If the attack is a grab then they expose the grabbing arm as a target. Momentarily at least, it is impossible for them to properly defend that limb. And that is what we take advantage of in this instance. Its very difficult for the attacker to prevent us from attacking their hand or wrist. The challenge is to make it a meaningful attack, one which won't simply be shrugged aside by superior strength, or be so fiddly that it diverts our own attention from what their other hand is doing.
There are various forms such an attack could take, depending on the situation. In this case a straightforward punch is just the job. It creates enough disruption of the attack to allow us to follow up with the rest of the technique - unbalancing and blindsiding the attacker, prior to counter-attacking.
Here is a nice straightforward application for soto-uke (outward block). Imagine that an assailant has grabbed your left wrist or forearm with their left hand (to restrain you while they punch with their right hand). If you move your left arm in an outward block movement its easy enough to take control, blindside them and grab their wrist. But what if they've grabbed your upper arm instead of your forearm? This is shown in picture 1.
Doing the same movement gets a different result. You can force a mild temporary lock on their wrist & strip their grip off in the process. This will make them turn to their right, blindsiding them slightly. But there's a problem. Unless their wrist is already bent back its quite easy for them to thwart your attempt - unless you're quite a bit stronger. If their wrist is bent in the other direction it makes it even more difficult for you. But help is at hand, in what your other hand is doing during the preparatory phase of the block.
Picture 2 shows the preparatory position. The left arm sweeps slightly across to the right. The right fist moves over it to the left. Don't waste this move, punch the back of their forearm just up from their wrist. This will bend their wrist back. I find striking with the middle knuckle, with your forearm rotated as shown, is most effective.
Now you can easily complete the outward block movement. Picture 3 shows the wrist being bent back prior to being stripped off.
Picture 4 shows the final position. Note how the right hand hasn't been drawn back to the hip - its not holding anything so there'd be no value in doing the full hikite. As soon as its done its job (punching the wrist) its just withdrawn to a guard. Where we go from here is the subject of another post.
Look at the picture of an Okinawan peasant, drawn by one of the expedition members of Commodore Perry's visit to Okinawa and Japan in 1853. He has no shoes, his hair is a mess - he can't even afford shoes or a hairbrush. Does that sound like someone who has time or opportunity to practice, never mind actively develop, a martial art? I don't think so.
We may have romantic ideas about what life was like in feudal Okinawa, but we should remember that for peasants life was hard, frugal & with little opportunity for improvement. Like mainland Japan, Okinawan society had a fairly strict class system. Peasants farmed or fished. Merchants traded. The nobility, ie. the warrior class, ran the country. There were many separate hierarchical levels of nobility, ranging from the king down to lowly officials such as policemen, but they all enjoyed various freedoms & all shared in the wealth of the country. The people who didn't get much of the wealth were ones who created most of it - the peasants. Their lot was not much better than that of slaves.
So the warriors ran the country & studied the arts of war, and peasants farmed - probably all day every day. Who then created and practiced Karate? The warriors of course. It's a no brainer.
So where did the myths about farmers practising Karate come from? A misunderstanding of historical events. The Meiji Restoration in 1868 heralded the end of the feudal era for Japan & Okinawa. Soon after that, the warrior class lost the basis of their wealth (free rice etc.) and had to fend for themselves. As in Japan, those higher up the chain likely became large landowners, those lower down had to make do with just a small patch of land. They fell on hard times. Those who were previously conversant with the way of the fist, sword, naginata, sai or whatever, now had to become conversant with the hoe and sometimes the rickshaw.
Outward block is sometimes referred to as soto-uke and sometimes uchi-uke, depending on style. I use soto-uke. Of course, its not really a block, it's a set of mechanical principles. Here they are (let's assume that the left hand is 'blocking').
Phase 1
From wherever it is, move your right arm so that it is straight(ish), extended in front of view and crossing the midline. If your fist starts at your hip this will feel like a punch (shoulder flexion and horizontal adduction, elbow extension, forearm pronation). Move your left arm across the body, underneath the right arm, with a feeling of punching across in front of you (shoulder flexion and a lot more horizontal adduction, elbow flexion followed by extension, forearm pronation).
Phase 2
The right arm retracts to the hip, ie. hikite (shoulder extension and slight horizontal abduction, elbow flexion, forearm supination). The left arm moves to the final blocking position in the hip/shoulder line (slight shoulder horizontal abduction, slight elbow flexion, forearm supination). The left upper arm and forearm are both at 45 degrees to the horizontal, perpendicular to each other.
Some points of note…
Like the other 'uke' movements we've looked at so far this move contracts both sides of the chest to generate power in phase 1, followed by both sides of the upper back in phase 2.
Unlike those moves, outward block both forearm rotate in the same way for each phase - pronation in phase 1 & supination in phase 2.
The 'blocking' fist finishes at shoulder height. In our Shorin Ryu system there is no distinction between different heights in basic 'blocking' motion, ie. jodan & chudan. I think that distinction was introduced in the 20th century as the basic blocking application was emphasised.
This move is very similar to mawashi-uke, the main difference being around the 'blocking' arm's forearm rotation.
Once upon a time Karate used several different fist formations but most modern systems use seiken (the standard fist) almost exclusively. Personally I use middle knuckle fist (known as nakadaka-ken or chuko-ippon-ken) almost as much as seiken. It just depends on what target I'm hitting and from what angle. Getting that choice right takes practice of course, but first you need to be able to form the fist, and to flip between that and seiken at a moment's notice.
Photo 1 shows the position of the fingers, with the thumb out of the way so you can see what's going on. The obvious difference to seiken is of course that the last joint of the forefinger is extended. The forefinger and ring finger touch, which pushes the middle finger foreknuckle forwards. This forms the primary striking surface.
Photo 2 shows the thumb folded into its correct position, so that the tip of the thumb touches the ring finger. This position of the thumb presses the forefinger against the middle finger, helping to hold all 3 fingers together. Now the middle finger foreknuckle is supported by the forefinger, the ring finger and the thumb.
Photo 3 shows the correct angle of the wrist for punching with the middle knuckle. Note how the wrist being bent back slightly creates a straight line through the forearm to the middle knuckle. This is not the only way to strike with this knuckle, but that's a subject for another post.
A note of caution - don't punch with power to random targets or you'll likely just damage your finger. Middle knuckle fist is a precision instrument, treat it with appropriate respect. You need to learn how and where to use it.
A final thought - this fist is so unfamiliar to most karateka that some have thought I couldn't form a proper fist, simply because they didn't understand what they were looking at it. What a shame that they're missing such a useful weapon from their arsenal.
Assaults typically begin in one of two ways - the surprise attack, or the verbal confrontation which escalates into a physical attack. Lets look at the 2nd of these possibilities, the verbal confrontation.
This kind of assault is a million miles away from how sparring occurs in the dojo. As a result, in my experience and no matter how good at sparring they are, many martial artists are not well equipped to deal with verbal confrontation. The simple reason for this is lack of practice. If you don't practice it how are you going to get good at it?
I don't want to get wrapped up in the details right now, but do want to make a couple of important points. Firstly, its critical that you employ some sort of defensive posture BEFORE the physical violence starts. Otherwise its most likely that the assailant will get the drop on you, in which you could be in serious trouble. Secondly - and this is what many people fail to appreciate - if you employ the right body language you could well resolve the confrontation at the verbal stage. And isn't that a worthy goal, to prevent violence from happening in the first place?
So how to gain the necessary conflict resolution skills to achieve this? One part of the solution is to engage in role play. One person plays the assailant. They might be determined to perpetrate an assault at any cost, they might be easy to dissuade, it can be played in different ways. The other person needs to a) maintain an appropriate defensive posture and b) attempt to defuse the situation. There's a right way and a wrong way to go about this, more on those details later.4
Last week I compared shiko-dachi (straddle stance) and kiba-dachi (horse stance). I concluded that everything kiba-dachi can do, shiko-dachi can do as well or better. And without the same stress on the knees!
So what's the point of kiba-dachi, why use it? Actually in our style of Shorin Ryu, we don't. And therein lies a clue. Kiba-dachi is a creation of Japanese Karate, not Okinawan.
In the 1920's when the founder of Shotokan, Gichin Funakoshi, started teaching Karate in Japan he quite quickly began to modify the art that he taught. Later, he stated that "I set about revising the kata so as to make them as simple as possible". If you look at the differences, before and after his modifications, its clear that one of changes he made was to make the kata more dynamc and athletic. The emphasis was on exercise, not on combat effectiveness. One obvious aspect of this is that he made the stances larger. Look at the 1st photo, from Funakoshi's 1926 book, showing him demonstrating Naihanchi kata, see how small the stance is.
During the 1930's & 40's Shotokan really took on the shape we recognise today. Look at the 2nd photo, showing the same move from the same kata as above, this time performed by a modern day Shotokan practitioner. Naihanchi kata became Tekki. Naihanchi-dachi became kiba-dachi.
Outwardly at least, kiba-dachi is the same stance just writ much larger. But it doesn't really work. The combative applications of Naihanchi/Tekki don't generally work in kiba-dachi. And the method of power generation that naihanchi-dachi teaches can't be learnt or practised in kiba-dachi, you just can't tense the right muscles properly.
So why do it? If you're interested in combat effectiveness I say bin it and use naihanchi-dachi instead. If you're not, just carry on, but do please look after your knees.
Have you ever sat in front of youtube looking at different people's ideas on bunkai, becoming more and more despairing.
Some of its just so rudimentary, with artificial attacks, hands held pointlessly at hips in hikite, its just never going to work in reality (no matter how respected the master that's demonstrating it).
Some of its just too fantastical, with no touch knockouts or convoluted combinations of pressure points, its more like a magic show than bunkai.
Some of its impressively athletic and acrobatic, but not actually got much to do with the kata, nor with reality.
Some of it might be quite good but, again, not actually based on the kata.
Eventually you find yourself thinking…
"These are not the kata applications I'm looking for."
Fear not, help is at hand. I could say "come and train with us" and that would be lovely, but I fear we couldn't fit you all in.
But the real solution is to learn to think and critically analyse for yourself. Learn what you can from the internet, or from books, attend seminars if you can. But don't just accept what others tell you - think about what you're doing. Apply common sense. Find training partners to work with outside normal dojo time. Test the bunkai you learn, try to break it. Ask "what if this, what if that". Strive to understand the principles the kata is teaching. Strive to understand the relationship between the kata and the bunkai. Perhaps the bunkai is too complicated - what can you do to simplify it? Perhaps the bunkai has got potential but needs a little something extra - what can you add to it to improve it. Make it work for you.
Always, always exercise your strongest muscle - your brain. And lastly … May the 4th be with you.
What is the purpose of shikodachi (straddle stance)? As with any stance its expressing a compromise between stability & manouevrability. Most stances provide a stable platform from which we can generate force in a particular direction (or the converse - dig in to create resistance). In the case of shikodachi this direction is sideways. Being a large-ish stance it confers significant stability but at the expense of manouevrability.
But I think a more important aspect is about how you get into or out of the stance, not about the position itself. Dropping into shikodachi is a great way to generate power by dropping your bodyweight. Standing up from shikodachi is a great way to recruit your strong leg and buttock muscles into the act of pushing upwards.
Another way is to use the stance itself to impinge on the opponent, eg. levering them over your leg.
The application I've shown recently uses two of these actions - dropping the bodyweight and using the stance to impinge on the opponent's leg.
What about kibadachi (horse riding stance)? There's not much this stance can do that shikodachi can't do too. In fact, shikodachi seems to be superior in a couple of ways. Firstly its rather easier to drop the bodyweight into shikodachi than into kibadachi. We all know this, dropping into shikodachi is quite easy, in kibadachi its always an effort due resistance in the tendons & ligaments of the legs. A little experimentation shows that its easier to push up from shikodachi than from kibadachi too. Shikodachi makes it easy to push up with the thigh and buttock muscles. The shape of kibadachi makes it more difficult to engage all of the same muscles. Note which stance sumo wrestlers use to drive up and forwards at the start of a bout.
So the question: why use kibadachi at all? And that's a subject for another day.
As I've been discussing palm-heels this week I just wanted to go through some do's and don'ts.
Picture 1 shows a way of using palm-heel that I learned years ago and I understand some groups still use now. The fingers are curled up, apparently to protect them. How does this protect your fingers? Which part of my hand contacted the target first in the photo? It's the distal joint of the fingers, not the palm-heel. So by curling my fingers all I've achieved is to bash my fingers onto the attacker's skull.
Contrast this with picture 2, which I think is far superior. The fingers do contact the target but the force is very much applied by the palm-heel. Most areas of the human body are curved not flat. The head for example presents a curved target for the palm-heel. So if you palm-heel to the face or side of the head your fingers will flex harmlessly over the top of the head.
Picture 3 shows one way of practising on a pad. This way is bad news. Because the target is flat the fingers are forced back slightly on impact. Most people will be able to feel an uncomfortable stretch on the tendons of the inner aspect of the wrist when they do this. Repeated practice in this way is likely to cause a repetitive strain injury.
Finally, picture 4 shows a better way of practising on a pad, which simulates striking the head quite well. Aiming to put the inside of the knuckles at the top edge of the pad will ensure that the fingers flex naturally over the top. So it better emulates the reality of striking the head and avoids stretching the wrist tendons.
To conclude, think critically about your weapon selection and target selection, and listen to the feedback you get from your body when you practice actually striking things.
Yesterday I looked at the risk of damaging yourself when punching and how using the palm-heel can avoid most of that risk. There are other techniques that are similarly robust - they're relatively easy to do and forgiving if you get them wrong. The knee strike and the elbow strike are the obvious examples. These are powerful short range techniques, even with relatively little training. If you mess them up you might not generate much power, but you're not very likely to damage yourself beyond a bit of bruising.
We teach all three of these strikes to beginners in the first session and use them extensively during the early months of training. But don't be fooled into thinking they're just for beginners. All three techniques are important weapons in my arsenal.
The photos all show another pertinent feature of good self-defence techniques. Note the other hand holding and drawing the assailant into the strike (hikite) - helping to achieve muchimi (sticking) and kuzushi (balance breaking).
…is that it's quite easy to get wrong, and to come unstuck as a result. Of course you need to practice in order to be able to deliver power, but you also need to deliver that power without overly damaging yourself in the process. You could sprain your wrist, damage your fingers, dislocate or break the bones of your hand. I personally know of 2 instances in which the result of a fight was decided by the first punch - the puncher broke his hand on the opponent's head and got a kicking as a result.
To avoid this problem you need to get a lot of things right when you punch: wrist alignment, fist shape, target selection, striking surface, angle to the target & distance. All this while someone's trying to knock your block off. It can be done, but it takes months - no, years - of practice to learn to punch both with power and with confidence that you're not going to damage yourself in the process.
If you do touch contact sport karate this may not be an issue for you. Or full contact in which you wear gloves, well its still an issue, but not at all as much as in self-defence. But when beginners come into the dojo - whatever the style - they almost always aspire to learning some self-defence skills. Yet generally in Karate we start them off with punching, something that's not going to be much use to them in self-defence for maybe a couple of years. I don't think beginners would be too happy if they understood that. Frankly I wouldn't blame them.
So what can we give beginners as a striking tool to start with? It's obvious - the palm-heel. It pretty much removes the whole issue about wrist alignment, removes the need to be able to form a fist and drastically reduces the need to get the angle of attack just right. Rather than wait a couple of years to be able to actually use it, beginners can finish their very first training session having acquired a tool they can use straight away.
Thanks to Steve Lowe (of the Wigan Koryu Kyudokan Dojo) for this, possibly the best description of the different ways of seizing the initiative I've ever seen...
This week we looked at the mechanics of gedan shuto uke (low knife-hand 'block') in shikodachi (straddle stance). Now time to look at application. There are numerous circumstances in which we can use this application, here we'll look at one arm being restrained by both of the assailant's hands (see photo 1). Note that this application only works if the assailant's lead leg is on the same side as the arm they're grabbing. So we'll assume the assailant has their right leg forward and is grabbing your left arm.
First (photo 2) drive you're left arm down (in a spearing motion) to their right. The idea is to draw them in that direction and encourage them to resist that movement.
Next (photo 3) step or slide (it just depends which foot you've got forward) your left leg behind their right leg. Drive deeply in so there is no space between your shoulder and theirs, and your hip and theirs. At the same time sweep your left arm up, in a circling motion about your own shoulder, then down slightly so your elbow comes down onto their chest.
Finally (photo 4) the scissoring motion. Simply complete the technique. The left arm drops into the gedan shuto position. The right foot pivots and the knees bend as you drop into shikodachi. This movement pushes your left knee/thigh through their thigh. The combined movement of the left arm and leg feels like cutting through the opponent with a pair of scissors.
Its possible that between steps 3 & 4 that you can feel the assailant is going to be thrown. Or you may feel that they're going to be able to step back and out with their right leg and thwart the throw. In this case, you can help matters along by catching the inside of their right knee with your right hand and (at the same time as the scissoring motion) lifting it up so that your hand comes to the final hikite position.
Gedan shuto (lower knife-hand sweep) is very similar to gedan barai (downward sweep). You can think of it as gedan shuto uke (block) or gedan shuto uchi (strike), it doesn't matter which as the movement is the same regardless of the actual application. The arm movements are virtually identical to gedan barai, the only differences being:
The hands are open
The retracting hand only comes back to the midline, not the hip
The retracting forearm is aligned parallel to the hips, not at right angles to them as would be the case in a normal hikite
The retracting arm can still be thought of as hikite (pulling hand). Done like this its good for pulling the upper arm (rather than the wrist) or for trapping a limb against your own body.
The stance varies from style to style and depending on application. Some styles use nekoashidachi (cat stance) or kokutsudachi (back stance). We typically use shikodachi (straddle stance).
When combined with shikodachi the final rotation of the forearms should be held off as late as possible and timed to coincide with the drop into the stance and pivoting of the rear foot.
This technique (or variations on the same theme) appears in several kata: Pinan Nidan (Heian Shodan), Passai (Bassai), Useishi (Gojushiho).
If I were in charge of naming Karate techniques I'd have called this one 'scissoring' because of the combined action of the lead arm and leg. In addition to the arms working in opposition (as in gedan barai) the lead arm and leg also work in opposition to produce a shearing action - hence the name 'scissoring'.
Back to last week's visit by Mike Sanderson. I asked Mike to do a demo of his skills with Nunchaku. Some teenagers have a mis-spent youth playing snooker, or nowadays video games. But Mike's mis-spent youth was clearly emulating Bruce Lee with his nunchuks instead.
I've never really taken nunchaku seriously. When other people thought they were really cool, I preferred to be anti-cool and study dull weapons like tonfa and sai instead (not that I was ever any good at them). But watching Mike work with chucks takes away any thought about them being gimmicky or ineffective. The speed, power and precision with which he wields either one or two chucks is truly impressive. You really wouldn't want to be on the wrong of them.
The picture doesn't do it justice. The chucks were moving just too fast for my camera to catch. This is the only photo I took that even remotely captured what was happening.
Finally, for now, on Age-Uke (rising block) - here's an application that uses the action of both hands.
With your arms raised, the attacker grabs both of your wrists.
Drop the left hand and raise the right, whilst moving both hands across your midline. Its very difficult for the attacker to prevent this, even if they're a lot stronger than you. This is moving into the chamber position for age-uke.
Drive the left hand straight up, now to the outside of the attacker's grab (to your right wrist). At the same time start pull your right hand down, retracting it to your hip. This combined action squeezes the attacker's left wrist in the crook of your left elbow.
Keep pulling the right arm down and pushing the left arm up, starting to pronate it into the 'blocking' position. The combined action will strip off the attacker's left grab.
As soon as the left grip is stripped away you can start to take control of one or both arms with your left and strike with your right. Be careful not to keep driving the block up once the grip is stripped away - doing so unnecessarily opens your left chest/armpit area as a target and gives the attacker a chance to regain the initiative.
Karate techniques are designed to express power throughout the whole range of the movement. If karate were a purely striking art that wouldn't be relevant. The point would be for power to be applied just around the end of the movement, the moment of impact. Everything would be geared towards that goal. But Karate isn't a purely striking art and the movements themselves are evidence of that. Just about any kata movement that I can think of, if done correctly, applies power throughout the whole movement.
Lets look at an example: age-uke (rising block). Imagine you're trying to raise your arm against resistance, perhaps as in photo 1 where an opponent is using both hands to prevent you raising one hand. Unless you're dramatically stronger than the opponent you won't have a chance of just raising your arm. Instead, draw your hand in towards your centre, supinating (rotating) the forearm as you do so (photo 2). From there push your hand straight up, keeping the forearm close to vertical (photo 3). Finally, for the last bit of the push, pronate (rotate) the forearm and let the elbow splay out a little (photo 4). There, you've now done age-uke and overcome superior resistance in the process.
So is age-uke a block or is it a grappling tool? It is of course more than either of those, it's a mechanical principle that can be applied in a whole variety of ways.
We've seen how age-uke (rising block) can go wrong if you have the elbow at too acute an angle. There is a further factor to consider. Do we want to do a 'hard' block, checking the motion of the incoming weapon by absorbing its momentum? Or a 'soft' block, redirecting the incoming weapon?
Remember the adage: strike a soft target with a hard weapon, and a hard target with a soft weapon. The same applies to blocking. A hard age-uke is a good choice for blocking punches from the inside. This is done with the end position of the movement, so the ulna strikes the muscles on the inside of the attacking limb.
That's maybe not such a good choice for blocking a weapon such as a stick or metal bar. Either could potentially break your arm. Better to use a 'soft' glancing block. This can be achieved by contacting the incoming weapon slightly earlier in the age-uke movement. Contact is made with the muscles of the back of the forearm (before it has fully pronated) and the forearm itself held more vertical. The forearm could be held in this orientation so that the stick slides down and is gently redirected (as shown in the photo), or it could be pronated immediately following contact to increase both the redirection and the degree of control. Tai-sabaki (body shifting) can help by combining evasion with the glancing effect.
I'd prefer to avoid a weapon rather than block it (imagine doing any empty-handed block to a blade). And I'd prefer a soft glancing block to a hard checking block. That said, sometimes you don't get much of a choice. Twice in my adult life I've had to directly block attacks with sticks. Once was with age-uke to a pool cue, once was with gedan-barai (downward sweep) to a stick with a couple of nails poking out of it. Evasion or glancing blocks weren't options in either case. That I didn't end up a couple of nails sticking in my arm was probably as much luck as skill on my part.
If you're going to use Age-Uke as a block, here's how not to do it. The problem here is the angle of the forearm at the moment of impact. If its horizontal or close to horizontal (so the angle at the elbow is about 90 degrees) then it becomes quite easy for the incoming downward force to push through, bending the elbow even further.
In this instance the attacker had a rubber stick. If it had been an iron bar I'd have had a broken arm and a broken head. So this is definitely NOT the way to do it!
Known as age-uke or jodan-uke, this is a principle introduced early in most styles of Karate. Phase 1 & phase 2 are not sharply differentiated as they are in gedan-barai, instead one blends seamlessly into the other.
In Phase 1 how the 'blocking' hand moves initially depends on where it starts from (picture 1). Wherever it is, it needs to get to the position with the elbow bent and at the hip so that the fist is in front of the abdomen. The other arm moves so that the hand is more or less in front. From here the 'blocking' arm moves as follows:
Shoulder flexion
Shoulder adduction
Elbow flexion (if it needs not bent enough already)
Forearm supination
The net result is that forearm is close to vertical in front of the chest.
For the other arm the actions are as follows:
Shoulder extension
Shoulder abduction (just enough)
Elbow flexion
Forearm supination
The net result for both arms is that they are crossed in front of the chest, with the 'blocking' arm further away from the body. This is the (fairly) arbitrary end of phase 1 (picture 2).
In phase 2 for the 'blocking' arm the shoulder flexion continues so that the arm continues to rise vertically. Meanwhile the other arm continues the shoulder extension and abduction so that the fist moves back towards the standard chambered position at the hip (picture 3). Finally, at the very end of movement just as the 'other' fist chambers, the 'blocking' forearm pronates and the shoulder abducts so that the elbow flares out (picture 4).
I've labelled some important features in pictures 3 & 4: firstly, the way the forearm drives up the centreline, the forearm being oriented quite close to vertical; secondly, the pronation of the forearm and flaring out of the elbow happen together, as close to the end of the technique as possible.
Over the last couple of months I've banged on at length about my approach to bunkai. I'm not going to say anything new here, I'm just going to summarise as briefly as I can, before moving on to other topics. I believe this approach gives us everything we need to know about the analysis of kata. Everything else can be worked out from this starting point. So here goes:
1. Understand the mechanical principles of the kata
Every move in kata embodies specific mechanical principles that make it a powerful movement. Strive to understand what those principles are, they're not rocket science.
2. Bunkai must use the same mechanical principles as the corresponding kata movements
Practising the kata should improve your ability to execute the bunkai, or at least maintain that ability (otherwise, what would be the point of practising the kata?). And the only way that practice of one can help execution of the other is if they both use the same mechanical principles.
3. Bunkai must comply with known principles of combat
I've previously listed what are, for me, the most important principles of combat. I'm not saying that you should use the same ones as me, though obviously I believe they're pretty good ones. But you should prioritise what you consider the most important principles and be able to justify why you believe that is so. Your bunkai should embody these principles. If it doesn't then, no matter how elegant it is or how well it fits the kata, its probably not going to work in reality (assuming you've got the principles of combat right of course).
And that's it in a nutshell. It really doesn't matter where you get inspiration for bunkai from. I suggest you cast your net as wide as possible. But wherever it comes from, testing proposed bunkai against the two sets of principles outlined above will provide a consistent and reliable approach to separating out the wheat from the chaff.
Gedan-barai (downward sweep) has many applications, beyond the obvious use as a block. Here is one we use a lot, which we introduce in the early kyu grades.
The attacker grabs your right wrist with his right hand.
Start to reverse the grip so that you're grabbing their wrist. At the same time bring your left forearm to just above their right elbow. Note in the photo that I've switched my stance at this stage.
Continue with the same actions: your right arm extends as you consolidate your wrist grab, your left ulna (forearm bone) slides up, sliding across the attacker's triceps tendon just above the elbow. This is the chamber position for gedan-barai (or at least its trying to be, even if the hands don't reach the final position).
Complete the gedan-barai. Your right hand pulls their wrist back to your hip (hikite), your left forearm presses down through their triceps tendon. If you've set it up correctly, their elbow will be hyperextended.
In the ground game, joint-locks that hyperextend the elbow are intended to result in a submission/dislocation. But standing up like this that's unlikely to happen. What is likely is that the attacker is forced to bend over, possibly dropping to their knees. Once you've got this far its not too difficult to drive the person face down towards the ground.
Here I've shown the technique in isolation. In practice I'm more likely to set it up with a strike first, lets say a punch to the ribs (with the left hand in this case). Once you've gained competence at doing it from a wrist grab you can begin to apply it in other situations, pretty much anytime you've managed to catch their wrist in a cross-arm wrist grab.
Downward sweep (or gedan barai) is one of the first principles learnt in Karate. It is an extremely versatile movement, that can be used in a whole variety of ways. Like many principles its split into 2 phases, each encapsulating different principles. The phases can be used in sequence or independently.
Phase 1 - the 'chamber'
One arm, let's say the left, bends so that the fist comes towards the opposite shoulder. This combines shoulder inward rotation, elbow flexion & forearm supination (rotation). Whether the shoulder extends or flexes depends on the starting position. This compound movement draws on a number of muscle groups working together to produce a powerful effect (I've discussed how well elbow flexion and forearm supination work together previously).
Meanwhile the right arm effectively does a low punching motion (shoulder extension, inward shoulder rotation, elbow extension and forearm pronation).
The net result is that both arms move inwards across the body, working in opposition as they do so. The left arm pulls up (to the opposite shoulder) while the right pushes down.
Phase 2 - the 'block'
Now the left arm sweeps down (outward shoulder rotation, elbow extension and forearm pronation) and the right arm retracts, pulling up slightly to the hip (shoulder flexion, outward shoulder rotation and forearm supination).
The net result is that both arms push/pull apart across & away from the centreline. The left arm pushes/sweeps down while the right pulls up.
Its worth noting that in phase 1 the arms work together to close off your centreline, whereas in phase 2 they open it up.
Gedan-barai is similar in some ways to tsuki (thrust). Tsuki involves simultaneous pulling & pushing more or less horizontally . Gedan-barai involves simultaneous pulling up & pushing/sweeping down. If I'd been in charge of naming Karate movements I'd have called this one 'Pull Up / Sweep Down'.
If a kata is a box of tools is it OK to mix techniques from different kata?
Yes, of course it is. If you're doing a job around the house are you limited to only using tools from the first toolbox you open? No, of course you're not. If the next tool you need is in a different toolbox you just open that toolbox and take it out. It would be bizarre to limit yourself to one toolbox just because that's what you opened first.
Applying this idea to kata would be equally bizarre. However, I did recently come across exactly that as a piece of advice written by a popular bunkai seminar instructor. I was astonished that anyone would think this.
I think though that I can see where the idea sprang from. A popular theory these days is that one kata can encode a whole self-defence system in itself. This is a premise based on the belief that most Karate practitioners in the 19th century only knew a handful of kata. If an expert only knew three kata, perhaps even just one would be enough for a self-defence system in itself? And if one kata is enough then perhaps somehow you've failed in some way (to understand the kata?) if you have to draw on other kata for inspiration in a particular situation?
It's a flawed premise compounded by an illogical conclusion. Its not about how many kata the masters of old practiced. No single kata addresses all the variations of self-defence situations. Whether you regard kata as a set of principles - as I do - or just a catalogue of techniques, there are always going to be situations where you need to step outside the confines of the moves in one kata and seek inspiration elsewhere.
Self-defence must be about pragmatism, not dogma. You can and should feel free to use whatever tools at your disposal, as and when you see fit.
When you're under pressure and your heart rate is raised, such as if you're scared or undergoing strenuous exertion, fine motor skills degrade rapidly. Fine motor skills are the fiddly tasks performed primarily by small muscles, such as writing or playing a musical instrument. The classic example of the loss of such skills can be seen in cheesy horror films where the hero - while escaping from the chasing monsters/zombies - struggles to get their car key in the keyhole, drops the keys but pulls it together to escape just in the nick of time. OK, its fictitious, but it is an excellent example of a real phenomena.
Martial arts too can rely on fine motor skills, such as seizing a vital point or performing a small joint lock. So how do we address the problem of these skills degrading under pressure? The answer is straightforward, avoid the use of such skills. Instead, rely on gross motor skills, broad brush stroke movements that are easy to do, and are still easy to do when you're scared or tired.
Does that mean that we should throw all the fiddly techniques in the bin? No, but we should understand when to use them. The main factor determining whether they'll work is how well you've controlled the attacker. As they throw their first punch they're not really under your control at all. But after your first block you'll hopefully be able to use your skills in muchimi, kuzushi and tai-sabaki to progressively bring them under your control. And the better that control is the easier it will be to apply your fine motor skills.
There are other factors too. The more you've practiced the technique, the more ingrained the skill is, can only help. And the calmer you can be, the less your fine motor skills will degrade. But still, ensuring the right level of control for the technique is the most critical factor.
So start with broad brush stroke movements and progress to fine motor skills only as appropriate.
If a kata is a box of tools, does it matter what it looks like?
No, of course it doesn't. My toolbox doesn't look pretty, or powerful, or elegant, because that's not what its job is. Its job is to carry my tools so that they're readily accessible whenever I need them. It wouldn't be a problem if it did look elegant or powerful, but that would simply be a by-product of its true purpose.
Similarly with the tools themselves. Their job is not to LOOK powerful, or for me to FEEL powerful while I'm using them. Their job is to enable me to APPLY power in different ways as and when I need to. The screwdriver turns, the hammer bashes, the vice clamps, etc.
My tools have been with me a long time. The paint may be chipped off some of them, some are worn to the shape of my hand, but they're my tools and I know how to use them. My toolbox is quite old, but it does its job exactly as it was designed to. Painting it bright red wouldn't enhance its functionality one little bit.
Kata is, of course, just the same. Yet in modern Karate kata is mostly practiced in a demonstrative manner, it is performed according to a particular aesthetic. It has become performance art. To me, what's important is whether practising the kata enables me to ingrain the principles it contains. What it looks like is purely an incidental by-product.
Now I don't have a problem with performance art for its own sake. But if you think that the performance art kata is the same kata that will save your butt in self-defence, then I fear that you are mistaken.
The bottom line: Time spent painting your toolbox red is time that could have been spent becoming more familiar with how to use the tools themselves.
Tsuki translates as 'thrust' and is the name given to punching in Karate. I've actually looked at the principle mechanics of tsuki already, when I discussed forearm rotation. To recap, the two different ways of rotating your forearm work together with bending/straightening the arm to produce more power. Pronation and extension work together, supination and flexion work together. This is what we do in tsuki. I don't want to dwell too much on the other aspects of tsuki, but I will draw attention to a) keeping your shoulders down and level, and b) keeping the elbows down. The overall result is a strong coordinated motion.
But you don't need to practice kata to learn how to punch. Lots of martial arts do that perfectly well without the need for kata. So why bother? I think the answer is simple, its not about punching, its about pushing AND pulling. In kata 'punching' is almost always accompanied by hikite (pulling the other hand back to the hip). This, in my view, is what tsuki is about - the simultaneous action of punching and pulling.
So the obvious application of tsuki is to hold and pull with one hand, while punching with the other. The photos show variations on this theme. But don't fall into the trap of thinking its just about punching, that's just the most obvious application. If I were in charge of naming Karate techniques I'd have called tsuki - yes you guessed it - 'Pushing and Pulling'. Thinking of it that way should give inspiration for bunkai (application) beyond the obvious.
Don't worry, I'm not about to go all mystical and esoteric. When I talk about qi I'm not talking about anything that can't be explained by either common sense or science. However, I don't want to get embroiled in a long and turgid exploration of qi at this point.
All I really want to say right now is that you shouldn't rely on upper body strength to make your techniques work. Upper body strength is a great thing, but there's every possibility that the attacker might have more of it than you do, in which case you'll be out-gunned. Instead you should use correct technique, good use of your own bodyweight, good distancing and timing, and so on and so on.
Quite often I see big strong karateka muscling techniques through - the techniques are OK, but they could be better if they worked on refining the mechanics some more.
In terms of testing your bunkai to see if it embodies this principle, if your bunkai requires superior upper body strength to make it work then its either fundamentally flawed (in which case bin it) or it needs refining in some way.
How to show qi in one photograph? With difficulty. I've chosen a picture of Morihei Ueshiba, founder of Aikido, kneeling in seiza. This image is brimming with ki, in the broader sense, not the narrow aspect of it I've described above. Ueshiba looks relaxed but alert, ready to move from his hara (belly) and spring into action at any moment.
Here is our entry level bunkai for yoi. It's a nice example in that it uses both phases of the movement, crossing then uncrossing. This technique is sometimes known in Okinawa as the 'old man's wrist release' as it requires little strength to make it work.
Start with both wrists grabbed.
Cross the wrists, pushing one of the attacker's wrists with the palm of your hand.
Grab the wrist.
Uncross your wrists, which pulls the attacker's arm across in front of your body.
What's not shown here is the footwork. Just the arm movements will give you some mileage. But using appropriate footwork to support what the arms are doing will give you a much better result. The kata itself doesn't tell us much about this - it does tell us that the stance should be a parallel one, but nothing about our orientation to or distance from the attacker.
How does it measure against our principles of combat so far?
Muchimi - great, you can't get much stickier than actually holding the enemy.
Kuzushi - you can get a bit of unbalancing just with the arm movement, but it works really well with the right footwork
Tai-sabaki - again, the arm movement can turn the assailant a bit, but with the right footwork you'll reposition both the assailant and yourself, very much to your advantage
So I've made 3 posts so far describing the principles of combat. You may have noticed that I repeatedly used one particular picture in each of these posts. "What a cheat!" I hear you say. Well, no, that was precisely my point. And here's the same picture again, just to ram the message home.
The principles are not mutually exclusive, they are in fact mutually supportive. Everything I do in combat is geared towards improving (or at least maintaining) muchimi (sticking), kuzushi (unbalancing) and tai-sabaki (body-shifting). Once I achieve each of these I make sure I maintain them until the confrontation is over.
In the picture, muchimi was first achieved when I intercepted the punch. I maintained it by sliding my hand to the elbow and pressing. In this instance I grabbed hold of the clothing. So the muchimi is maintained by the grab and by pressing into the attacker's arm with the little finger side of my hand.
This helped me to achieve kuzushi, by pressing the attacker's elbow across his body. The muchimi and kuzushi together helped me to achieve tai-sabaki, not by moving me on this occasion, but by turning the attacker.
From here I think my most likely follow-up would be to strike to the head with my free hand, or to catch the wrist and apply an arm-bar. Or both, first the strike then the arm-bar. Either would be augmented by driving my body forwards, if my lead leg crashes into their leg in the process all the better. So the counter works to maintain and most likely improve the muchimi, kuzushi and tai-sabaki. And that's as it should be.
Of course, there are other principles we can consider. But I thought it was worth pausing to consider just how well these three work together.
In my view, self-defence has three major components, or pillars upon which it is built: prevention, awareness and preparation.
Prevention includes a whole range of different behaviours such as making sure your car doors are locked when you drive around town, not going to dodgy parts of town especially at night, and so on and so on. The general idea is simply to prevent trouble from finding you in the first place.
Awareness involves being aware of your environment and the people/dangers present, and being aware of the dangers of the different situations you find yourself in. Its value is quite straightforward. It doesn't matter how good your blocks and kicks and punches are, if you don't see (or hear or feel) the fist that's about to clock you round the head then you're not going to be able to do anything about it.
Preparation is what most martial artists spend most of their training time on - either practising the techniques of combat or engaging in fitness and strength exercise/conditioning to support their combat skills.
All 3 components are important, but they're not just important in themselves. They also support each other. For example, both awareness and preparation have an effect on your body language which predators find off-putting, in other words they act as a form of prevention in and of themselves.
Perhaps 'pillars' are not the right analogy. Perhaps it would be better to say that self-defence is like a 3-legged stool. Remove any one of the three legs (prevention, awareness or preparation) and the stool cannot stand up, it needs all three.
So if a kata is just a toolbox and the moves within it just tools (mechanical principles)…
…does the sequence of the kata matter?
Not one jot!
If you do a DIY job, do you take out your tools and use them in the order that they've been packed away in your toolbox? No, of course you don't. You take out each tool you need and use it as required for that particular job. To do otherwise would be bizarre, it certainly wouldn't result in effective DIY.
Self-defence is just the same. Take the principles (tools) out of your kata (toolbox) and use them freely as required. To try to adhere to the kata sequence is you working for the kata, not the kata working for you.
Seizing hold of the assailant is a very commonly used tactic in Karate and the wrist is probably the most frequently used place to seize. It is after all a form of muchimi (sticking) and it can help considerably with kuzushi (unbalancing) and tai-sabaki (moving to a better position).
Like any skill, seizing the wrist takes a bit of practice to do well. One good way to practice is to do so from having your own wrist grabbed. Once you've got the hang of that you can start to work on other ways to catch the wrist, from a punch for example.
The photos show the key points to seizing the wrist from a cross-arm wrist grab. Note the use of appropriate supination and pronation (forearm rotation) to maximise the power you can apply to the technique. Also note the way the opponent's wrist is ultimately grabbed, so that their arm and their shoulder are twisted in the process.
Tai-sabaki literally means 'body movement' or 'body shifting'. I'm using the term as a shorthand for 'move to a better position'. This is a concept beautifully expressed in Brazilian Ju-jitsu, where it is central to their approach to groundwork. BJJ rightly recognises that its much easier to apply a joint-lock, choke or whatever finishing technique if you're in a superior position compared to the opponent. So much so that they even do a form of free-play where the aim is simply to get a better position. Points are awarded for successfully achieving one of a number or recognised superior positions.
This concept is equally important in stand up self-defence. Why would you want to stand toe to toe and slug it out with the attacker, relying wholly on being faster and/or more powerful than they are? Far better to move to a position which reduces their ability to hit or otherwise attack you. At the same time it reduces their ability to defend against your attacks. So standing at their side, or even behind them, is great. Generally you want to be facing them but without them facing you. You can move yourself, or the opponent, or - more typically - a bit of both.
Of course, the advantage is only momentary, very quickly they'll adjust position so that they can attack or defend. So the advantage needs to pressed. You need to continually seek to improve your position. Facing away from you is better than facing you. Bending over is better than standing up. On their knees is better than bending over. Laying down is better than kneeling. Lying face down is better than face up.
You could argue that the best position is one where the attacker is lying face down while you're kneeling on top of them (to pin them there). But I've got a better one - they're laying facing down while you're sat in the pub a couple of miles away, having resolved the situation and made a sharp exit.
Time to start looking at the mechanics of kata movements in more detail.
The logical place to start with is 'yoi,' the 'ready' position at the start of kata.
There are of course different yoi positions for different kata and in different styles.
I'll look at what I think is the most common yoi of all, that typically found in the Pinan/Heian kata.
This yoi, like many karate techniques, has 2 phases to it.
In phase 1 the hands generally start open, by the sides of the body.
From there the arms move inwards across the body (shoulder adduction), the arms bend (elbow flexion) and the forearms rotate (supination).
As discussed in an earlier post, these are mutually supportive movements.
Different styles bend the arms to different degrees. In the picture I've done it a bit more than I usually do just to emphasise the movement.
Phase 2 starts with the hands forming fists, usually normal fist but middle knuckle fist, as I've shown, is fine too.
Now we do the opposite of phase 1 - the arms move outwards (shoulder abduction), the arms straighten (elbow extension) but not completely, and the forearms rotate the other way (pronation).
What is the stance telling us? Given that it's a completely neutral stance I don't think its telling us anything. In application you must use whatever foot movements and body position is appropriate.
The most important point about yoi is that the wrists cross and uncross. We can apply force with the crossing motion of phase 1 and/or we can apply force with the separating motion of phase 2. If naming karate movements was up to me, I'd have called yoi 'crossing and uncrossing the wrists' as this is what its all about.
Muchimi is one concept that didn't really survive the transition from Okinawan Karate-jutsu to Japanese Karate-do.
The word itself is Okinawan (not Japanese) and translates roughly as 'stickiness'.
The idea is essentially to 'stick' to the opponent, but why would we want to do that?
Well, violence is inherently chaotic.
In order to give some confidence in our ability to resolve a violent situation we need to bring some sort of order to that chaos.
In other words, we need to control both our own movements and the opponent's.
In order to properly control an opponent we need to be in contact. We could influence them without being in contact (a feint for example), but for proper control contact is essential.
But its not just about holding or moving the opponent, its also about using your limbs (or whatever part of your body) to 'listen' to the opponent's movement, to determine where he's moving AS he moves rather than AFTER.
You can effect muchimi with any part of your body.
You could grab them or, in the right circumstances, their clothing.
You could stick with your arm or your leg, or whatever part of your body works at that moment.
The listening quality of muchimi is very important and its use has been understood in Chinese martial arts for, I believe, a very long time.
Tai Chi and Wing Chun are just two diverse arts that put great store on 'sticking to' and 'listening' to the opponent.
Karate, being an offshoot of Kung Fu, shares that heritage.
The listening aspect of muchimi works because it relies on an innate human skill known as proprioception, ie. your ability to automatically know where every part of your body is in relation to every other part. In the past 20 years or so, research into what are known as tactile displays has demonstrated that humans can put proprioception to great use - we can respond to tactile stimulus both faster and more appropriately than visual or auditory stimulus. To put this in a martial context, if you can feel an incoming punch you can deal with it faster and better than if you can see it. And who wouldn't want to be able to do that?
Every martial artist who knows me, knows how sceptical I am of using high kicks in self-defence.
So much so, that it now appears there's a rumour going around that the reason for this is that I can't kick high.
Let me assure all concerned that I can kick quite high enough, thank you very much.
As you can see in the attached photo, I'm kicking a good 20 centimetres or so above my own head height, with no difficulty at all.
A few days ago I discussed testing bunkai to see if it accords with known principles of combat.
Time to start looking at what I believe those principles should be.
I'll start with kuzushi, as its one I've already mentioned.
Kuzushi is usually translated as 'unbalancing' or 'breaking balance', in other words the art of breaking the opponent's balance.
I think that definition needs expanding a bit - breaking the opponent's balance while keeping your own.
It also needs extending in time.
Its not enough to break the opponent's balance once. Once you've broken it, you need to keep it broken until the fight is over.
So once you achieve kuzushi you need to keep it. Don't give it back!
But what's so special about balance anyway?
Well, without balance you can neither defend nor attack effectively.
Your strikes will lack power and the range of options (what movements you can do) will be limited.
Perhaps most importantly humans, like many other animals, possess a self-righting reflex.
So when you're taken off-balance, your nervous system will automatically apply itself to the task of rebalancing, momentarily putting on hold any 'executive' commands such as 'hit the other person'.
So if you unbalance your opponent, they'll be too busy rebalancing themselves to mount an effective attack, any attack they do manage to mount will lack power.
But only if you continue to keep them off-balance.
Over the past few weeks I've made a number of posts about kata and bunkai.
I want to summarise that now, to draw it all together into a consistent approach to the subject.
Its not that grand really, quite straightforward actually.
But hopefully it does take away a lot of mystery and confusion, the need for multiple 'rules' that can only be inconsistently applied.
In their place all that should be left is a pragmatic, verifiable approach to using kata to improve self-defence skills. Here goes…
The purpose of kata is to condition into the body powerful ways of moving, ie. valid bio-mechanical principles.
Martial techniques can only be considered bunkai if they rely, more or less, on the same muscle recruitment as the kata, ie. they feel like the kata (whether they look like it is irrelevant).
Bunkai is only valid if it is consistent with known principles of combat.
There, quite simple really. 'That is obvious' I hear you cry! Yet I'll wager that the great majority of people reading this would find that some portion of the bunkai they practice doesn't feel like any kata, and some portion isn't consistent with valid combative principles.
I challenge you to look at your bunkai in this light and see how much of it actually passes the test.
If it doesn't, throw it out, what you'll be left with is the bunkai that a) works, and b) is actually sharpened by kata practice.
And finally, how do we define kata itself?
Its simply a collection of mechanical principles.
You could say that the principles are tools and the kata is just a container to put those tools in, ie. a toolbox.
I think this is a nice analogy, one for which I cannot take credit. But I will run with it in future posts, as it has some profound implications.
The picture shows club members demonstrating kata at a recent grading, the only time in my view that kata should be 'demonstrated' rather than 'practiced'.
Yes, of course it does. And also, No, sadly it doesn't.
The question is, what do we actually mean by 'better'?
I think most people would describe better in this sense as nicer, kinder, more truthful, more principled, perhaps even more enlightened.
But that clearly isn't the case at all.
Some of the most egotistical, dishonest and frankly dysfunctional people I've met have been martial artists. Quite senior ones at that.
Karate (or any other martial art) training won't change these basic characteristics.
If you're a saint, Karate won't stop you being a saint. Equally, if you're a cad and a bounder, Karate won't stop you being a cad and a bounder.
What Karate will do, is make you a stronger person. Not just physically, but mentally too.
Years of austere training will develop in you resilience, strength of spirit and the ability to endure. In these respects, you will be 'better'.
And that is exactly what the founders of Karate-do had in mind.
They wanted to use Karate as a vehicle to produce young men who were both stoic and obedient.
Young men who were strong in spirit, but willing to put the needs of the nation ahead of their own.
As Anko Itosu (teacher of Gichin Funakoshi) wrote when he was (successfully) attempting to get Karate-do training introduced to Okinawan schools "I believe this will be a great benefit to our nation and our military".
It wasn't about individual fighting skill. It wasn't about being a nicer person.
It was about being a productive and obedient servant of the nation, whether that be in time of war or peace.
In keeping with that ethos, the picture shows militaristic Karate-do training at Shuri castle in Okinawa in the 1930s.
Yesterday I briefly mentioned principles of combat. Over the coming weeks I will delve into what I consider the important principles.
But for further exploration of your own on this subject, here's one book I would warmly recommend:
The Rules of Combat (the Development of Warrior Tactics) by Vince Morris.
You can get it direct from the Kissaki Kai website. There's an accompanying DVD (or two) available now.
I haven't seen these so can't personally recommend them (though I've always found Vince Morris' other videos/DVDs to be packed full of useful information).
The book, however, is a must read as far as I'm concerned.
Now, if only I could remember who I lent my copy to...
So you've got some exciting new bunkai to play with.
You may have picked it up from a seminar, a book, a video, seen it in another art, or just thought it up yourself.
I think all these possible sources are perfectly valid.
Lets assume that your new bunkai does indeed match the kata, so you've got that base covered.
But do you know if it would actually work in real life?
How can you test it, without both parties going full pelt to see what happens?
If the bunkai is intended to seriously injure the attacker, then testing it so vigorously is going to rack up injuries very quickly.
There could be very serious injuries. So that's no good, there needs to be some other way that you can test it.
You can, and should, practice it to make it slick and try it with partial intensity against partial resistance.
But as the resistance and intensity are partial, then the confidence it brings can itself only be partial. There needs to be another way.
Happily there is. That is to assess bunkai against known principles of combat.
I believe there are a number of principles that transcend individual arts but which are generally key to successful technique.
For example, kuzushi - taking the opponent's balance.
Generally speaking, I've found that techniques that achieve kuzushi have a far higher chance of working than those that don't,
for reasons which I'll explore at another time.
So if your new bunkai doesn't achieve and maintain kuzushi throughout then I've got to question its effectiveness.
The task is straightforward then. First, identify what you believe to be the core principles of combat.
Second, assess your bunkai to see if it adheres to most (all?) of those principles.
If it doesn't, throw it away, or possibly see if it can be modified to improve it then re-assess. Simple!
Traditional & Sport Karate focus very much on the striking aspects of Karate practice, so much so that other parts of the whole curriculum became all but forgotten.
Joint-locking is one such example.
That has all changed in the past 20 years or so, but it astonishes me that there are still many karateka who are unaware of Karate's rich heritage, and even some who deny its existence.
Yet the evidence is quite clear.
The top left hand photo shows Gichin Funakoshi, founder of Shotokan Karate, demonstrating an armbar takedown in his 1925 book.
He even describes it as a kata application. There can be no ambiguity there.
The other photos show members of our club working on basically the same technique.
It's a relative of armbars seen in various schools of Ju-Jitsu in that it strives to hyper-extend the elbow joint.
Applied like this however, its unlikely to dislocate the elbow or get a submission.
The intention is to control the attacker, unbalancing them and driving them face down towards the ground.
Once there you could dislocate the elbow, or restrain the attacker, or just take the opportunity to escape.
In our club, this is the first joint lock that students are introduced to, at about 8th or 7th kyu, and its an important staple of our curriculum.
Take a look at the attached picture. This is a technique that I've seen knocking about for years, taught as an application for Kaisho Haiwan Uke, the opening move of Pinan/Hiean Yondan.
Given my previous definition that bunkai should use approximately the same muscle recruitment as the kata then this technique clearly qualifies as bunkai for this kata. The technique is virtually identical to the kata, just a little difference in how your feet get to where they need to be.
But is it actually any good? Is it tactically the right thing to do? I've got to say that I don't think it is. Let's ask a couple of questions of the technique...
Why the back stance (kokutsudachi)? What extra value is it bringing here?
Why strike the face from the side in the manner shown, given that it brings you so much closer to the attacker's other hand?
It seems to me that standing side on to the attacker, in a back stance with your arm raised like this exposes just about everything worth exposing to the attacker - both inner thighs, the side of the chest right up to and including the armpit, and the whole length of the inner aspect of the right arm. Heaven forbid that the attacker should be holding a knife in his left hand. Perhaps the idea is that he's so spoilt for choice of juicy targets that's he's frozen into inaction? One can only hope.
Would it make sense to do something else instead? Well how about you just stay where you are, blocking with the left hand just as in the kata and hitting them with a palm-heel to the face. At least this would expose somewhat fewer targets to the attacker's other hand. It would also be better at breaking his balance - thrusting your hand into the face will unbalance more than the strike from the side. It would definitely make it more difficult for him to follow up his initial attack.
So why do it as shown in the photo, when there are simpler, tactically superior alternatives? The only answer I can see is that it matches the kata. This is you working for the kata. Surely the whole point is to make the kata for you?
So just because something matches the kata doesn't make it the right thing to do. Its not justification for ignoring common-sense.
My thanks to my students, who managed to endure being pushed, pulled and prodded to get them to stand in such a silly position. And also thanks to Alan Platt for saying to me, some time ago, now "Make the kata work for you, not the other way round".
Have a look at the photos on the right.
Here we see Kaisho Haiwan-uke, the name given to the opening move of Pinan/Heian Yondan.
The arrow shows roughly the direction that the left arm travels.
Also shown are two possible applications (bunkai) for this movement.
On the surface of it both may look plausible. Certainly the snapshot in time captured in each photo looks identical.
For now, lets ignore the right hand, which is using a rising block to intercept a round punch.
In technique 1 the left hand sweeps inwards to strike the face, in technique 2 it sweeps forward/out to strike the neck.
Are they both bunkai for kaisho haiwan-uke? Lets ask that question another way.
Will practising the kata movement help you to improve or maintain your ability to do the technique?
For technique 2 I'd say the answer is an unambiguous YES.
The movement is essentially the same in the kata and the technique.
The height of the hand or the bend in the elbow may vary depending on the height/distance/position of the attacker, but the movement is essentially the same.
The same muscles have been recruited in the same order.
For technique 1 I've got to say NO.
Sweeping the arm inwards is fundamentally different to the kata movement.
No amount of practice of the kata is going to make one jot of difference to my ability to do the technique.
So its not about whether the kata and the technique look similar, its about whether they feel similar, whether they recruit roughly the same muscles in roughly the same order.
Otherwise there would be no benefit in ingraining muscle memory through repeated practice of the kata.
A final note, this is not about whether the technique is any good, that's a separate question.
Its just about whether the kata and the technique rely on the same muscle memory. Only then can the technique really be considered bunkai.
So I was walking through the park, on my way to work, and once again had the opportunity to marvel at the general public's lack of awareness of their surroundings.
The path I was on was split between pedestrians on one side and a cycle lane on the other.
The young woman walking along in front of me had headphones on and was strolling along in the cycle lane.
Would you believe it, a man on a bicycle came up behind her! Who would have expected that?
I heard him call "Excuse me", then louder "Excuse Me!" and finally shout "EXCUSE ME!".
Then he slammed on his brakes. She heard the screech of his brakes immediately behind her and flinched, just as he swerved onto the grass narrowly missing her.
If you're so easily surprised by a cyclist on a cycle path, how surprised would you be by a mugger?
To be fair, the cyclist wasn't much better.
I'm not sure why he expected that she would hear him, in his place I think I'd have slowed down earlier and simply just moved over onto the grass. Job done.
Still, looking on the bright side, with these kind of willing victims wandering round everywhere, what muggers are going to bother with me?
My heart sinks sometimes when I hear prospective new students tell me that they're interested in the 'spiritual side of Karate'.
Usually what its telling me is they're attracted by the ritual associated with martial art practice.
They like the angry white pyjamas.
They like white headbands with rising sun symbols.
They like talking in pigeon Japanese.
They like pottering about in a kimono at home rather than a dressing gown.
They especially like performing kata on mountain tops and other dramatic locations.
Usually they're not so keen on the hard work, the repetition, the sweat, the bruises and the pain.
What they completely miss is that whatever spiritual benefits Karate might bring, they come as a direct result of the hard work, the repetition, the sweat, the bruises and the pain. Not instead of them!
The picture shows Shoshin Nagamine - founder of Matsubayashi Shorin Ryu and not a man afraid of hard work - in seated meditation.
Modern Karate almost exclusively uses only one fist formation - seiken, the standard fist in which all the fingers are curled tightly and the primary impact area is the knuckles of the index and middle fingers.
You only have to look in any historical Karate book to see several other variations but they're vanishingly rare in actual practice in most modern dojo.
There are a few kata where you see these different fists but you're unlikely to see them in actual practice.
I think the reason for this is that the wealth and depth of understanding that existed on different ways and places to traumatise the human body was deliberately brushed aside and replaced with 3 target areas: high, middle and low (jodan, chudan, gedan).
And if you're not concerned with where you're striking you don't really need the different fist formations in order to access and apply pressure to the different targets.
And so we see the demise of all those funky fist formations.
I think that karateka should be as familiar with each of them as they are with the standard seiken.
You should be able flip from one to another, or from open hand to any fist formation without having to think about it. This, of course, takes practice.
The photo shows how to form the 4 basic variants:
Normal fist, Sei-ken - nice and easy, everyone knows that one.
Single knuckle, Ippon-ken - the primary striking surface is the fore-knuckle of the forefinger, there are actually several variations on this theme in which the thumb is used to brace the forefinger in different ways.
Single knuckle, Chuko-Ippon-ken or Nakadaka-ken - the primary striking surface is the fore-knuckle of the middle finger. Note the way that the end of the forefinger is straightened. If you've not seen this before, ask yourself why that would be?
All foreknuckles, Hira-ken - the primary striking is any/all of the fore-knuckle except the little finger.
I've looked previously at forearm rotation and how to combine with arm flexion/extension to generate power.
I've also looked at how these two together can combine with arm rotation (sweeping the arm across the front of your body, as in mawashi-uke or shuto-uke).
But there's another dimension, or rather plane of movement, that can come into play. That is the vertical plane.
When performing mawashi-uke you get an increased effect if you raise and lower your hand slightly while sweeping it across your body.
See the (approximate) line of travel shown in the picture. This works for two reasons.
First, moving your arm in this manner while in contact with the attacker's arm makes it easier to redirect their incoming force.
Their arm is essentially free to move in a (vertical) circle with their shoulder as the centre of that circle.
It doesn't take much encouragement to get their arm to move in that manner.
As you do so, the direction of force that you're applying is continually changing.
That continual change is very hard to resist (it would require the direction of their resistance to continually change in harmony with your force).
Second, you will have more muscular synergy (ie. more power) by combining the vertical movement appropriately with the other parts of the movement.
Think about pushing up with your hands either palm-down or palm-up. Which will be stronger?
If pressing down which will be stronger, palm-up or palm-down? If you're not sure, a little experimentation with dumbbells will answer the question.
So for maximum effect combine forearm supination, elbow flexion, shoulder inward rotation and shoulder flexion.
The combine forearm pronation, elbow extension, shoulder outward rotation and shoulder extension.
If that's a bit of an anatomical mouthful, just do the mawashi-uke properly!
You may have heard the claim before - there are no blocks in kata.
I think this saying was first popularised (invented?) by George Dillman in the early 1990s.
Not wishing to put myself in the same camp as George Dillman (heaven forbid!), I'm going to go a step further.
There are no punches, strikes or kicks either.
There are, in my opinion, no techniques at all.
There are simply movements.
And these movements express principles, mostly mechanical principles but also some tactical principles.
For example, when I see a lunge punch (oi-zuki / jun-zuki) in kata I don't see a punch, I see simultaneous pushing and pulling.
You could apply that movement as a punch but it could be applied in other ways too.
So the main thing we're getting when we practice kata is practice of the mechanical principles of Karate. Simple:)
The photo shows kata practice at the old Shinseido hombu dojo in Sevenoaks in about 1998.
The old dojo was the source of many a splinter in the soles of the feet.
Spot the kata…
Sometimes the students get their revenge. Here we have the 'separating the elbows' movement as at the start of Naihanchi Nidan.
I think of this as Naihanchi Nidan because the feeling of the left arm is about pulling up to the side, not just pulling the fist back to the hip as in a standard hikite.
From the position in the photo it would have been easy to segue into gedan shuto (low knifehand) in shikodachi (straddle stance) as seen in a number of kata - the arm and leg performing a scissoring action which would have easily dumped me on the ground.
Last Monday I discussed forearm rotation in different karate techniques, describing how supination lends strength to techniques that involve bending the arm, whereas pronation lends strength when straightening the arm.
There is another (related) way where forearm rotation can be used to increase the force applied, that is when you externally rotate your arm, ie. move your arm outwards across the front of your body, as seen in numerous Karate techniques, especially uke waza ('blocking' techniques).
Consider the attached picture.
Imagine your raised right hand has already crossed your centre-line over towards the opposite shoulder and that now you're trying to push something back across the other way - an incoming punch for example.
If you push across with your forearm supinated (palm-up) you'll find that this is much stronger than with the forearm pronated (palm-down).
Once you cross your centre-line however, and the further you move away from it, the more the opposite becomes true.
There is a synergy going on here between the muscles that rotate the forearm, those that control the elbow and those that control the shoulder.
But you don't need to get too involved in understanding the complexities of the muscular interactions.
Nor do you need to take my word for it. You can prove it to yourself very easily.
Get a partner to stand with one arm outstretched pointing at your left shoulder.
Raise your right forearm to the outside of their arm and push it across to your right.
Try it with your hand palm-up and palm-down. Feel which is strongest. Now do the same with their hand pointing towards your other shoulder.
It won't take long to work out which orientation is strongest in which position.
To make best use of this phenomena, techniques that sweep the arm across the body in this manner should start out with the forearm supinated and end up pronated, ie. the forearm pronates as it goes across.
And this is exactly what many techniques do.
Recently I awarded a couple of grades to students without going through the formal grading process.
This isn't a copout.
Both club members have actually been plagued by injury recently.
Yet both kept training, despite the injury.
It would have been easy for them to take time out to rest and heal.
But both persisted in turning up to train and doing what they can.
Sometimes I've modified the content of their training so as to focus on areas that weren't going to aggravate their injuries. I
ts important, when injured, to keep training if you can - but in a way that doesn't aggravate matters and gives your body a chance to heal properly.
Karate is a personal journey, one that's ultimately more about spirit than technical skill.
So its not that I'm unconcerned about these two students' technical development.
I'm actually quite satisfied with how they've progressed of late.
But I'm most impressed with their determination to persist in the face of adversity.
And on that basis I'm more than happy to promote both to their next kyu grade.
Sometimes its not just the bad guys who are out to get you.
Sometimes nature's at it too.
I was walking to work yesterday and came across this tree fallen across the path in the park, blown down in the high winds during the night.
I estimate the tree had been about 30 feet tall.
It was still very windy.
I thought I was being a bit risque walking along the path at the edge of the park, but I kept both eyes and especially ears focused on the task of detecting any falling branches.
There were plenty already littering the ground.
What amazed me was the number of joggers running round the park wearing headphones.
And the number of students on their way to exams, also wearing headphones.
It was business as usual as far as they were concerned.
Awareness is one cornerstone of self-defence.
I often berate our club members if they admit to wearing headphones in public.
Depriving yourself of one of your primary senses seems like folly to me.
But walking through the park in a high wind wearing headphones, while there are branches and even trees falling from the sky?
My mind boggles at the lack of common-sense some people display.
Like lambs to the slaughter!
Here are some more pics of knee strikes to various targets.
I haven't included a knee to the inner thigh, simply because I don't have a photo to hand.
But these are just as useful as striking the outer thigh.
Either way, inside or out, a knee to the thigh works wonders for unbalancing and controlling the attacker.
Everywhere you look in Karate (in kata at least) you'll find forearm rotation. There are not many techniques that don't employ it. Why is this?
The main reason is simple, forearm rotation enables you to apply more force to the task of straightening or bending the arm. It makes your techniques stronger, as long as you do it in the right way at the right time. There are two basic ways of rotating your forearm: supination (as if tightening a screw with your right hand) and pronation (loosening a screw with your right hand).
Exactly how this works is quite involved, the human body being the complicated mechanism that is, but the general idea can be grasped by looking at the biceps muscle. The main job of the biceps is to flex (bend) the arm at the elbow but it also plays a role in supination. If you bend your elbow and supinate your forearm at the same time you will recruit more fibres in the biceps than with either movement alone. Each movement becomes stronger as a result. They are mutually conducive.
Extension (straightening) of the elbow and pronation are similarly mutually conducive. The exact mechanism is less clear cut, but is essentially the opposite of flexion/supination.
The other options, combining flexion with pronation or extension with supination are inevitably weaker. We should expect to see the majority of karate techniques combine the stronger options rather than the weaker options. And that is exactly what we do see, eg. pulling back (hikite) combines flexion and supination, whereas thrusting (tsuki) combines extension and pronation.
Now the challenge is, can you find a karate technique that breaks that rule?
Well that depends on why you're doing Karate. If its for self-defence the answer could be very different than if its for sport or character development. In any case, I suppose the answer is the one that gives the greatest chance of success, with the smallest penalty when it doesn't succeed.
Personally, I only consider this from the viewpoint of self-defence, in which case the answer is easy. Is it a jump spin frapuccino, or perhaps a flying mocca-latte (I lose track of the fancy names for different kicks)? No, it's the humble knee strike.
In the close grappling/striking range that so frequently occurs in real violence there are many opportunities for knee strikes - and few opportunities for most other kicks. Karateka often think of the knee only for attacking the groin, or perhaps the head if you've happened to pull it down. But it's highly effective when used to attack the thigh, inside or out. That may not be a fight finisher in itself but it is great for breaking the attacker's balance, which is absolutely key to successful self-defence. Once their balance is broken, multiple opportunities for follow-up present themselves, while at the same time the attacker is focussed simply on regaining their balance.
The knee strike wins hands down for simplicity, versatility, reliability and speed - easily creating opportunities to finish an encounter.
The primary purpose of mawashi-uke is to intercept an attack with one arm then take control of it with the other hand. For example, against a right punch you might initially intercept the punch with your left forearm. Your right forearm then passes up under your left in order to make contact with the attacker's arm. You right hand is then able to grab the attacker's wrist. The overall effect is to enable you to block and catch a punch in one movement.
A secondary purpose is to enable to switch from one side of the attack to the other, ie. to go from the inside to the outside, making it much more difficult for the attacker to follow up with another punch.
Some people get confused about mawashi-uke (especially if they practice Goju Ryu kata such as Sanchin or Saifa) thinking that it incorporates a double palm-heel strike. There's a simple explanation for this misunderstanding - the palm-heel is actually the next move of the kata. The two movements can be used in conjunction (if you miss the grab for example) but they don't have to be.
Mawashi-uke is hugely important in Karate. The switching movement is actually at the heart of most of the major 'blocks'. It can be seen in the midway or chamber position of many kata movements, including the ubiquitous age-uke (rising block) and soto-uke (outward block). Its even in gedan-barai (downward sweep) where its done upside down in order to deal with low attacks. Once you understand the principle you start to see it almost everywhere in Karate.
In our dojo you'll often hear me say 'Nice Hikite'! Hikite means 'pulling hand' and usually refers to the act of pulling one fist to your hip while the other hand is doing something. You might think it's a compliment but our club members know different.
Usually when I say 'nice hikite' it's a gentle form of sarcasm. Apparently beating students with a shinai (bamboo kendo sword) is frowned upon nowadays so grumpy old instructors have to resort to gentler measures.
Joking aside, many Karate students - no, many instructors too - just can't stop themselves from doing hikite all over the place, whether its relevant or not. But we have a rule - you only pull your hand to your hip if its doing something to the opponent. Anything else is tactically wrong (other than in kata, where you're practising the movement). As Gichin Funakoshi, founder of Shotokan Karate, said "…the meaning of hikite…is to grab the opponent's attacking hand and pull it in while twisting…". That's pretty unambiguous.
By pulling and twisting you can control and unbalance the opponent while at the same time hitting them (with the other hand). This will also increase power but not in some ill-defined biomechanical way, as most karateka think. It increases power simply because you're both pulling and pushing (hitting) the opponent at the same time.
So if your hand's not doing something useful it should be held in a guard, never at the hip. And the cardinal sin? Pulling your punching hand back BEFORE you punch. There's never any excuse for doing that, unless of course your aim is to give the opponent the best chance of blocking your punch.